Eduard 1/48 Tempest V
| KIT #: | R0018 |
| PRICE: | $130.00 |
| DECALS: | 14 options |
| REVIEWER: | Tom Cleaver |
| NOTES: | Royal Class boxing. BarracudaCast spinner, exhausts, seat and wheels. |
| HISTORY |
For a history of the aircraft, visit this link.
Pierre Clostermann:
Pierre Clostermann is one of the best-known World War II fighter pilots, and arguably the best-known French fighter pilot of the war, because of the wide success of his memoir of his combat experiences, “Le Grande Cirq”, printed in English as “The Big Show,” which is still in print 70 years after it was first published in 1951. With 33 credited victories, he was called “France’s first fighter” by Charles DeGaulle.
Born in Curitiba, Brazil, in 1921, son of a French diplomat, he first learned to fly in Brazil at age 15 before going to France for secondary education in 1937, where he gained his private pilot’s license.
After railing to gain admission to the Armee de
l’Air on the outbreak of war in 1939, Closterman went to Los Angeles, where he
studied at CalTech and also obtained a commercial pilot’s license. He finally
j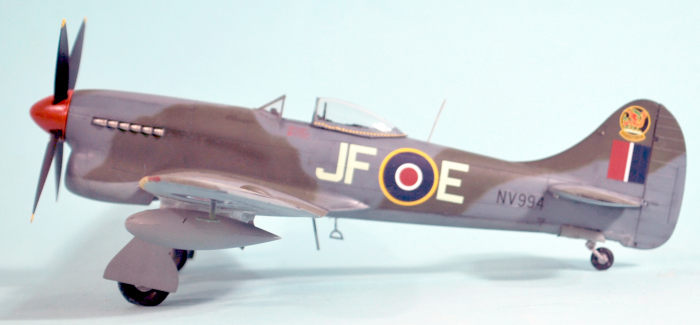 oined the Free French Air Force in the UK in 1942. After completing training
and promoted to Sergeant Pilot, he received orders in January 1943 to 341
Squadron RAF (known to the Free French as Groupe de Chasse n° 3/2 "Alsace"),
flying the Spitfire.
oined the Free French Air Force in the UK in 1942. After completing training
and promoted to Sergeant Pilot, he received orders in January 1943 to 341
Squadron RAF (known to the Free French as Groupe de Chasse n° 3/2 "Alsace"),
flying the Spitfire.
He scored his first two victories on July 27, 1943, when he shot down two Fw 190s. In October 1943, he was commissioned an officer, and was assigned to 602 Squadron RAF, remaining with the unit until August 1944. He was one of the first Free French pilots to land on French soil, at temporary airstrip B-11, near Longues-sur-Mer, Normandy on June 18, 1944. Shortly after the liberation of Paris, he was reassigned to French Air Force Headquarters.
After running afoul of bureaucratic politics in the air ministry, Clostermann took a re-secondment to the RAF as a supernumerary Flight Lieutenant with 274 Squadron flying the Tempest Mk V. He flew fighter sweeps, airfield attacks, "rat scramble" interceptions of Me-262 jet fighters, and rail interdiction missions over northern Germany during January and February 1945. He briefly served with 56 Squadron, before transfer to 3 Squadron in March. On March 24, 1945 he was wounded in the leg by German flak and belly-landed his badly damaged aircraft was hospitalized for a week. From 8 April 1945 he was commander of "A" Flight, 3 Squadron and was awarded a bar to his DFC.
On May 12, 1945 during a victory fly-past to mark the war's conclusion, another Tempest collided with his, with the other two Tempests of the flight involved. The other three pilots were killed, while Clostermann bailed out, his parachute opening just a few feet above the ground. He remained with 122 Wing RAF until he left the military altogether on July 27, 1945 with the RAF rank of Wing Commander and the French rank of Lieutenant.
 Over 432 sorties, Clostermann was officially
credited with 33 victories (19 solo, 14 shared), five "probables", and eight
"damaged". He also claimed 225 motor vehicles destroyed, 72 locomotives, five
tanks, and two E-boats. Recent analysis of his combat reports and squadron
accounts indicate his actual score was 11 destroyed, with another seven
“probable”, for a total of 15–18 victories.
Over 432 sorties, Clostermann was officially
credited with 33 victories (19 solo, 14 shared), five "probables", and eight
"damaged". He also claimed 225 motor vehicles destroyed, 72 locomotives, five
tanks, and two E-boats. Recent analysis of his combat reports and squadron
accounts indicate his actual score was 11 destroyed, with another seven
“probable”, for a total of 15–18 victories.
After the war, Clostermann remained in aviation, arranging for Cessnas to be produced by Reims Aviation. He served as a Gaullist Deputy in the French National Assembly from 1946-69. He rejoined the air force and fought in Algeria in 1956-57, writing a novel, “Leo 25 Airborne” about his experiences. No stranger to controversy, during the Falklands War in 1982 his private comments in a letter to a class of Argentine pilots being trained at an Armée de l'Air establishment where his son was an instructor,i n which he praised the courage displayed by Argentine Air Force and Navy pilots during the war, which were motivated by ethnic insults towards Argentinians he had become aware of in the British press during the conflict, became public when the private letter's comments found their way to Buenos Aires, where they were published in newspapers as propaganda. The Murdoch press in the UK went after him for perceived "betrayal" of his links with the United Kingdom via his war service in the RAF. He caused controversy in France in 1991 over his opposition to the Gulf War. He died at his home in the Pyrenees in 2006.
| THE KIT |
Following the release of the Profipack kits of the Tempest V Series 1 and then Series 2, this Royal Class kit was released in 2019. The kit provides markings for no less than 14 Tempest V Series 1 and 2 airplanes, both during the war and after. The kit also comes with a very nice, high-quality book on the Tempest with lots of photos, good history and profiles.
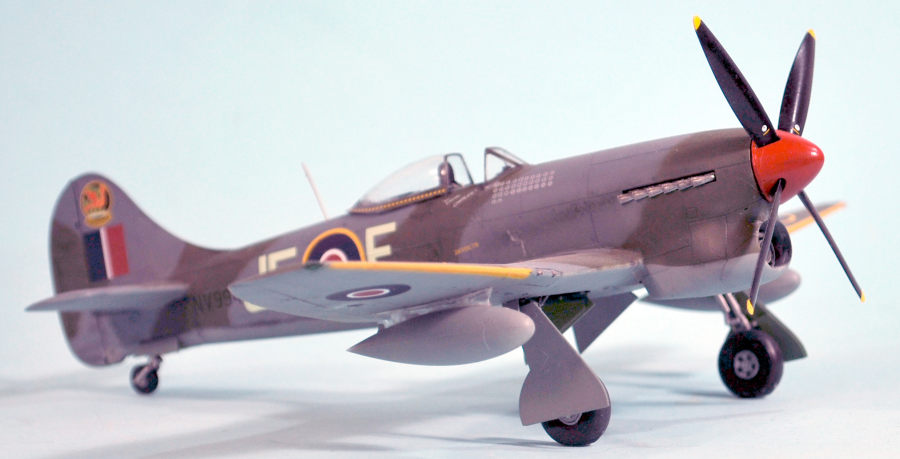
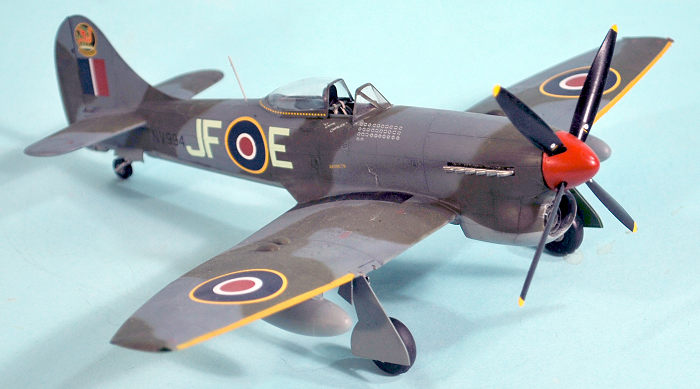
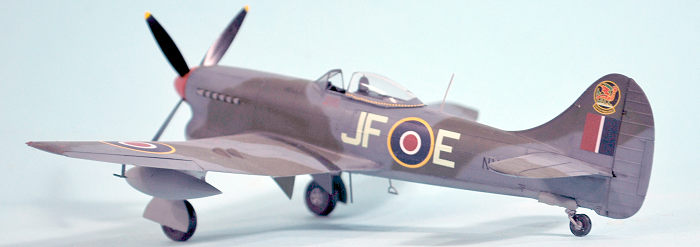
Among the decal options are Clostermann’s Tempest V NV994, during the war before it received the “Le Grande Charles” markings, which were entirely post-war. I did the airplane in its full markings in which it was lost during the victory fly-past, using some of the decals left over from the Profipack Series 2 kit. I also used the critical mass of Barracuda Resins improvement parts I had collected.
| CONSTRUCTION |
This kit maintains the Eduard reputation for being “fiddly,” and care must be taken throughout the construction to insure all sprue nibs and any minor flash are cleaned off the parts, since they fit very precisely. That said, the end result is worth the extra effort taken during construction.
I found that following Eduard’s construction
sequence made the process far more difficult than it needed to be. The
atmosphere over the workbench was frequently a deep royal purple with thunder
rolling and lig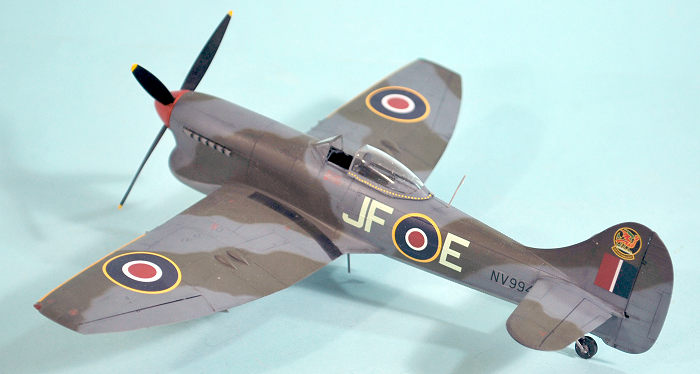 htning bolts flashing, as I discovered yet another place where
following the instructions made things harder than they had to be. As a result,
I am going to outline here in detail an alternative method of construction. I am
already using this hard-won knowledge on a second kit, and things are working
much easier, so follow closely:
htning bolts flashing, as I discovered yet another place where
following the instructions made things harder than they had to be. As a result,
I am going to outline here in detail an alternative method of construction. I am
already using this hard-won knowledge on a second kit, and things are working
much easier, so follow closely:
The fit of parts is really tight, in fact in some places, too tight for most of us to get it properly assembled in a traditional method. Also, there are a lot of small parts on the sprues, and they have really delicate sprue gates attaching them to the sprue. It is very easy to knock one off unnoticed while cutting another part off the sprue, with that small part disappearing forever, to drive you nuts when you come to the point in the instructions where you are directed to attach it. “Where the @#$##@!! is it?!” you will be crying. HANDLE THESE SPRUES WITH EXTREME CARE.
First, the edges of the parts for the radiator assembly, the fore and aft bulkheads of the cockpit assembly (assuming you are using the kit parts), and the wings need to be scraped a bit (the way I have suggested you scrape the area where the wing cannon cover fits to the fuselage in the new Fw-190). Not a lot, but a bit. You also must make absolutely certain you do not paint any of the mating surfaces of the major sub-assemblies because that will affect the assembly.
As regards the cockpit: I suggest you use the plastic instrument panel assembly with decals; it will ultimately fit better than the photo-etch pieces when it comes to shoehorning that instrument panel into the fuselage. Additionally, if you do not use all the photo-etch levers, you will not miss anything; almost all the detail parts will not be visible in the cockpit once assembled.
Now, regarding the fuselage sub-assembly: trim the radiator housing parts and be very careful that you attach them to the fuselage half in the grooves that are there for attachment. If you don’t do this, the forward fuselage will have trouble getting squeezed together tight enough for a good joint on the centerline. I suggest you assemble the fuselage before inserting the cockpit assembly. This will allow you to get the part with the fuselage opening properly positioned by working it from inside and outside; pressing it in from outside, as Eduard suggests, will make a good joint with no gaps difficult to achieve.
If you cut off the little locating pins on the outside of the cockpit assembly, it is easy to pop it into the fuselage and slide it into position. With the fuselage assembled and the joints set up, there will be no problems associated with later assembly after you get the cockpit into position.
The final difficult bit is the wing sub-assembly. When you assemble the parts of the wheel well into the upper wing, DO NOT attach part E79 (the inner gear door retraction mechanism) to Part E48 (the inner gear well bulkhead) as the instructions would have you do. Save that part and attach it with tweezers (it’s easy) once you are at final assembly and putting the landing gear and doors into position. Otherwise, you are guaranteed to knock off the retraction mechanism. Also, go through the instructions and find all the parts that should be attached inside the wells and do them now. DO NOT WAIT till you come across that instruction later - you’ll likely have knocked the part off the sprue by then.
You should thin down the rear area of the lower wing, where it will fit to the upper wing part. Unfortunately, this leaves a seam right through the middle of the flap, which is big enough regardless of the thinning you did to need some filler. After sanding off most of the flap surface detail doing this, I rescribed the rivet pattern with my pounce wheel.
Now comes attaching the wing sub-assembly to the fuselage. DO NOT fully assemble the upper wing parts to the lower wing before doing this, because that will require you to bend the wing to pop the upper wings into the fuselage to get the large tab inserted correctly. Instead, attach the lower wing to the fuselage, and work the joint from inside and out to get everything fore and aft smooth. Let that then set up so those fore and aft joints are really solid. Then take the upper wing, insert the tab into the fuselage, then position the upper wing. Once you have run glue around the joint, use rubber bands to squeeze the parts fore and aft, so that joint between the upper and lower parts that runs along a panel line through the flaps; you want to squeeze that joint together tight. Do not glue the upper wing to the fuselage until you have glued the upper and lower wings. Once you run glue along the wing-fuselage joint, use a strong rubber band run around from wingtip to wingtip, to squeeze the wing against the fuselage and get a good solid joint.
 If you do all this with the fuselage and wing
sub-assemblies, you won’t have to use any gap filler, and you won’t lose any of
that beautiful surface detail. If you do it the way Eduard tells you, you will
have to use joint filler along the fuselage centerline, the fore and aft
wing-fuselage lower joints and the upper wing-fuselage joint, which you will
then have to sand down, losing that great surface detail and if you don’t have a
nice little pounce wheel like I do, you will be SOL to get that detail back.
If you do all this with the fuselage and wing
sub-assemblies, you won’t have to use any gap filler, and you won’t lose any of
that beautiful surface detail. If you do it the way Eduard tells you, you will
have to use joint filler along the fuselage centerline, the fore and aft
wing-fuselage lower joints and the upper wing-fuselage joint, which you will
then have to sand down, losing that great surface detail and if you don’t have a
nice little pounce wheel like I do, you will be SOL to get that detail back.
The horizontal stabilizers and the control surfaces are easy. Assemble as they fit.
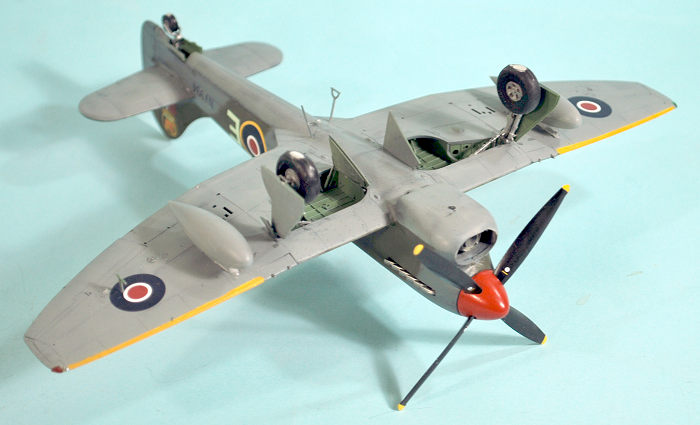
The Barracuda Resins seat, with molded-in seat harnesses, was used, as well as the more accurate radiator front assembly, and the spinner, which is also more accurate than that in the kit. If you’re a Tempest V fan, these are very useful in creating a fully-accurate model. I also decided to use the underwing drop tanks.
| COLORS & MARKINGS |
I painted the model using Tamya XF-81 RAF Ocean Grey, XF-82 RAF Dark Green and XF 83 RAF Sea Grey Medium.
The kit decals went on without any problems.
I assembled and attached the main landing gear, removed the masking from the canopy and posed it open. I also attached the drop tanks at this point. As regards weathering, I kept the airplane as clean as the photos in the accompanying book showed NV994 to be other than some light exhaust staining.
| CONCLUSIONS |
I like the Tempest, whichever engine it was using. The kit demands some experience on the part of the modeler, and extreme care needs to be taken in getting the small parts off the sprue successfully. Taking your time with assembly will be thoroughly paid off with the result. I’ll undoubtedly return to finish off the other kit.
22 July 2021
Copyright ModelingMadness.com. All rights reserved. No reproduction in part or in whole without express permission.
Review kit courtesy of Eduard.
If you would like your product reviewed fairly and fairly quickly, please contact the editor or see other details in the Note to Contributors.