| KIT #: | ? |
| PRICE: | $44.95 MSRP for the Trumpeter P-40B/C |
| DECALS: | See review |
| REVIEWER: | Tom Cleaver |
| NOTES: | Cutting Edge Hawk 75 conversions and decals used |
| HISTORY |
Quick: what airplane shot down the first German aircraft on the Western Front in World War II and shot down the first Japanese aircraft to be lost in the Pacific War?
I’ll bet you didn’t say “The Curtiss Hawk 75.” But that’s the correct answer. The first German aircraft lost on the Western Front were two Bf-109E-3s shot down by Hawk 75A-1s of GC II/4 on September 8, 1939. The first Japanese aircraft lost in the Pacific War was an Aichi D3A-1 “Val” shot down over Pearl Harbor by a P-36C of the 18th Fighter Group. Though only 1,100 Hawk 75s of all types were produced between 1937-41, the aircraft was used on all operational fronts against all three Axis powers at one time or another, and was flown by air forces on both sides!
Though the Hawk 75 series is commonly thought of as something of a failure, it was recalled with pleasure by both Erik Shilling and Kyosti Karhila - the ranking Hawk 75 ace in history - in interviews with me. Steve Hinton, who is the only contemporary pilot to have flown the Hawk 75, P-40B, P-40E and P-40N, says that the Hawk 75 has the best handling characteristics of any of the P-36/P-40series, with finger-light controls and excellent maneuverability. Kyosti Karhila, who shot down 14 enemy aircraft while flying a Hawk 75A-3 for two years on the Eastern Front, said that “the only problem was it wasn’t fast enough.”
 Don Berlin,
Chief Designer of Curtiss-Wright, first set pencil to paper to create the
Hawk 75 in 1934, the same year that saw the birth of the Messerschmitt
Bf-109, the Hawker Hurricane and the Supermarine Spitfire. The design was
as revolutionary for Curtiss - at the time the premier supplier of fighter
aircraft to the U.S. Army Air Corps and the U.S. Navy - as were the other
designs for their respective creators. It was the first all-metal,
retractable-gear, enclosed-cockpit fighter produced by Curtiss. While the
XP-36 lost the 1937 Fighter Competition to the Seversky P-35, the P-36 came
back - powered by a better engine - to obtain the largest production order
from the Army for a fighter since the First World War, and went on to spawn
the P-40.
Don Berlin,
Chief Designer of Curtiss-Wright, first set pencil to paper to create the
Hawk 75 in 1934, the same year that saw the birth of the Messerschmitt
Bf-109, the Hawker Hurricane and the Supermarine Spitfire. The design was
as revolutionary for Curtiss - at the time the premier supplier of fighter
aircraft to the U.S. Army Air Corps and the U.S. Navy - as were the other
designs for their respective creators. It was the first all-metal,
retractable-gear, enclosed-cockpit fighter produced by Curtiss. While the
XP-36 lost the 1937 Fighter Competition to the Seversky P-35, the P-36 came
back - powered by a better engine - to obtain the largest production order
from the Army for a fighter since the First World War, and went on to spawn
the P-40.
Curtiss had always been known for maximizing the export potential of their designs, and the Hawk 75 was no exception. The French Air Force found itself after the Munich Crisis in the unenviable position of having two of its most advanced fighter designs fail to achieve their performance goals at the moment they were needed most. While the prices quoted by Curtiss were nearly twice what the French thought the fighter was worth, and was more than twice as expensive as domestic designs, it had the benefit of being proven and available. Curtiss convinced the French Government to invest in a second factory in Buffalo to insure promised delivery dates, and began delivering the Hawk 75A-1 - equivalent of the USAAC P-36C Hawk - in the Spring of 1939. By the time France surrendered a year later, 320 Hawk 75A-1, A-2 and A-3 aircraft had been delivered to the Armee de l’Air.
Numerically second to the Morane-Saulnier M.S. 406, the Hawk 75 equipped four Groupes de Chasse at the time of the German invasion on May 10, 1940. The pilots immediately discovered their airplane was inferior to the Bf-109E on all counts other than maneuverability and airframe strength, with the Bf-109E able to break off combat at will due to its appreciably higher speed, though the Hawk proved able to take punishment and still get home. French pilots shot down over 150 German aircraft in the five weeks they fought the Luftwaffe.
 Following the
Franco-German Armistice, almost all of the 200 Hawk 75A-4s on order for the
French were taken on charge by the RAF. While the previous Hawk 75s had
been powered by the Pratt and Whitney R1830 Twin Wasp, the Hawk 75A-4
utilized the Wright GR-1820 Cyclone 9. The Cyclone-powered Hawk was the
fastest of all, with a top speed of 323 mph, though the Cyclone was a much
more troublesome engine than the Twin Wasp.
Following the
Franco-German Armistice, almost all of the 200 Hawk 75A-4s on order for the
French were taken on charge by the RAF. While the previous Hawk 75s had
been powered by the Pratt and Whitney R1830 Twin Wasp, the Hawk 75A-4
utilized the Wright GR-1820 Cyclone 9. The Cyclone-powered Hawk was the
fastest of all, with a top speed of 323 mph, though the Cyclone was a much
more troublesome engine than the Twin Wasp.
By November 1942, the Hawk 75A-3s of GC II/5, the Lafayette Escadrille, were one of three Hawk 75 units based in Morocco, outside Rabat on the Atlantic coast. On November 8, 1942, American forces began to invade French Morocco, and the Hawk75s engaged in combat with Grumman F4F-4 Wildcats of VF-9 and VF-41 for two days. 15 Hawks were lost in combat while the French shot down 7 Wildcats. Following the Armistice, the French units were re-equipped with more modern aircraft, with GC II/5 exchanging their Hawk 75s for its descendant, the P-40F Warhawk. The Hawk75s remained in service as fighter trainers until 1947.
The 200 ex-French Hawk 75A-4s, along with 12 similar Hawk 75A-6s originally
sold to Norway, as well as 12 Hawk 75A-9s sold to Iran, were known as the
Mohawk IV in RAF service. 72 were used as fighter trainers in South
Africa, while 12 were supplied to Portugal where they equipped one fighter
squadron. The remainder were eventually sent to India, where 5 Squadron
RAF began equipping with the Mohawk in December 1941, providing the sole
fighter defense of north-east India until May 1942. In March 1942, 146
Squadron equipped with Mohawks. The two squadrons were joined by 155
Squadron in 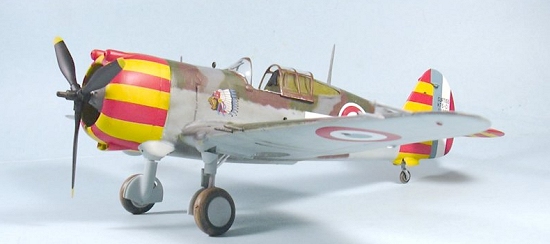 September
1942, forming the Mohawk Wing. The Mohawks were used for bomber escort,
standing patrols and close support. In January 1943, the squadrons began
“Rhubarb” operations - flights of 2-4 fighters free-ranging over enemy
territory at low altitude in bad weather - strafing whatever enemy activity
they came across. The excellent low-altitude maneuverability of the Hawk
75 was put to good use on these operations, which frequently constituted
the only offensive RAF operations during the monsoon season which began in
May. The squadrons were heavily engaged in ground-support operations
during the fighting of 1943. 5 Squadron turned in their Mohawks for Hurricanes in
June 1943, followed by 146 Squadron that October. 155 Squadron was the
last Mohawk operator, exchanging their Mohawks for Spitfire VIIIs in
January 1944.
September
1942, forming the Mohawk Wing. The Mohawks were used for bomber escort,
standing patrols and close support. In January 1943, the squadrons began
“Rhubarb” operations - flights of 2-4 fighters free-ranging over enemy
territory at low altitude in bad weather - strafing whatever enemy activity
they came across. The excellent low-altitude maneuverability of the Hawk
75 was put to good use on these operations, which frequently constituted
the only offensive RAF operations during the monsoon season which began in
May. The squadrons were heavily engaged in ground-support operations
during the fighting of 1943. 5 Squadron turned in their Mohawks for Hurricanes in
June 1943, followed by 146 Squadron that October. 155 Squadron was the
last Mohawk operator, exchanging their Mohawks for Spitfire VIIIs in
January 1944.
Only the Hawk 75s of HleLv 32 remained on first-line service following 155 Squadron’s changeover to Spitfires. These Hawk 75s would finally be discarded in 1949.
In the hard school of war, the Hawk 75 proved to be mediocre, despite many admirable qualities. Although inferior in performance to the majority of its opponents, it was tractable and sturdy, and its war record brought it no shame.
| THE KIT |
The Trumpeter P-40B first appeared in 2003. At the time, I said that the
horizontal tail surfaces were incorrect. This past October, when I was
able to compare the only Hawk 75A in existence as it sat next to a P-40E
out at Chino, I discovered that the kit had provided the tail surfaces for
the Hawk 75A. Due to the longer nose of the P-40, the elevators are
noticeably greater in chord than those for the Hawk 75 when the two types
are in close proximity. Thus, the Trumpeter kit makes up
 into a better
P-36/Hawk 75 than it does a P-40.
into a better
P-36/Hawk 75 than it does a P-40.
Meteor Productions announced last year that they would produce a resin conversion set for the Trumpeter kit, allowing a modeler to build a Pratt and Whitney Twin Wasp-powered P-36A, P-36C, Hawk 75A-1/A-2/A-3 or a Cyclone-powered Hawk 75A-4. The kits have arrived in the last month, accompanied with decals that allow a modeler to make Hawks operated by the USAAC, French, Dutch, Finns, Norwegians and British.
With the Trumpeter kit costing $44.95 (though bargains abound nowadays since the kit has been something of a shelf-sitter) and each conversion set costing about $55, the price of a Hawk 75 is pushing more than $100 when one adds in a resin cockpit (which is absolutely necessary) at $25 and a decal sheet at $12. MPM has recently announced future release of a 1/32 P-36A/Hawk 75A-3 as a limited-run kit from their Azur range at a price around $50. (It remains to be seen if it will actually be produced as MPM/Azur often announce releases that never come to fruition or at the least take many years. Ed). Given what I have seen of the Dewoitine D.520 and Polikarpov I-16 kits, a modeler will likely still need the Cutting Edge cockpit, the Cutting Edge decals, and probably an 'accurizing' set so the total cost differential between that kit and this conversion will not be as different as one might think.
| CONSTRUCTION |
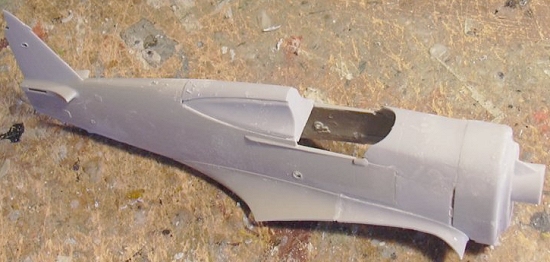
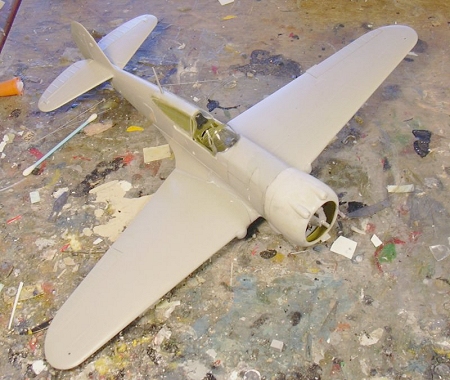
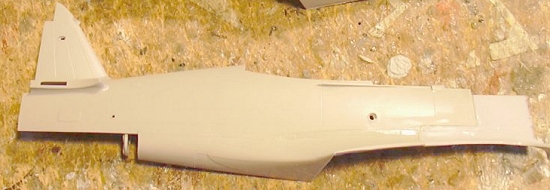 Converting the Trumpeter kit involves cutting off the fuselage forward of
the cockpit, the area of the fuselage around the tailwheel, and the removal
of the center section of the lower wing from just outboard of the gear
wells, and their replacement with resin parts. The instructions in the
conversion set are clear about this, and the surgery is not difficult.
Other than the difference in assembling the cowlings, the two sets work the
same. I discovered that the mounting for the Twin-Wasp engine was too
high, so I cut it off the firewall, glued the engine on, and then glued the
mount back onto the firewall in the correct position, centered on the
fuselage centerline.
Converting the Trumpeter kit involves cutting off the fuselage forward of
the cockpit, the area of the fuselage around the tailwheel, and the removal
of the center section of the lower wing from just outboard of the gear
wells, and their replacement with resin parts. The instructions in the
conversion set are clear about this, and the surgery is not difficult.
Other than the difference in assembling the cowlings, the two sets work the
same. I discovered that the mounting for the Twin-Wasp engine was too
high, so I cut it off the firewall, glued the engine on, and then glued the
mount back onto the firewall in the correct position, centered on the
fuselage centerline.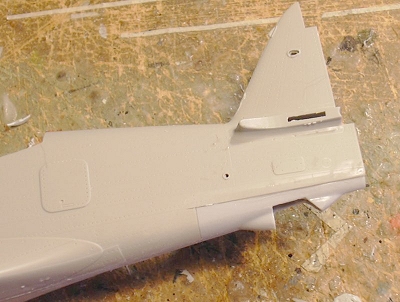
Once the fuselage and the lower wing have been assembled, the modeler will need to use Mr. Surfacer 500 to get rid of the seams. Sanding these areas smooth will take off the surface detail on both the Trumpeter and Cutting Edge parts. I rescribed panel lines where necessary and restored the engraved rivet detail with a pounce wheel. Nothing in all of this was difficult for anyone who has ever done a “kit bash.”
 The biggest problem I faced was the cockpit. The problem here is that
Cutting Edge didn’t get it right. As with the 1/48 P-40B cockpit, the
designer failed to note that the Hawk75 and P-40B have a deeper fuselage
than the later P-40s after the P-40D, which results in a cockpit in the
earlier airplanes that is deeper than the later ones. As the only modeler
who has sat in a 1:1 Hawk 75, P-40B and P-40E, let me explain this
difference. In the Hawk 75 and the P-40B, the cockpit is deep enough that
- when your shoulders are level with the cockpit sill, you are sitting in
approximately the position you the reader are in as you sit in your chair
and read this. In the P-40E and later, with their lowered upper fuselage
line and shallower cockpit, the seat is just above the cockpit floor and
your legs are almost straight out in front of you with your feet on the
rudder pedals. The measured difference in cockpit depth of the Hawk 75
from sill to floor and that of the P-40E from sill to floor (I pulled out a
ruler and did this) is about 10 inches. This is noticeable.
The biggest problem I faced was the cockpit. The problem here is that
Cutting Edge didn’t get it right. As with the 1/48 P-40B cockpit, the
designer failed to note that the Hawk75 and P-40B have a deeper fuselage
than the later P-40s after the P-40D, which results in a cockpit in the
earlier airplanes that is deeper than the later ones. As the only modeler
who has sat in a 1:1 Hawk 75, P-40B and P-40E, let me explain this
difference. In the Hawk 75 and the P-40B, the cockpit is deep enough that
- when your shoulders are level with the cockpit sill, you are sitting in
approximately the position you the reader are in as you sit in your chair
and read this. In the P-40E and later, with their lowered upper fuselage
line and shallower cockpit, the seat is just above the cockpit floor and
your legs are almost straight out in front of you with your feet on the
rudder pedals. The measured difference in cockpit depth of the Hawk 75
from sill to floor and that of the P-40E from sill to floor (I pulled out a
ruler and did this) is about 10 inches. This is noticeable.
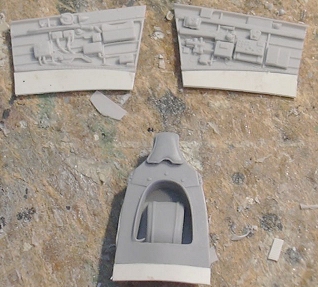
 Unfortunately, not realizing this, Cutting Edge merely scaled up the side
walls of their 1/48 P-40E cockpit and made the rear bulkhead fit that.
Thus, the cockpit is about 1/4 inch too shallow. I fixed this on my two
models with Evergreen sheet attached to the lower edge of the side walls
and rear bulkhead, as shown in the accompanying photograph. One could go
to the effort of putting in increased detail down there, but as I found
while sitting in the Hawk, all that is really there is more fuselage
framing, and it is not that visible in the model once the cockpit is
installed in the fuselage.
Unfortunately, not realizing this, Cutting Edge merely scaled up the side
walls of their 1/48 P-40E cockpit and made the rear bulkhead fit that.
Thus, the cockpit is about 1/4 inch too shallow. I fixed this on my two
models with Evergreen sheet attached to the lower edge of the side walls
and rear bulkhead, as shown in the accompanying photograph. One could go
to the effort of putting in increased detail down there, but as I found
while sitting in the Hawk, all that is really there is more fuselage
framing, and it is not that visible in the model once the cockpit is
installed in the fuselage.
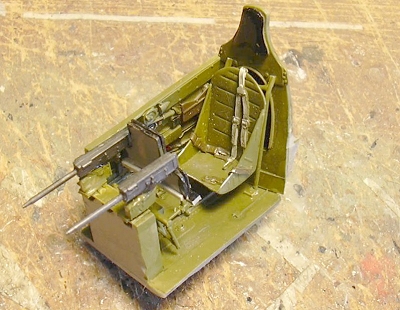
 On my kits, I assembled the fuselage and then installed the cockpits, with
a lot of test-fitting to get everything right. In the end, with a cockpit
that is the right depth, with the additional detail of the resin parts, the
model wants its canopy slid back to reveal all this.
On my kits, I assembled the fuselage and then installed the cockpits, with
a lot of test-fitting to get everything right. In the end, with a cockpit
that is the right depth, with the additional detail of the resin parts, the
model wants its canopy slid back to reveal all this.
The other problem I had was that Cutting Edge did not provide propeller hubs. The kit prop has no hub detail (since it’s all inside the spinner) so I had to scratch-build different hubs using some of the kit sprue to get props that look “close enough” from a foot away.
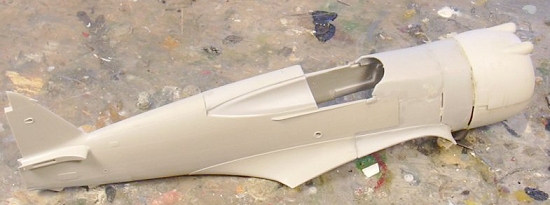 There was also a considerable bit of test-fitting to get the wing
sub-assembly to fit to the fuselage, which resulted in applying
cyanoacrylate glue to fill the gaps, Mr. Surfacer 500 to smooth things out,
and bringing out the pounce wheel to restore the engraved rivet detail.
Again, this was nothing one wouldn’t expect in a conversion like this. The
conversion set instructions say you should be “experienced”, and they are
right.
There was also a considerable bit of test-fitting to get the wing
sub-assembly to fit to the fuselage, which resulted in applying
cyanoacrylate glue to fill the gaps, Mr. Surfacer 500 to smooth things out,
and bringing out the pounce wheel to restore the engraved rivet detail.
Again, this was nothing one wouldn’t expect in a conversion like this. The
conversion set instructions say you should be “experienced”, and they are
right.
Attaching the rear quarter panels also involved a lot of test fitting and sanding down to get them the right shape to fit in position. I also had to scrape out the rim of the fuselage so they could fit down without standing out too far.
With everything assembled, it was time for the paint shop.
| COLORS & MARKINGS |
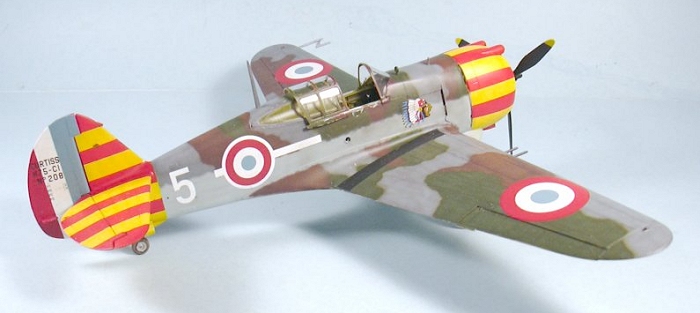
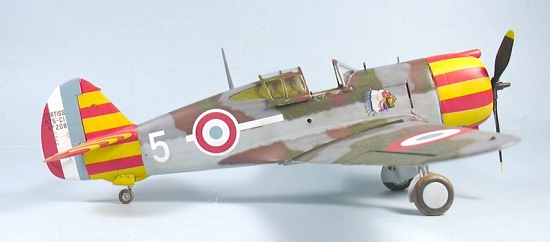
 I had decided I would do the French Hawk 75A-3 as these airplanes had had
their camouflage modified in North Africa, using a profile by John Valo in
“Wildcats Over Casablanca.”
I had decided I would do the French Hawk 75A-3 as these airplanes had had
their camouflage modified in North Africa, using a profile by John Valo in
“Wildcats Over Casablanca.”
I first “pre-shaded” the model with Flat Black airbrushed along the panel lines. I applied the “Slave’s Pajamas” markings with Tamiya Flat Yellow and Flat Red.
Having seen the restored Hawk 75 out at Chino - which had correct
camouflage - I used my Tamiya RLM76 mixture for the underside blue-grey. I
used Tamiya “Dark Sea Grey” for the upper surface grey, Tamiya “Olive
Green” for the green, and Tamiya “Red Brown” with some black added for the
“chocolate brown” color. All of these were lightened to simulate the
sun-fading the airplane would have experienced under the North African sun
for the two years it was based in Morocco.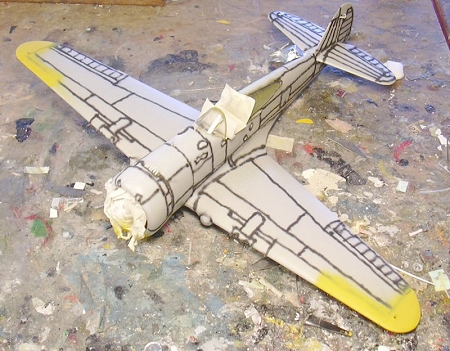
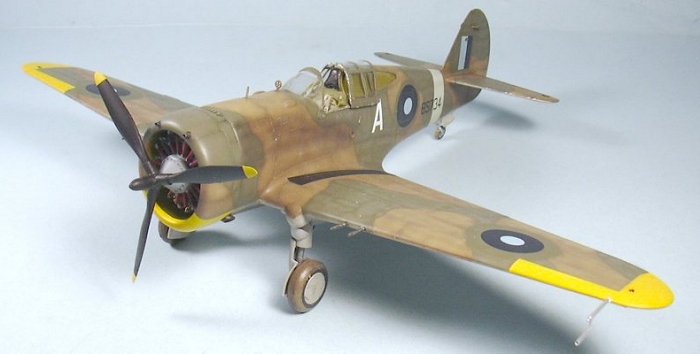
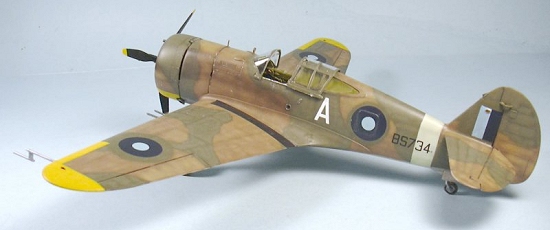
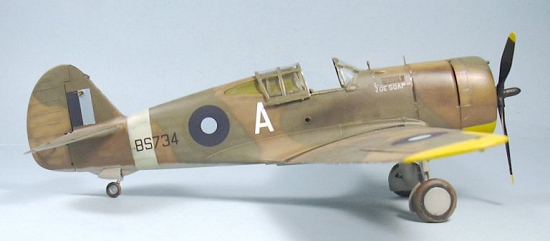
The RAF Mohawk IV was painted in the SEAC “Temperate Land Scheme” of Sea Grey Medium undersides, and a disruptive pattern of Dark Earth and Dark Green, using Tamiya “Medium Grey” for the underside and Gunze-Sangyo Dark Earth and RAF Dark Green for the upper surfaces. The upper surfaces were “sun-faded.” Since these airplanes were originally marked in the standard RAF national insignia prior to changing over to the two-blues SEAC roundels in the summer of 1943, I used Dark Green to “overpaint” the areas of the original insignia.
Decals:
The French Hawk 75 was marked using the Cutting Edge decals, with the fuselage insignia modified per the profile I was using. I used the Lafayette Escadrille Indian decal from a Craftworks P-36 kit I have been struggling with.
For the Mohawk IV, I used SEAC decals from an old Modeldecal sheet. The rest
of the markings came from the Cutting Edge decal sheet.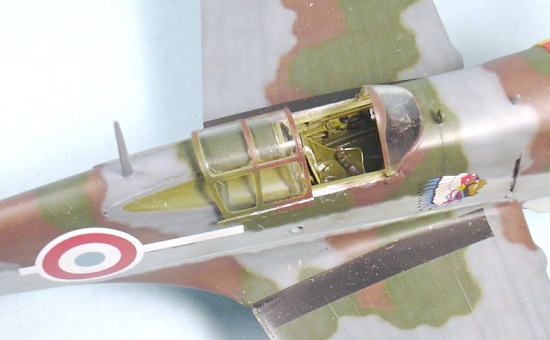
| FINAL CONSTRUCTION |
I applied exhaust stains with Tamiya “Smoke,” then gave each model two coats of Xtracrylix Flat Varnish. When that was dry I attached the landing gear, unmasked the cockpit glass and attached the canopy in the open position, and attached the propellers.
| CONCLUSIONS |
I’ve always liked the P-36/Hawk 75, and am glad to have these two models in my collection. Doing this conversion won’t be for everyone - only those modelers who like the Hawk 75 series will be interested. This conversion is far easier and more accurate in final look than the Craftworks resin kit. How it will stack up against the Azur kit we will only know when that becomes available, though based on their previous releases I am sure these models are more detailed than that will be.
If you like a project where “some modeling skill” is required, either of these are an interesting project.
April 2005
Conversion kits and decals courtesy of Meteor Productions. Trumpeter kits courtesy of my wallet.
Copyright ModelingMadness.com. All rights reserved. No reproduction in part or in whole without express permission from the editor.
If you would like your product reviewed fairly and fairly quickly, please contact the editor or see other details in the Note to Contributors.