Italeri 1/48 F-22A Raptor
| KIT #: | 10850 |
| PRICE: | $18.50 'used' |
| DECALS: | Four options |
| REVIEWER: | Martin McClendon |
| NOTES: | Testors rebox |
| HISTORY |
 The F-22
Raptor is one of the most expensive aerial weapons systems ever designed. The
subject of lengthy delays and political wrangling over its rollout and
procurement, the Raptor was developed from the winner of the USAF Advanced
Tactical Fighter competition which started in 1981. Its first flight was in
1997. Development and testing lasted years, with the first planes reaching
operational status in 2005.
The F-22
Raptor is one of the most expensive aerial weapons systems ever designed. The
subject of lengthy delays and political wrangling over its rollout and
procurement, the Raptor was developed from the winner of the USAF Advanced
Tactical Fighter competition which started in 1981. Its first flight was in
1997. Development and testing lasted years, with the first planes reaching
operational status in 2005.
As a fifth-generation aircraft, the Raptor has the ultimate in stealth advantages, both in shape and surface coatings. Looking something like a crow’s head sewed onto the body of a stingray that swallowed a toaster oven, its blended body fuselage is all angles and curves, except for its boxy payload bay. Thrust vectoring and computer aided flight controls make it able to perform stomach-churning aerial maneuvers to give its pilot the upper hand in achieving a firing position against an adversary, should one ever get that close. It utilizes data links to increase its lethality through sharing of information and can carry six AMRAAM-120s and two AIM-9s. It can also be fitted with bombs, in the weapons bays or on pylons, to serve in a ground attack role. The F-22 is slated for retirement in the 2030s.
| THE KIT |
Let’s say you want a Raptor in 1/48 scale, but you don’t want to break the bank. There is really only one choice, and this is it. The Hasegawa and Academy versions are much more expensive. The new price for this kit, which Italeri is still producing, is also frankly somewhat steep for what is inside the box. I found an older edition on a popular auction site and waited patiently until a seller was willing to make a deal.
According to Scalemates, Italeri’s F-22A Raptor kit debuted in 1999, two years after the real thing first flew. It was reboxed by both Testors and Revell in the following years. This is the 2009 Testors 80th Anniversary “Limited Edition” with added decals, but the plastic is the same as all the others.
 The good: I
think Italeri’s kit comes closest to accurately capturing the unique blended
surfaces of the Raptor with a decent attempt at depicting panel lines that are
laid out to reduce radar cross-section. A long nose-mounted pitot tube is
included for prototype version of the plane. I am not a Raptor expert and don’t
know if there are other noticeable differences between production blocks. The
kit also includes armament, both internal and external, but no drop tanks. The
gatling gun door, bleed air doors and APU door can be posed open, as can the
weapons bays. The arrestor hook can be posed extended or concealed. Main wing
flaps can be posed down, and the canopy can be posed open. A
not-very-accurate-looking boarding ladder is also included.
The good: I
think Italeri’s kit comes closest to accurately capturing the unique blended
surfaces of the Raptor with a decent attempt at depicting panel lines that are
laid out to reduce radar cross-section. A long nose-mounted pitot tube is
included for prototype version of the plane. I am not a Raptor expert and don’t
know if there are other noticeable differences between production blocks. The
kit also includes armament, both internal and external, but no drop tanks. The
gatling gun door, bleed air doors and APU door can be posed open, as can the
weapons bays. The arrestor hook can be posed extended or concealed. Main wing
flaps can be posed down, and the canopy can be posed open. A
not-very-accurate-looking boarding ladder is also included.
The bad: Italeri’s plastic is somewhat soft and almost toylike, with a weird feel and flexibility, but it is easily carved and sanded. Gear bay shape and detail is spurious. Weapons bays can be posed open, but are inaccurately shaped with generic detail. The real ones have sloping sides where the air intakes pass behind them. This has the effect of rendering any intake trunking impossible, as the weapons bays block the intakes. I assume that when Italeri made the kit, they did not have permission to examine these areas of the plane. Or, they needed to control costs on the project and simplified the internal details. Italeri includes an intake backing piece that looks like an attempt to create a “forced perspective” view down the intake, but is only about ½” deep.
The ugly: the top of the model is split into front and rear halves along a straight line from wing shoulder to wing shoulder, making for a glaringly prominent seam that will be difficult to sand and putty.
| CONSTRUCTION |
The parts breakdown is pretty basic, and it seems like details were simplified for less experienced modelers. There are fit issues with things like the cockpit and exhaust parts, where part locations are vague. There are long seams with no locator pins etc, and the front and rear fuselage halves, vertical stabilizers, and flaps must be carefully test fitted and adjusted to come together properly. Attention should be paid to the angle of the “chine” that starts at the tip of the nose and travels upwards to the wing roots. This line should rise slightly from the nose to the inlets, so the nose droops downward slightly. If it doesn’t, trimming of the lower fuselage behind the nose gear will be needed where it contacts the engine intakes.
As soon as I had a look at the inaccurate weapon bay shapes, I found myself at a crossroads. I could just close all the bay doors and conceal them. But then I am still left with the inaccurate engine intakes blocked by weapons bays. Well, I could make some foreign object covers for the inlets and hide those too. Or, I could go crazy with my X-Acto and try to bring the Italeri kit closer to the accuracy of the Hasegawa kit. Having decided to go crazy, I began researching the actual shapes of the weapons bays and engine inlets.
The side bays are easy to adjust. I used the “Mk.1 Eyeball” to gauge where to saw through the bay and create an angled rear wall for the forward half. A new rear panel was cut from sheet styrene and installed, with ribs made from styrene strips. I then 3D printed an insert for the lower part of the bays, which are covered with electronics panels. The trapezes that the missiles are mounted on also received heavy reworking, as the kit parts bear little resemblance to the real thing. I used some leftover AIM-9 rails from an old Monogram F-14 to lengthen and change the trapeze shape.
The bottom bays were harder. Being molded into the
fuselage as one piece, and difficult to access because of the fuselage sides, I
decided to use the knife attachment of my soldering iron to cut/melt my way
through the thick plastic here. The result wasn’t pretty, and there were two
spots where the hot knife damaged the fuselage accidentally, but it sure saved
me a lot of time. The resulting opening was covered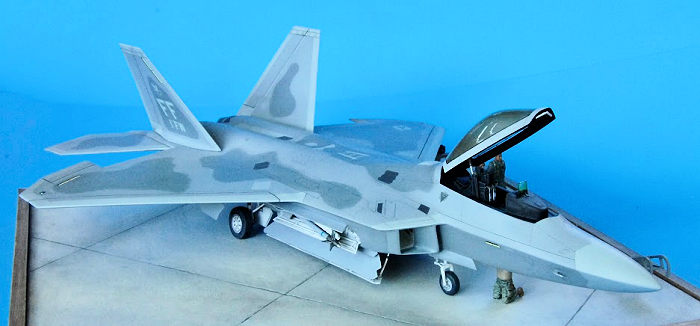 with sheet styrene after cleanup. The molded-in detail was removed and again, 3D
printing was used to create approximations of the inner ribs in the weapon bays.
Several other details were scratch-built with bits of styrene and tubes and
wiring were installed from various gauges of wire. Metal wine-bottle foil was
used to make little wire clips, and the whole thing was smeared with Liquitex
modeling compound to try and unify it all. I was by no means going for total
accuracy here, but just getting it “good enough.”
with sheet styrene after cleanup. The molded-in detail was removed and again, 3D
printing was used to create approximations of the inner ribs in the weapon bays.
Several other details were scratch-built with bits of styrene and tubes and
wiring were installed from various gauges of wire. Metal wine-bottle foil was
used to make little wire clips, and the whole thing was smeared with Liquitex
modeling compound to try and unify it all. I was by no means going for total
accuracy here, but just getting it “good enough.”
The molded-in nose gear bay is inaccurate but will barely be seen, and would be tough to cut out and modify, so I left it. I did however decide to improve the main gear bays which are pretty visible. First I used a carpenter contour gauge to get the approximate shape of the inside of the fuselage for the front and rear bulkheads of the bays. I traced these on paper, scanned them, and imported them into Sketchup, where I traced them to create pieces to 3D print. Then I cut the landing gear mounting surfaces off of the kit bays and bulked them up with some 3D printed details as well. Then some wiring was added to those parts and to the roof of each bay on the underside of the fuselage top.
At the same time, I was creating engine inlets. These are very angular, allowing me to make the top, bottom, and sides from sheet styrene rectangles. After using thick paper to cut templates and test fit, I cut out and glued the styrene inlet trunks together. These will, I hope, give a much better overall effect than the kit’s odd shortened intake pieces. All this was reinforced with bits of sprue. The front of the forward gear bay bulkhead was painted black so that anyone looking up the inlet will just see darkness.
I wanted to deploy the flaps in a drooped position. I had to thin the plastic on the lower wing trailing edge so the bulge from the flap actuator would fit better. Horizontal and vertical stabilizers are each molded in two halves and go together without trouble. However the joint between the vertical tails and the fuselage needs work. I spent a good deal of time trimming the underside of the right-hand tail to fit. The left-hand side was practically perfect though!
The cockpit was also worked over: I cut away the high bathtub-like sides and made new lower side instrument panels. The cockpit opening has an additional lip which was cut away, it did not appear to be present on the actual plane. The rear deck behind the pilot is also inaccurate. I created a new deck flush with the cockpit sill and added details the “Verlinden Way,” from wire and styrene as per research. The instrument panels were researched online and printed out on photo paper and mounted onto the IP and side consoles. They are a little shiny but a vast improvement over the kit provided decal and molded detail I had cut away. The ejection seat doesn’t look completely terrible, but I did cut off the pitot sensors on the headrest and glue them flat in the un-deployed state. The rear rails were bulked up and gaps filled. Belts were also printed on photo paper, cut out, and glued down after painting. Then the cockpit was glued into the top nose section. The bottom nose section could now be glued to the top, and little triangular filler pieces inserted to form the roofs of the engine inlets. It is not a completely terrible way to portray these shapes, but if you don’t get everything lined up right, you will have more trouble down the road.
The thrust-vectoring petals are molded into the top and bottom fuselage halves. They have inner surfaces that are glued in place as well as side walls. All these parts fit poorly, with vague locations and yawning gaps, especially the petal surfaces. Trimming was needed to make them fit and also to give some space between them when the fuselage is put together, so you can see the afterburner cans behind them. These are rudimentary but almost invisible. I painted them black and dry-brushed with Tamiya metallic grey and left it at that. Meanwhile lots of putty was used to fill gaps in the petals and in between the side walls. Everything was painted MM light ghost grey, then drybrushed with Tamiya titanium and given a dark oil wash.
I was now getting close to closing up the fuselage. I installed the main gear bays after painting them Tamiya white and picking out a few details in black. The main fuselage parts fit together fairly well—at first. I had read many accounts online of how to best attach the main fuselage pieces together, with some advocating going against the printed instructions by gluing the front and rear top portions together first, to avoid a gap at the main joint. I had been test-fitting all through the process, to see how the nose portion would mate up with the main fuselage, and everything looked OK, so I went ahead and followed the instructions, gluing the top and bottom cockpit sections together, then gluing them to the bottom of the fuselage. This was left to cure, with a good fit around the engine intake portions.
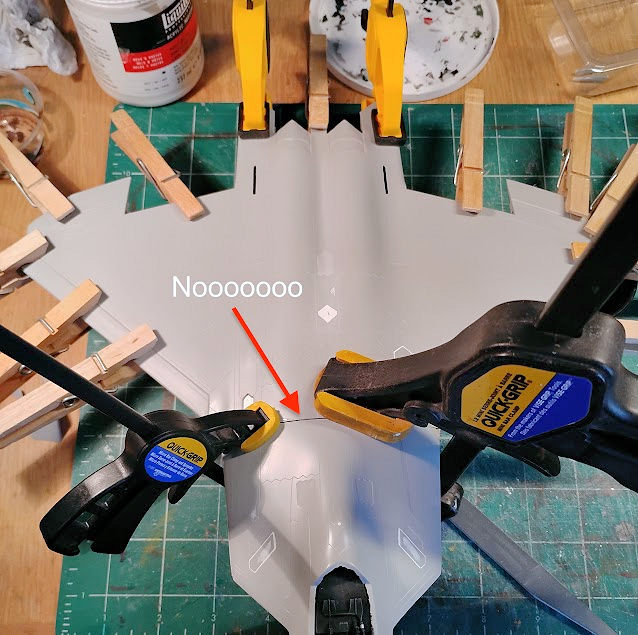 Then I
prepared the upper fuselage for gluing. But now, despite copious test fitting
that showed no gap, when I plopped the top fuselage into place, I was left with
an ugly gap along that glaringly obvious lateral top seam! I swear it fit the
day before! Nothing for it at this stage but to glue the top fuselage section on
and clamp the living daylights out of everything and hope I could get it close.
Despite all my efforts, a 1mm gap remained after everything was cured up and the
clamps were removed. Ugh. Not only did the gap need to be filled, but the gentle
slope of the fuselage at that point needed to be maintained, so that the seam
would be invisible. Many sessions with CA glue, files, white putty, and primer
were to follow.
Then I
prepared the upper fuselage for gluing. But now, despite copious test fitting
that showed no gap, when I plopped the top fuselage into place, I was left with
an ugly gap along that glaringly obvious lateral top seam! I swear it fit the
day before! Nothing for it at this stage but to glue the top fuselage section on
and clamp the living daylights out of everything and hope I could get it close.
Despite all my efforts, a 1mm gap remained after everything was cured up and the
clamps were removed. Ugh. Not only did the gap need to be filled, but the gentle
slope of the fuselage at that point needed to be maintained, so that the seam
would be invisible. Many sessions with CA glue, files, white putty, and primer
were to follow.
After lengthy sessions of filling and sanding to deal with the unfortunate lateral seam in the Italeri Raptor’s upper fuselage, I got as close as I figured I ever would to making everything smooth again. Obliterated panel lines were carefully re-scribed here, and many of the lines on the underside were deepened. The molding process had left many of them shallow. Scribing is not my strong suit, and several hours were spent until I got what I felt was acceptable (or I gave up). The gatling gun door and APU door were glued shut—there is only vague detail provided inside these areas. I filled the entire gun door to bring it flush with the surrounding surface and then re-scribed the outline in the putty with a pin.
Then it was time to glue the engine intakes into place. These do not fit well at all. The inner surface is too short, and the outer strut is too long. A rotary tool was used to carefully trim away a chunk of the fuselage to allow the outer strut to blend nicely with the fuselage chine at the upper corner of the intake. The inner surfaces had to be built up with scraps of sheet styrene to get them to meet the upper wall of the intake. After installing, more sanding and filling ensued. I decided not to do too much blending on the interior, where the intakes matched up with my scratchbuilt trunking. Not much room to work and just not worth the effort, given how little is seen.
I then glued all of the control surfaces onto the fuselage, to avoid having to do any putty or sanding after paint was applied, and this worked well, despite having to do some finicky masking later. The rear engine nozzle and tail boom areas need some work to blend in the various parts, as do the arrestor hook doors, followed by rescribing. The pitot tubes were also attached to the nose at this point. The ones Italeri provides seem too large and square; I used spares from another kit and shaped them to more closely resemble the ones in my research.
Meanwhile, all the “white parts” were shot with white rattle can primer from the hardware store: landing gear, weapon bay doors, gear doors. Here I made my only use of aftermarket parts: the Eduard wheel set for the Hasegawa Raptor, which is easy to modify to fit on the Italeri landing gear.
All missiles were assembled and primed with Tamiya primer to prepare for painting at this stage.
| COLORS & MARKINGS |
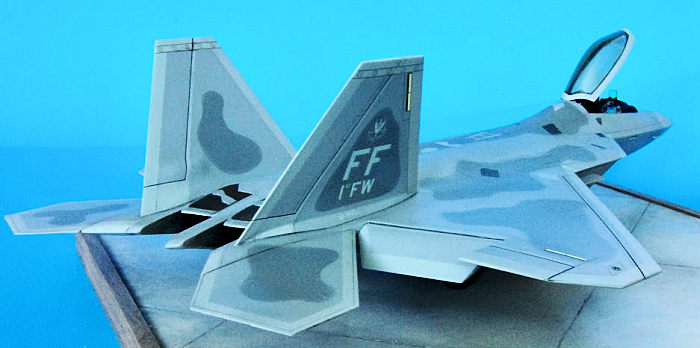
For me, one of the main reasons to make a Raptor is the very cool camo pattern, in a world where most fighter jets are just monochromatic grey. Rather than buying specific federal standard colors, I stuck with my Tamiya paints, custom mixing with black, white, and neutral grey to create 3 grey tones. The lightest grey had a few drops of yellow and blue added to try and match it as closely as possible to the colors on Italeri’s decal sheet for various panels.
Actual Raptors can be seen one of two ways: with pristine paint or with what is called “Raptor Sheen,” a weird shiny surface that appears to be different colors depending on the angle of view, and may be part of their low-observable characteristics. I decided at this point not to try and replicate this, but to keep it simple and clean, like a plane fresh from the factory, with no metallic sheen added.
 The cockpit,
gear and weapons bays were masked off, and large areas of light grey (mostly the
outlines of the wings and stabilizers) were sprayed first, then masked off. My
custom medium grey was then sprayed over everything top and bottom, as well as
on all missiles. I cut paper masks for the dark grey splotches. Thereafter I
spent several days carefully masking and painting smaller panels in various
colors according to research. There are many molded-in grates and vents, and
instead of using the provided decals I decided to mask and spray these to avoid
problems with the decals adhering to these recessed and textured surfaces. For
these I used Tamiya German grey.
The cockpit,
gear and weapons bays were masked off, and large areas of light grey (mostly the
outlines of the wings and stabilizers) were sprayed first, then masked off. My
custom medium grey was then sprayed over everything top and bottom, as well as
on all missiles. I cut paper masks for the dark grey splotches. Thereafter I
spent several days carefully masking and painting smaller panels in various
colors according to research. There are many molded-in grates and vents, and
instead of using the provided decals I decided to mask and spray these to avoid
problems with the decals adhering to these recessed and textured surfaces. For
these I used Tamiya German grey.
All surfaces that were to receive decals were carefully smoothed with soft cloths and a little emery paper to help reduce any decal frosting. Three thinned coats of Pledge (Future) built up the sheen.
This Testors issue of the kit comes with the standard Italeri decals for that time, as well as a special sheet with markings for four different planes. The Italeri decals work fairly well, but are thicker and some of the markings seem a little large for the scale. The bonus sheet, on the other hand, is excellent. Printed in Mexico, it is exquisitely done with tiny markings easily legible, and the decals are thin, strong, and adhere well—especially considering they are 26 years old. I also printed my own decals for the placards in the weapons bays, weapon stencils, and mesh areas inside the engine intakes.
After the decals had dried, I wiped down the model and sprayed another coat of Future. Then I mixed up some dark grey oil paint, well thinned, and began dripping the paint into every panel line and crevice, wiping away excess. I did everything at once: inner bay areas and external panels, as well as landing gear parts, doors, etc. Extra oil paint was thoroughly removed to keep the airframe looking well-maintained. Shallow panel lines that would not take paint were traced with a 0.5mm mechanical pencil.
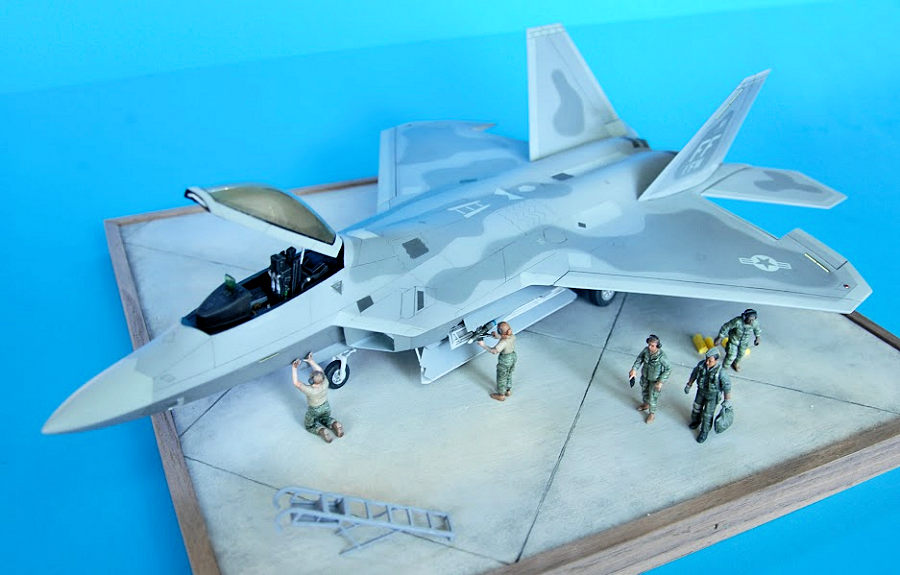
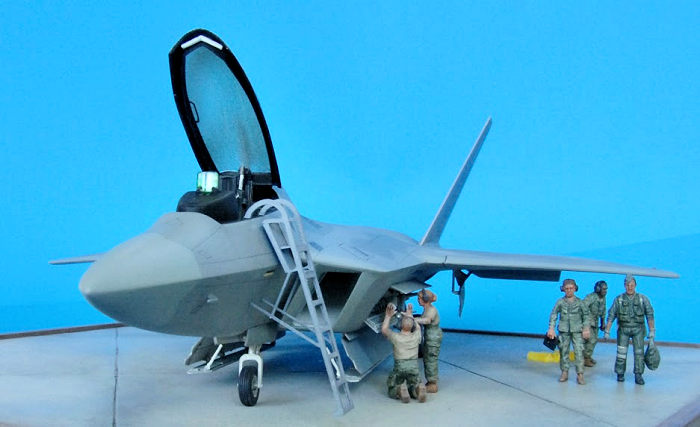
As the oil paint was left to cure, I began creating figures for my display. I had bought the Hasegawa set of USAF personnel. It’s a bargain at around $18 for two dozen figures. The quality has been eclipsed by 3D scanned and printed figures, but you can’t beat the price. I modified the 1980s-90s uniforms by adding cargo pockets and other small changes. A mix of Tamiya acrylics and Liquitex water-based artist acrylics was used to create the small patterns of “digicam” on the ground crew uniforms. Everything then got various tones of oil washes to bring out details. For faces and hands, thinned burnt umber and burnt sienna oil paint were daubed on and settled into facial and finger details.
Missiles received final painted details and homemade decals consisting of stencils and blue “training round” stripes, then oil wash shading.
| FINAL CONSTRUCTION |
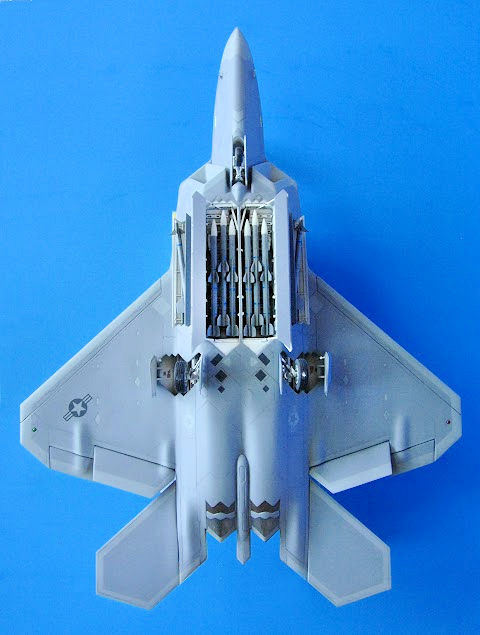
now it was time to put it all together. CA glue was used to attach all the finicky weapons doors, gear doors, landing gear, etc. I made new weapon bay door actuators from bits of wire, much closer to scale dimension than the kit ones. I also added some hydraulic actuators to the main gear doors that are not provided in the kit. The side weapon bay doors were slightly modified to sit further inside the openings, as per research. Once all the AIM-120s were installed in the main weapon bay, I realized that they blocked most of the hard work I did on detailing this area! Oh well, I like the look of the full bay.
 I used
Krylon artist’s matte spray to dull the model down. I worked carefully with
light passes, building up two or three coats. The product seems to work about as
well as other dulling sprays, but it seems like the solvent in it is pretty
“hot.” If my decals hadn’t been protected by a coat of Future, I don’t know if
they would have survived. I have no proof of this—just a hunch.
I used
Krylon artist’s matte spray to dull the model down. I worked carefully with
light passes, building up two or three coats. The product seems to work about as
well as other dulling sprays, but it seems like the solvent in it is pretty
“hot.” If my decals hadn’t been protected by a coat of Future, I don’t know if
they would have survived. I have no proof of this—just a hunch.
Lastly the cockpit glass was polished out and dipped in Future. I then sprayed on a mix of Tamiya smoke with a tiny bit of Tamiya gold, but I didn’t like the result. It looked like the Tamiya paint reacted to the Future…Or maybe I didn’t thin the paint enough, but either way it looked blotchy. In any case, I stripped the canopy with Windex and then sprayed the inside with the smoke/gold mixture. Then I brush painted Future on the inside and outside, restoring some shine and clarity. Still not perfect but it will do. The canopy and HUD glass were glued into place with Krystal Kleer glue. The HUD was painted with Tamiya clear green, and the wingtip navigation lights were based with Tamiya chrome silver, then tinted with clear red and green.
For the display, I smeared some Liquitex modeling paste on a bit of plywood and traced concrete seams as 5” x 5” squares into the wet compound. A combination of rattle can and Liquitex acrylic paints toned the concrete. Scraps of walnut strips were pinned onto the sides of the base, and the Raptor and its crew were installed, including “chocks” which came with the Eduard wheel set. Nice touch, Eduard.
| CONCLUSIONS |
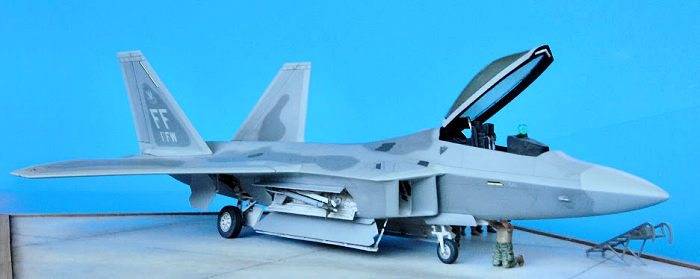
I started this model in November of last year, now it is July. But who’s counting? The challenges inherent in the scratch building and addition of figures afforded me many pleasant hours of modeling, using the “good bones” of the Italeri kit to get near the Hasegawa kit in terms of details. Did I succeed? Yes, if you stand about 3 feet away and squint.
Italeri’s 1/48 Raptor is a simple kit designed for younger builders, but with fit issues which might ultimately frustrate beginners. Unless you are an experienced masochist, you will probably want to spring for the extra money and get the Hasegawa kit if you wish to add a Raptor to your collection.
5 August 2025 Copyright ModelingMadness.com. All rights reserved. No
reproduction in part or in whole without express permission. If you would like your product reviewed fairly and
fairly quickly, please
contact
the editor or see other details in the
Note to
Contributors.