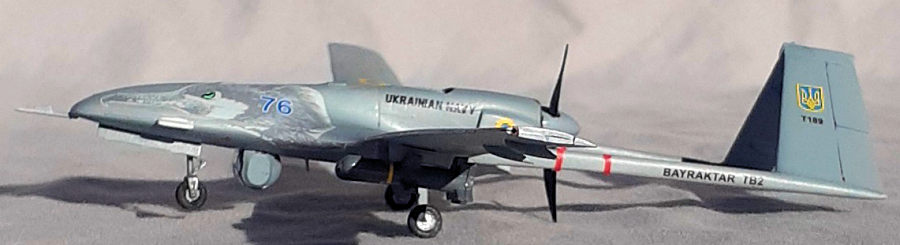
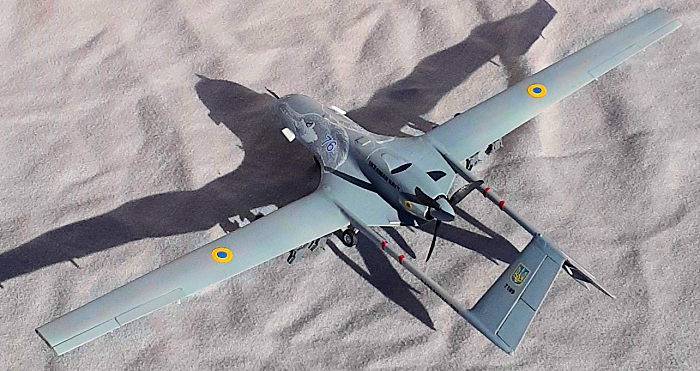
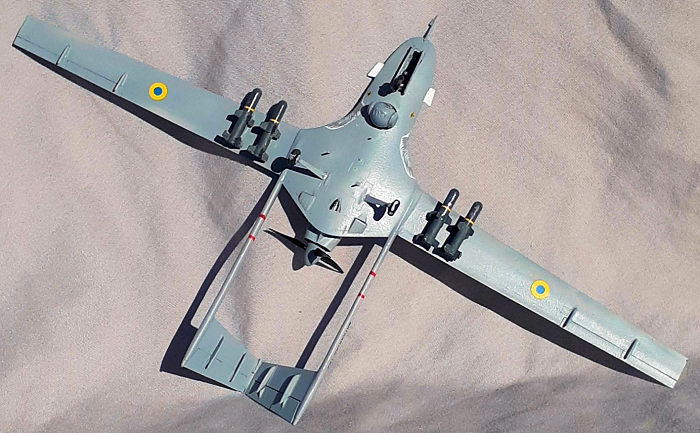
Clear Prop 1/48 Bayrakter TB.2
| KIT #: | CP 4810 |
| PRICE: | $30.00 |
| DECALS: | One option |
| REVIEWER: | John Summerford |
| NOTES: |
| HISTORY |
Recent releases of kits for the Ryan Firebee drone, (circa 1950) and Culver PQ-8 used during WW II as an aerial gunnery target, led me to investigate the timeline of drones. Highlights, moving backward from WW II, are: Radio control aircraft models operated by hobbyists in the 30’s and 20’s, Samual Langly’s Aerodromes number 5 and 6 (circa 1896) that did fly, William Henson’s and John Stringfellow’s 20ft. wingspan, steam powered model that did glide from its launch ramp, but did not sustain self-powered flight, (circa 1847) and the first drones, Chinese gunpowder powered rockets. (circa 1232)
 Hmmmm, I wonder if a book could be written about the
history of drones/UAVs.
Hmmmm, I wonder if a book could be written about the
history of drones/UAVs.
Regarding the Bayraktar TB.2, the following is pulled from of Baykar Technology’s website:
The Bayraktar TB2 is a Tactical Armed / UAV System, developed and manufactured by Baykar. A highly sophisticated design that provides all solutions that operator may need in one integrated system. The system consists of Bayraktar TB2 Armed / UAV Platform, Ground Control Station, Ground Data Terminal, Remote Display Terminal, Advanced Base with Generator and Trailer modules. Thanks to Baykar's technological accumulation and capabilities, the entire system is produced indigenously.
Bayraktar TB2 is a Medium Altitude Long Endurance (MALE), Tactical Unmanned Aerial Vehicle capable of conducting Intelligence, Surveillance and Reconnaissance (ISR) and armed attack missions. An onboard avionic suite with a triple redundant avionic system encompasses units enabling a fully autonomous taxiing, take-off, landing and cruise. TB2 has proven its efficacy with over 1.000.000 of operational flight hours. Since 2014, it keeps carrying out missions successfully within the Turkish Armed Forces, Gendarmerie and the Turkish National Police. Currently, 257 Bayraktar platforms are at the service of Turkey, Qatar, Ukraine, and Azerbaijan. Bayraktar TB2 holds the record in the Turkish aviation history for endurance (with 27 hours 3 minutes) and for altitude (with 25.030 feet). Bayraktar TB2 is also the first-ever aircraft in its category to be exported abroad.
| THE KIT |
In a single bag are five sprues of dark gray styrene parts and a clear sprue. Sealed in a smaller bag within the bigger are the decals and a 12-page booklet of instructions. Total parts count is 136. Eight are not intended for this subject. Color call-outs are for Mr. Color and Ammo by MIG.
| CONSTRUCTION |
Construction starts by building up the nose gear well in the lower fuselage half. Included in that is the addition of the three-part retraction arms that are installed protruding from the well. Fearing breakage, they were left off. A 1gm weight is called for and the exhaust pipe completes the interior. The upper half was glued on, seamed addressed, then the engine nacelle was assembled and added, more seam work done before completing the fuselage.
Sub-assemblies of the tail, booms and wings came next. The instructions call for the addition of the weapons pylons, ailerons and their actuator fairings to the wings be added after attachment to the fuselage. Instead, they were added during this step.
 Bringing the booms and tail together is the most
challenging part of the build. Not only must everything be attached at once, bet
keeping it aligned as the glue cures requires care. I’m not sure how to build a
jig for this step, but I recommend it. As it was, the right boom dipped lower
than the left, throwing the tail out of alignment. A little bending pressure
applied when the glue was nearly cured helped bring it back, but not completely.
Bringing the booms and tail together is the most
challenging part of the build. Not only must everything be attached at once, bet
keeping it aligned as the glue cures requires care. I’m not sure how to build a
jig for this step, but I recommend it. As it was, the right boom dipped lower
than the left, throwing the tail out of alignment. A little bending pressure
applied when the glue was nearly cured helped bring it back, but not completely.
The tail attaches by pins into sockets in the booms. It would have been very helpful if the joins were deeper as I found them to be weak and that also would help in alignment. If Clear Prop re-issues this kit, I recommend that a lap-joint be employed with the lap faces aligned with the angles of the tail. Another issue that arose was that the circumference of the booms was noticeably larger than the mating surfaces of the tail, leaving a step to deal with. Much cyano glue used a filler and filing plus sanding followed. Only one repair was needed during that process.
Attaching the wings was much simpler. However, I managed to get the left-wing dihedral to be greater the right, and I didn’t notice that until it was too late.
Once the prop, bombs, and camera turret were assembled, it was time for painting.
| COLORS & MARKINGS |
 Light Ghost Gray was used for the airframe, overlaying
a coat of primer. The bombs were painted dark gray, and the prop blades black.
Everything was given a brush-coat of acrylic floor wax in preparation for
decals.
Light Ghost Gray was used for the airframe, overlaying
a coat of primer. The bombs were painted dark gray, and the prop blades black.
Everything was given a brush-coat of acrylic floor wax in preparation for
decals.
My experience with eastern European decals is that they can be difficult to work with, but that was not the case here. However, the decal placement instructions could be clearer regarding the multiple bird head markings. They do call for a setting solution for the main decals to get them to lay down on the compound curves. Some slicing of bubbles and more solution was required after the decals dried. Another clear coat, this time matt, was brushed onto the model.
The nose gear was assembled and it was very fiddly, consisting of five parts, not including the retraction arms. While that was curing, the main gear was assembled and installed, then the camera turret. The nose gear came next. I found that the strut attachment to be tenuous and it was reinforced with cyano. Attaching the doors went well.
The bombs were glued to the pylons and the final step was the prop.
| CONCLUSIONS |
 This is a nifty subject worth pursuing, just don’t
think it will be quick build. I was surprised by how much filler was used in the
seams.
This is a nifty subject worth pursuing, just don’t
think it will be quick build. I was surprised by how much filler was used in the
seams.
I recently viewed a video by a model builder who went on a rant about kits becoming too complex. I think this kit is an example of that complaint. Cleaning the sprue attachment points is very time consuming and the chances of such small part disappearing during that process is greatly increased. As noted about the nose gear strut be fiddly, the scissors links are two pieces, each smaller than 2mm by 3mm. Another part of the same size is the front cap piece for the ruddervators. Really? Couldn’t that detail be molded into cap? The armament also comes in multiple pieces, with separate fins. Why? How about a left and right half instead?
Even without a cockpit to deal with, this 48th scale kit took about 20 hours to build, which is my normal for a “regular aircraft”.
6 February 2025
Copyright ModelingMadness.com. All rights reserved.
No reproduction in part or in whole without express permission. If you would like your product reviewed fairly and fairly quickly, please
contact
the editor or see other details in the
Note to
Contributors.