Hobby Boss 1/72 Rafale F3-R
| KIT #: | 87246 |
| PRICE: | $20.00 |
| DECALS: | Two options |
| REVIEWER: | Spiros Pendedekas |
| NOTES: | LM Decals LMX0136-72 |
| HISTORY |
The origins of the Rafale can be traced back in the late 1970s, when the French Air Force and French Navy sought to replace and consolidate their existing fleets of aircraft. In order to reduce development costs and boost prospective sales. France entered into an arrangement with the UK, Germany, Italy and Spain to produce an agile multi-purpose "Future European Fighter Aircraft" (which would become the Eurofighter Typhoon). Subsequent disagreements over workshare and differing requirements led France to pursue its own development program.
Dassault then went on building its own future fighter. Built as a technology demonstrator, the so-called Rafale A first flew in July 1986 as part of an eight-year flight-test programme, paving the way for approval of the project. It would be a twin-engine, canard, delta wing, multirole fighter, equipped with a wide range of weapons, able to perform air supremacy, interdiction, aerial reconnaissance, ground support, in-depth strike, anti-ship strike and nuclear deterrence.
 The Rafale is distinct
from other European fighters of its era in that it is almost entirely built by
one country, involving most of France's major defence contractors, such as
Dassault, Thales and Safran. Many of the aircraft's avionics and features, such
as direct voice input, the RBE2 AA active electronically scanned array (AESA)
radar and the Optronique Secteur frontal infra-red search and track (IRST)
sensor, were domestically developed and produced for the Rafale programme.
The Rafale is distinct
from other European fighters of its era in that it is almost entirely built by
one country, involving most of France's major defence contractors, such as
Dassault, Thales and Safran. Many of the aircraft's avionics and features, such
as direct voice input, the RBE2 AA active electronically scanned array (AESA)
radar and the Optronique Secteur frontal infra-red search and track (IRST)
sensor, were domestically developed and produced for the Rafale programme.
Originally scheduled to enter service in 1996, the Rafale suffered significant delays due to post-Cold War budget cuts and changes in priorities. There are three main variants: the Rafale C single-seat land-based, the Rafale B twin-seat land-based and the Rafale M single-seat carrier-based versions.
Introduced in 2001, the Rafale is being produced for both the French Air Force and for carrier-based operations in the French Navy. It has been marketed for export to several countries, and, as of 2025, was selected for purchase by the Egyptian Air Force, the Indian Air Force, the Indian Navy, the Qatar Air Force, the Hellenic Air Force, the Croatian Air Force, the Indonesian Air Force, the United Arab Emirates Air Force and the Serbian Air Force. It iis considered one of the most advanced and capable warplanes in the world and among the most successful internationally. It has been used in combat over Afghanistan, Libya, Mali, Iraq and Syria.
In January 2021, Greece signed a contract with Dassault for the purchase of six new built and 12 used F3-R aircraft formerly used by the Armée de l'Air at a total cost of €2.4 billion, including armaments and ground support, followed by an additional contract in March 2022 to buy six additional Rafales, to be delivered from mid-2024. On 19 January 2022, the first six Rafales landed at Tanagra Air Base where a welcoming ceremony was held. The type officially entered service in September 2023, proudly guarding the Greek skies ever since.
| THE KIT |
Hobby Boss came in 2009 with the single seater Rafale C, followed one year later by the twin seater Rafale B (previewed by our Editor here) and the navalized Rafale M, periodically reissuing them with the exact same box arts and decals. By all means very nice kits, they are among the best options for building an accurate Rafale.
The subject kit is the single seater Rafale C, bought from a still going strong Athens hobby shop in 2025 and for a look at its contents you may read its preview found at the ever growing MM archives.
| CONSTRUCTION |
 I started by attaching
the rudder pedals and instrument panel to the cockpit tub, then attached the
cockpit on the inside of the top fuselage half. Similarly, the main gear bay was
attached on the inside of the lower fuselage half, followed by opening the
required holes for attaching my chosen external stores. The two halves were then
joined, followed by the nose and I was quite pleased with the fact that the
wings were molded together with the fuselage halves, simplifying construction a
lot. Though not mentioned in the instructions and, since the twin wheel nose
landing gear seemed strong enough, I secured 20 grams of fishing weight in the
front prior to attaching the nose, to avoid tail sitting.
I started by attaching
the rudder pedals and instrument panel to the cockpit tub, then attached the
cockpit on the inside of the top fuselage half. Similarly, the main gear bay was
attached on the inside of the lower fuselage half, followed by opening the
required holes for attaching my chosen external stores. The two halves were then
joined, followed by the nose and I was quite pleased with the fact that the
wings were molded together with the fuselage halves, simplifying construction a
lot. Though not mentioned in the instructions and, since the twin wheel nose
landing gear seemed strong enough, I secured 20 grams of fishing weight in the
front prior to attaching the nose, to avoid tail sitting.
Basic cockpit color was black all over. I used the very nice decals for the instrument panel and side consoles, which, with the help of strong decal softener, succumbed beautifully onto the complex surfaces, while I applied a mini blob of green clear paint on the Head Level Display, as the decal depicts it in a non realistic light blue color. The very nice looking 4-piece seat was painted black with off-black cushions. Its framing was lightly dry brushed with silver, to add some interest to the otherwise all black cockpit, while seat belts were used from masking tape, painted dark gray.
As a note the canards and elevons are held neutral with hydraulic pressure, drooping upon engine shutdown, so, unless you put a pilot in, the latter “all-drooped” is the correct stance for a static model. Now the canards themselves can be attached “drooped”, but the elevons are molded horizontally (something true for all Rafale models so far), meaning that you have to separate them by sawing, something not too easy. In any case, a good number of us consider the “all horizontal position” more charming, even without a pilot in the cockpit, which may be regarded as a sort of (modeling) artistic license.
 Continuing
construction, I attached the one piece fin, the top spine and the nose bay. The
latter two are provided as inserts, being correct for the specific Rafale
version and, as in every insert case, some care must be taken in order to line
them up with the main frame. The two intakes (each a 2-piece affair) were then
assembled and attached, requiring some care in order to have everything in the
correct position (if you do everything correctly, they practically click into
position).
Continuing
construction, I attached the one piece fin, the top spine and the nose bay. The
latter two are provided as inserts, being correct for the specific Rafale
version and, as in every insert case, some care must be taken in order to line
them up with the main frame. The two intakes (each a 2-piece affair) were then
assembled and attached, requiring some care in order to have everything in the
correct position (if you do everything correctly, they practically click into
position).
Having all major parts attached and before adding the more delicate ones, I went on the primary filling and sanding session, not that much really, as overall fit was very nice, with the usual mini gaps at the usual expected places (intakes, inserts and the like). I then went on adding a few smaller bits, such as the canards, the intake located ECM antennas, the refuelling probe (which I would typically keep on breaking away ever since…), the delicate APU exhaust cover located close to the fin base, the underwing hydraulic actuator fairings, the SCALP missile pylons, the fuselage located MICA missile pylons and the arresting hook. The two big 2000lt tanks and one of the two provided 1250lt tanks were also assembled at this time, as well. After a minor filling and sanding session, I reattached for the gazillionth time the refuelling probe that I had systematically been breaking and took the sleek bird to the paint shop!
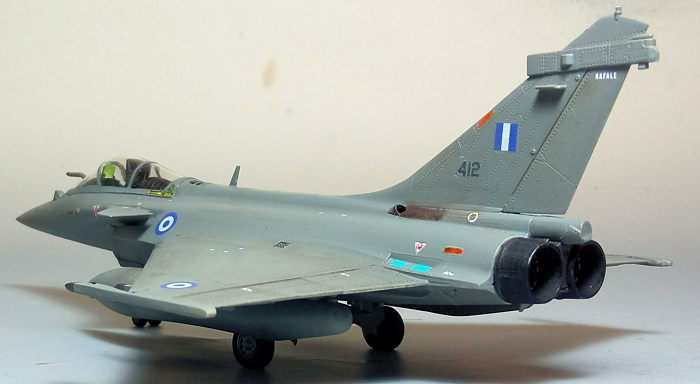
| COLORS & MARKINGS |
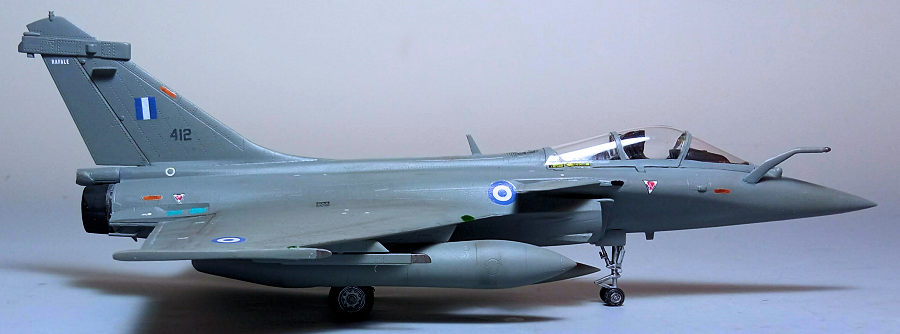
 Albeit construction was
not totally simple, painting could not be easier, as everything, including the
auxiliary tanks, is painted medium gray. I chose Hu140 Gull gray, which, to my
eye, comes close to what the Rafale looks like in reality. The fin base area
behind the APU exhaust was painted Tamiya X-11 Silver. The four SPECTRA
countermeasure antennas near the canards and the intakes were carefully painted
black, while the aft-located chaff magazines were painted a home brewed light
turquoise blue shade. A coat of Future prepared the bird for decaling.
Albeit construction was
not totally simple, painting could not be easier, as everything, including the
auxiliary tanks, is painted medium gray. I chose Hu140 Gull gray, which, to my
eye, comes close to what the Rafale looks like in reality. The fin base area
behind the APU exhaust was painted Tamiya X-11 Silver. The four SPECTRA
countermeasure antennas near the canards and the intakes were carefully painted
black, while the aft-located chaff magazines were painted a home brewed light
turquoise blue shade. A coat of Future prepared the bird for decaling.
For the insignia I used the quite sharply printed LMX0136-72 decal sheet from the Greek LM decals company. Being laser printed meant that the decals had to be carefully cut from the sheet as close to their edges. The code numbers became invisible once applied to the gray areas, so I used spares to represent #412 machine. For the rest of the decals I used the Hobby Boss decals, which, once more, behaved flawlessly. A coat of Future sealed the decals.
| FINAL CONSTRUCTION |
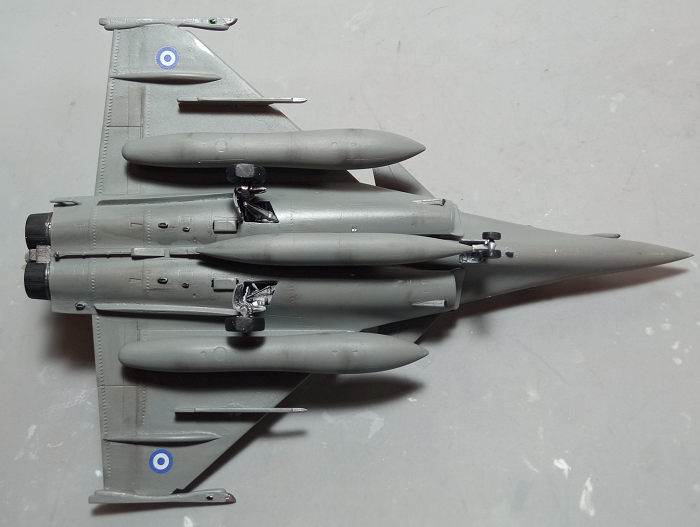
The very nicely done landing gear was assembled and attached in position. It took a bit of effort to assemble and twerk the main legs at their distinctive positive camber angle, but in the end all looked good. All four wheels were tad filed to look weighted. All landing gear parts, including bays, door innards and wheel rims were painted Tamiya X-11 silver, the main wheels brake housings and main gear retraction springs were painted gunmetal, while the tires were painted black, ending a somewhat demanding but very rewarding process, as the landing gear looks great for the scale.
The 2000 lt wing tanks and the smaller 1250 lt centerline tank were all attached in position. The good looking dual exhaust was assembled and attached. Its inner liner and rear external circular ring painted Mr Hobby Burned Iron, while the nozzle flaps were painted Tamiya XF-1 Flat Black (as the latter are made of carbon composite). The 2-piece aft located SPECTRA countermeasures jammer was assembled, painted fuselage color and attached right on top of the dual exhaust (next time I will assemble and attach it to the main frame during basic assembly, to avoid gaps).
 Time for some
weathering. True, those birds are kept very clean, but I couldn’t help adding a
light black wash to all landing gear parts and some slight dry black/brown
pastel application in a few areas, in order to achieve a more real, less toyish
look. A final satin coat gave the bird its final hue.
Time for some
weathering. True, those birds are kept very clean, but I couldn’t help adding a
light black wash to all landing gear parts and some slight dry black/brown
pastel application in a few areas, in order to achieve a more real, less toyish
look. A final satin coat gave the bird its final hue.
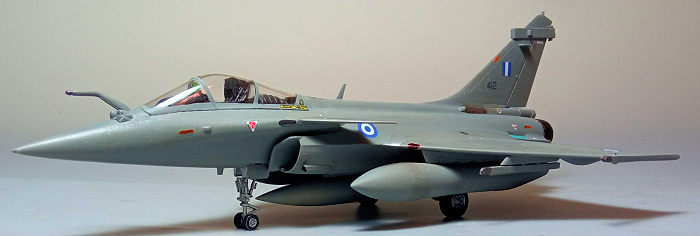
The main canopy was assembled and, together with the windscreen and the HUD glass, was attached in position. Be sure to attach precisely the canopy’s front and rear inner frames, otherwise you will most probably have difficulty aligning the canopy with the windscreen if you go for a closed canopy. I did not pay too much attention, ending up shaving off some material on a trial and error basis from the already assembled sensitive canopy, which was a nerve wracking process. All transparencies had their well defined frames hand painted. The long knocked off (courtesy of Yours Truly) bottom UHF antenna was represented by styrene sheet, with the same material used to replicate the top ADF antenna, which is different for the Hellenic Rafales than the one the kit provides.
I applied some clear yellow paint over the orange formation lights, to add some realism (not sure if they look better now, though).The six navigation lights were represented by applying red and green clear paint at the corresponding spots, while the wing root located landing light was represented by painting the corresponding area silver. The spine located anti collision beacon was replicated by pinning some silver paint with a fine tip silver pen, before calling the French Hellenic beauty done!
| CONCLUSIONS |
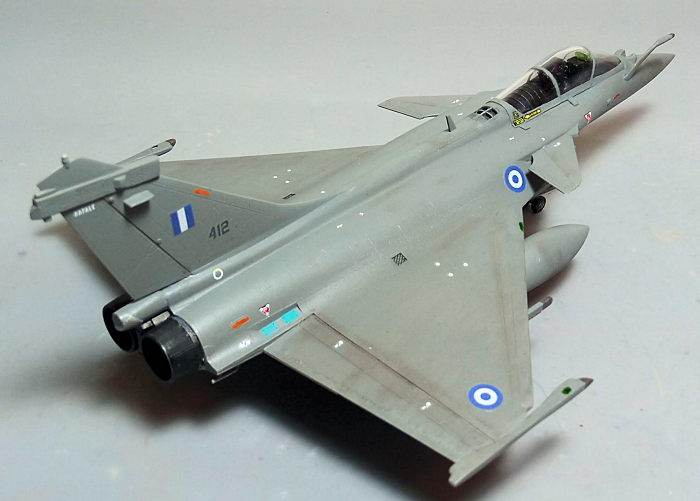
I was very pleased with this Hobby Boss Rafale: general shape looks spot on, molding is nice and crisp, panel lines are finely recessed and at the correct places, overall detail is more than sufficient for the scale, fit is very good, transparencies are nice and clear, instructions are comprehensive and decals are superb.
Out of the box, a really nice Rafale can emerge. Construction, while pleasant, is at areas tad complex, so I am hesitant to recommend this kit to the absolute beginner, who must secure a few simpler builds under his belt before tackling it. However, the kit is perfect for the casual modeler.
Offered at a very sensible price, this is a winner from Hobby Boss.
Happy Modeling!
4 March 2025
Copyright ModelingMadness.com. All rights reserved. No reproduction in part or in whole without express permission.
If you would like your product reviewed fairly and fairly quickly, please contact the editor or see other details in the Note to Contributors.