LVT Rear Water Vanes
By
Ian Sadler
The scans provided
with this short write up are aimed mainly at scratch builders, the
measurements as all are taken from the kit parts and allowances are made
for the use of replacement parts from aluminium foil. In this case it comes
from cat food trays which in the UK have an outer covering of brass on the
aluminium foil. The thickness has been tested on a
 micrometer and is 6
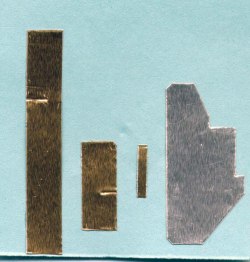
thousands of an inch. The outer plate shown in aluminium is 31mm long by 13
mm wide the cut outs come from the kit measurements. The tiny bar in brass
is 10 mm long by 1.5 mm wide, the next one is 12 mm long by 7mm wide the
cut is 7 mm from one end, the longest in brass is over sized to allow you
to work with it, this is 44 mm by 7 mm and the cut is 13 mm from one end.
As other countries have different standards of thickness you will have to
make your own allowances on these measurements.
micrometer and is 6
thousands of an inch. The outer plate shown in aluminium is 31mm long by 13
mm wide the cut outs come from the kit measurements. The tiny bar in brass
is 10 mm long by 1.5 mm wide, the next one is 12 mm long by 7mm wide the
cut is 7 mm from one end, the longest in brass is over sized to allow you
to work with it, this is 44 mm by 7 mm and the cut is 13 mm from one end.
As other countries have different standards of thickness you will have to
make your own allowances on these measurements.
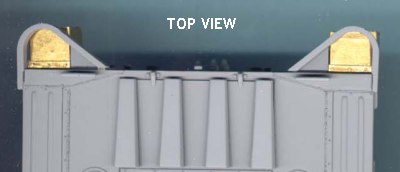
It only takes four parts to make an individual water vane, but you must
remember that they are handed and the bends are opposite for left and right
hand.
The main shape on the scan is cut out twice and then you must mark them up
for the side you are working on. The very small strip is the top re
enforcing bar that goes at the top outer edge of the vane under the hoop
provided in the kit it can have three or four bolts holding it on, you
need good ref photos to show how this is done.
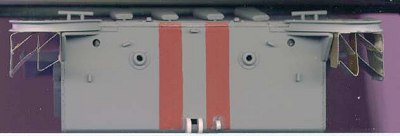
The next medium bar is the one that coursed me most trouble to understand,
it is in effect the top vane that runs from the top corner to the bottom
opposite corner, this must have a cut in at the middle and only half way
through. This can be seen on the scan. The larger bar is the last one to be
fitted, this forms a zig - zag and the longest side is the central vertical
division of the whole vane. The other vanes are formed top and bottom of
the central cut this has to be on the opposite side to allow the two to
mate up at the centre.
I started by bending the plate over the kit part and made allowances for
fit on the kit by test fitting several times, when satisfied I supper glued
it into place. This was repeated for the opposite side but remember the
bends are in the opposite way.
 The next to be fitted was the smaller of the 7 mm bands this only needed a
lip at top and bottom for super gluing. Remember to have the cut in this
facing you. I then left it to harden over night before I made the next
vane, this was all trial and error for fit as the angles are very hard to
determine by eye. But in the end I got there, remember to allow for the
small lip at the top and bottom for super gluing, in place.
The next to be fitted was the smaller of the 7 mm bands this only needed a
lip at top and bottom for super gluing. Remember to have the cut in this
facing you. I then left it to harden over night before I made the next
vane, this was all trial and error for fit as the angles are very hard to
determine by eye. But in the end I got there, remember to allow for the
small lip at the top and bottom for super gluing, in place.
I do not say it is easy but by close study of the kit parts and the
finished article you should be able within an hour made at least one if not
the pair.
 The satisfaction comes in knowing that you made them, a point of interest
you do not have to make them perfect as they very quickly became damaged or
parts were ripped off.
The satisfaction comes in knowing that you made them, a point of interest
you do not have to make them perfect as they very quickly became damaged or
parts were ripped off.
The scan of the rear view the vanes in this are as good as I could get them
but the scanner vibrations distorted them every so slightly.
If you do not give it a go how are you to improve?
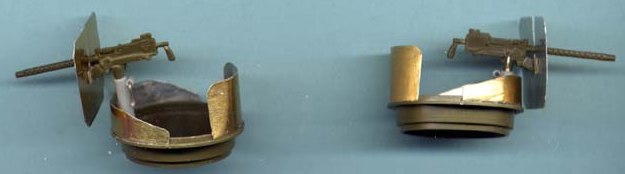 The other image shows the replacement machine gun armour, for this I
used the kits parts as templates and made the similar allowances.
The other image shows the replacement machine gun armour, for this I
used the kits parts as templates and made the similar allowances.
Best of luck and cheers Ian Sadler IPMS UK Armour TAS leader