Making Ejection Seat Pull Handles
by Tom Berto
Executive Summary:
One can make scale twisted yellow/black ejection seat pull ropes by heating, then simultaneously stretching and twisting 3D-printed yellow and black hexagonal PLA strips.
Perspiration and Inspiration
I’ve made two 1/48 F8 Crusader models for pilots who flew them for the US Marines, and I wasn’t completely bowled over by my job in painting the pull cords on their Martin-Baker ejection seats models – yellow overall, with a careful job of painting the black stripes.
I’ve used stretched sprue for rigging, antenna wires, and repairs for as long as I can remember. Years ago, I was delighted when I learned that tiny hex bolt heads could be made by carving a piece of circular sprue into a hex, then stretching it and dicing up the resultant micro-hexagonal stick.
A cosmic ray struck the junction between two neurons in my brain: I conceived the idea of gluing two half-round pieces of sprue, yellow and black, into a circular piece, heating it, then twisting it while stretching it. I would get a yellow and black stretched sprue... with twist.
Not having a kit on hand with parts molded in yellow, I made a prototype with a gray and black sprue from two different kits. Results were promising, at best – the plastics used had slightly different properties, and so the softening was not uniform. It was also laborious to scrape the two round sprues into half-rounds.
Where to find lots of yellow and black sprue? A member of our club had an old Matchbox P-12E with a yellow sprue, and donated it to me (thanks, Bob!), but I realized that I’d need quite a few P-12Es to try this out. Where to find more plastic?
Evergreen makes styrene rod in a bunch of different diameters, and any color you want.. but only as long as it’s white. Then I had the thought that the plastic filament used for 3D printing is available by the kilogram – several hundred feet - and in many different colors. A quick experiment showed that PETG could not be glued with solvent-type liquid cements, but PLA can.
My first thought was to make a hexagonal bundle of aligned PLA filaments, glue that together, then twist it. But my friend Jared, a 3D-printing ace, suggested that he print up some two-color sticks of PLA. A quick heat, pull, and twist experiment with a rectangular red/black stick was very promising, and when, at my request, Jared figured out the layers and printed a yellow and black hexagon, I finally had the raw material that worked just about perfectly.
3D printers are cheap and widespread, but expertise in using them is a much more rare commodity. I was very fortunate that Jared’s curiosity, skill, and enthusiasm were available for this project.
How To
 Jared,
the 3D-printing ace, kindly provided the parameters for printing – they are
listed at the bottom of this article. The raw material I had success with is
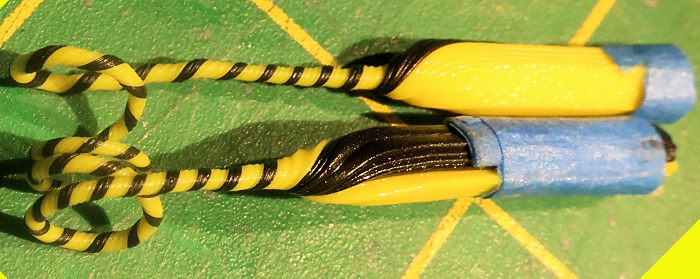
Creality Hyper PLA 1.75 mm diameter (pre-print) filament, in yellow and black.
The hexagon is 4 mm across the flats, and six inches long.
Jared,
the 3D-printing ace, kindly provided the parameters for printing – they are
listed at the bottom of this article. The raw material I had success with is
Creality Hyper PLA 1.75 mm diameter (pre-print) filament, in yellow and black.
The hexagon is 4 mm across the flats, and six inches long.
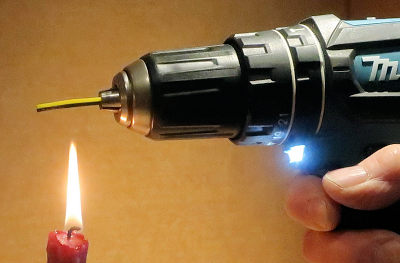
I cut the “printed” six-inch stick into four pieces (to get at least four attempts), then chuck it up in a cordless, variable-speed, reversible drill with about an inch sticking out. I set the drill on the low speed range, and in *reverse* - this yields a spiral with a twist direction which matches that on the ejection seat pull cords.
I heat the sample by holding it about an inch above a candle flame. The optimum amount of heating is not hard to determine: if the PLA is too hot, the sample separates. If it’s too cold, it tears in half. I found that I get good results if I stop heating about a second after it starts to sag. This part is not much different from creating regular stretched sprue.
 Now:
don’t try this if you can’t walk and chew gum at the same time:
Now:
don’t try this if you can’t walk and chew gum at the same time:
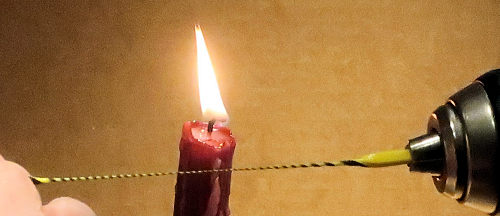
I remove the sample and drill from the flame, stop the drill, grab the free end, then start the drill, while pulling gently. If the spiral is too tight, I slow down the drill and/or stretch a little faster. If the spiral is too loose – too much advance per turn – I speed up the drill. As the PLA cools, I have to pull harder and turn the drill faster. And if it pulls apart during the process, it doesn’t ball up into a Gordian knot.
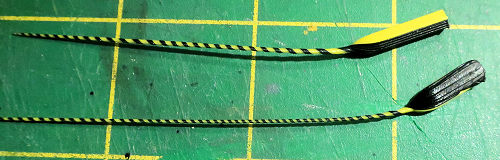
I typically end up with five inches of twisted sprue per attempt. Quite often, the finished diameter and the angle of the twist changes throughout this piece, but it’s not hard to find a section that’s uniform over a long enough section.
The final diameter of the spiral is a matter of luck and mental feedback. A smaller cord (say, 1/48 scale) would result from faster pulling and twisting, from the start. I tried larger, more round sticks, and they were harder to use – I think because the heating was less uniform through the diameter. Filing the hexagon into a circle improves the result – slightly - but takes more time.
Forming into Loops
 This
brand of PLA is tough. To form the loops, wrap several turns of it around a
metal pin about 0.100” in diameter, then tape them in place. Immerse that for a
moment in hot water (if you don’t need to use tape, the water isn’t hot
enough!). The hot water anneals the PLA in the shape of the loops. Remove the
tape, and you’ve got yourself loops of ejection seat cord. If the loops are too
big, wrap them again, around a smaller pin, then anneal with hot water.
This
brand of PLA is tough. To form the loops, wrap several turns of it around a
metal pin about 0.100” in diameter, then tape them in place. Immerse that for a
moment in hot water (if you don’t need to use tape, the water isn’t hot
enough!). The hot water anneals the PLA in the shape of the loops. Remove the
tape, and you’ve got yourself loops of ejection seat cord. If the loops are too
big, wrap them again, around a smaller pin, then anneal with hot water.
Final Notes:
Of course, any two colors in the same line of filament can be used, to create any pairing desired. This particular brand comes in at least ten different colors that I could count (I ran out of fingers). If I had a printed red and white hexagon, I could make tiny candy canes, for a model Christmas tree. More than two colors could be used, as well.
Print Settings Used (Other Settings May Also Work):
Recommended Slicer: Cura
Printer: Creality CR10 Smart Pro
Nozzle size: 0.8 mm
Layer Height: Initial: 0.32 mm Standard: 0.4 mm
Print Temperature: 225 C
Bed Temperature: 70 C
Print Speed: 40 mm/s
Initial Layer Speed: 12 mm/s
Retraction Distance: 1 mm
Retraction Speed: 25 mm/s
Adhesion Type: Skirt or None
Filament change Setup:
To set up the print for a filament change in Cura, go to Extensions > Post Processing > Modify G-Code. From the Modify G-Code Window, click “Add a script” followed by “Pause at height”.
• Set “Pause at” to (Layer Number).
• Set “Pause Layer” to the (5). The “Pause Layer” corresponds to the last layer printed with the first filament, thereby changing the ratio of the initial color to the secondary color. I used slightly more yellow than black.
• Check the box for “Keep Motors Engaged”.
• Check the box for “Park Print”.
• Check the box for “Use M109 for Standby Temperature”.
• Set “Standby Temperature” to (200).
The “Pause at Height” command will automatically pause the print at the selected height, at which point the filament spool can be changed to the secondary color. Be sure to manually feed a few inches of filament through the extruder to purge any of the first color that remains in the nozzle.
April 2024
Copyright ModelingMadness.com. All rights reserved. No reproduction in part or in whole without express permission.