Cheap Imitations
Resin
Casting on a Miserly Budget
The Problem
 Any modeler who ever opened a box to
find a superbly rendered engine, ejection seat, or wheel; or anyone who has
doled out twice the cost of the kit for an aftermarket “update”, has toyed
with the notion of reproducing these parts. Resin casting, after all, is an
uncomplicated affair. You simply dunk the master into some rubber glop.
Wait till it hardens, pull it out and fill the resultant cavity with
dime-store epoxy. Repeat until you have enough for all your other kits.
Keep making them for all your friends. Continue pouring epoxy and go into
business on the Internet. Get rich and buy our own injection molding
company so you can make the planes you’ve always wanted. Get so rich that
you buy and fly a fleet of REAL Messerschmitts and Mustangs with an
occasional Tu-52 to boot!
Any modeler who ever opened a box to
find a superbly rendered engine, ejection seat, or wheel; or anyone who has
doled out twice the cost of the kit for an aftermarket “update”, has toyed
with the notion of reproducing these parts. Resin casting, after all, is an
uncomplicated affair. You simply dunk the master into some rubber glop.
Wait till it hardens, pull it out and fill the resultant cavity with
dime-store epoxy. Repeat until you have enough for all your other kits.
Keep making them for all your friends. Continue pouring epoxy and go into
business on the Internet. Get rich and buy our own injection molding
company so you can make the planes you’ve always wanted. Get so rich that
you buy and fly a fleet of REAL Messerschmitts and Mustangs with an
occasional Tu-52 to boot!
OK,
back down to Earth now. A bit of market research will pop that bubble. .
Life is never as simple as at first it seems, and so is it with resin
casting. The requisite materials are too expensive to make the endeavor
cost effective. An 8 oz “starter set” of the most popular casting system
(can we mention the name “Alumite”) retails for a whopping $60 US. That’s
enough for a lifetime supply of aftermarket wheels and engines. Similarly,
queries to wholesalers of artist or specialty plastic supplies invariably
reveal that the compounds must be bought in minimum quantities ranging from
multi-pound cans to 50-gallon drums.
Modelers are by nature tinkerers and
experimenters determined to circumvent expenses through resort to household
or “off the shelf” products. It is then that they have revealed to them the
reasons for specifically compounded components. The rubber-based mold
making substance is the limiting factor. It must be at once liquid enough
to flow into and around the master
 form’s most intimate intricacies, such
as a radial engine’s push rods and cooling fins, slippery, pliant, yet
resilient enough to release from same without shredding; set within a
reasonable time to a firmness capable of holding the original shape, and be
both incompatible with and unaffected by any epoxy or resin reproducing
material. The most logical, indeed the only readily available product is RTV (Room Temperature Vulcanizing) silicone rubber, sold in auto supply or
hardware stores (“Ironmongeries” I recall from UK visit is the term there)
as all-in-one caulks, sealants, adhesives, and gasket makers. They work
passably well for copying simple shapes such as canopies and nose bowls,
but fail dismally at attempts to capture the shape of engines, wheels,
seats and such. RTV products are, after all, deliberately formulated to be
viscous, viciously adhesive, resistant to compression, and utterly indifferent
to greasy or oily surface contaminants. They will not flow into fine details,
nor readily release their grip on the master form;
form’s most intimate intricacies, such
as a radial engine’s push rods and cooling fins, slippery, pliant, yet
resilient enough to release from same without shredding; set within a
reasonable time to a firmness capable of holding the original shape, and be
both incompatible with and unaffected by any epoxy or resin reproducing
material. The most logical, indeed the only readily available product is RTV (Room Temperature Vulcanizing) silicone rubber, sold in auto supply or
hardware stores (“Ironmongeries” I recall from UK visit is the term there)
as all-in-one caulks, sealants, adhesives, and gasket makers. They work
passably well for copying simple shapes such as canopies and nose bowls,
but fail dismally at attempts to capture the shape of engines, wheels,
seats and such. RTV products are, after all, deliberately formulated to be
viscous, viciously adhesive, resistant to compression, and utterly indifferent
to greasy or oily surface contaminants. They will not flow into fine details,
nor readily release their grip on the master form;
 no
matter what type or quantity of mold release grease is used. Subsequently, any
solvent strong enough to soften set silicone will dissolve resin; and even cast
metal masters will suffer from the scrubbing required to remove all rubber
residue.
no
matter what type or quantity of mold release grease is used. Subsequently, any
solvent strong enough to soften set silicone will dissolve resin; and even cast
metal masters will suffer from the scrubbing required to remove all rubber
residue.
The Solution
These obstinacies prompted an exhaustive
search of all the shelves in the kitchen, bathroom, and workshop-garage for
mitigating admixtures. After futile fiddlings with silicone sprays,
waterproofing liquids, and even cooking oils, a last gasp of alchemy led to
the secret ingredient – the proverbial Philosopher’s Stone that transmutes
base caulking compound into the gold of mold-making material. That Holy
Grail is anti-seize compound - another inexpensive acquisition from the
automotive supply section of Wal-mart. It is a grease-based suspension of
metallic particles that may be powdered aluminum, or something more exotic,
such as molybdenum disulfide lubricant. Sold for a few dollars in squeeze
tubes or small tins, its actual raison d’etre is preventing the unwanted
fusion of dissimilar metals in assemblies such as steel threaded spark
plugs (Igniters, I believe they are called on the eastern side of the
Atlantic) to aluminum engine cylinder heads. Whatever its intent or
composition, it cures (no pun intended) all the shortcomings of RTV rubber,
as relates to our own designs.
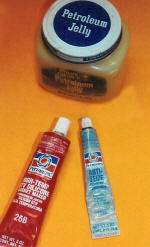
Not all by itself, though. Further
experiments led to the following refined recipe: One part anti-seize
compound, one part petroleum jelly (Vaseline), 3 parts RTV – the red “Hi
Temp Gasket Maker” seems to work slightly better than others, though this
may be imaginary, as the multiple RTV renderings are likely the same base
with different pigments and prices.
Caveats and Cautions
Prior to launching into the details of
the procedure, a few generalities bear mention. The rubber formula will
likely need
 tweaking. If it sets up overly firm or sticky more anti-seize
is called for. Conversely, if it refuses to harden more RTV is in order.
This technique reproduces one-sided parts, such as engine facades, in a
single mold. Wheels, landing gear spats, and similar components can be
fashioned in mating halves, as they are in most short run low-pressure
injected kits. Three-dimensional parts require a two-part split mold, with
the additional complications of aligning pins and air evacuation
channels. The rubber recipe is amenable to that process, but such parts
are rarely needed in model airplaning.
tweaking. If it sets up overly firm or sticky more anti-seize
is called for. Conversely, if it refuses to harden more RTV is in order.
This technique reproduces one-sided parts, such as engine facades, in a
single mold. Wheels, landing gear spats, and similar components can be
fashioned in mating halves, as they are in most short run low-pressure
injected kits. Three-dimensional parts require a two-part split mold, with
the additional complications of aligning pins and air evacuation
channels. The rubber recipe is amenable to that process, but such parts
are rarely needed in model airplaning.
Lest the lawyers get their advocacies
in an uproar, the warning must be included that RTV and epoxies cause skin
sensitivities and emit harmful vapors. Provide adequate ventilation and/or
use a respirator mask. The 3-M Company sells a disposable surgical type
mask that adds an adsorbant charcoal layer to the usual pressed paper dust
filter. It is marketed as a protection only against “nuisance odors” such
as latex paint fumes, but does an excellent job of blocking acrid and
organic vapors. In the absence of an industrial respirator, such a mask is
the absolute least protection that should be worn when sanding, spraying,
or cooking up chemicals. The legal eagles will also insist upon a phrase or
two regarding the reproduction of someone else’s enterprise. As with
photocopying, as long as the duplication is for personal and non-commercial
use, the “counterfeiter” is generally unconcerned with copyright issues,
though a stiff upper lip should be maintained mated to a stiff lower one
regarding the source of that superb P&W Wasp or MB MkVII “bang seat”.
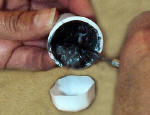
Making the Mold
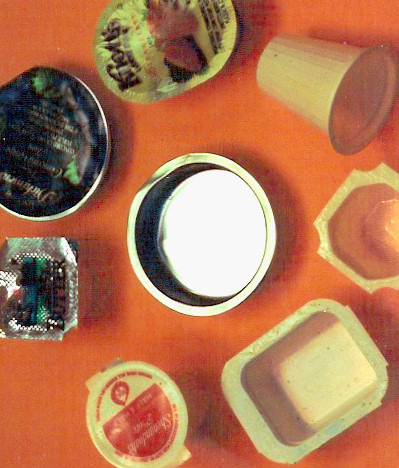
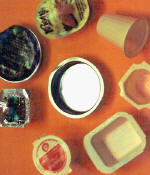 Before
mixing up the mush the container consideration must be cogitated upon. The best
and cheapest vessels are the half-ounce plastic tubs in which restaurants
dispense bu
Before
mixing up the mush the container consideration must be cogitated upon. The best
and cheapest vessels are the half-ounce plastic tubs in which restaurants
dispense bu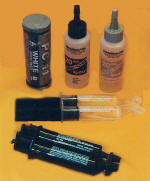 tter,
jelly, coffee creamer, and other condiments. Another alternative is
the inexpensive plastic or metal paint pallets sold in artsy-craftsy stores for
oil and watercolors but also suitable for mixing epoxy and forming shallow
molds. At fifty cents apiece they can be discarded rather than cleaned.
For larger parts, as in 1/48 scale, 2 ounce plastic bathroom cups, or those used
for dispensing potions and pills for assorted ills are perfect.
tter,
jelly, coffee creamer, and other condiments. Another alternative is
the inexpensive plastic or metal paint pallets sold in artsy-craftsy stores for
oil and watercolors but also suitable for mixing epoxy and forming shallow
molds. At fifty cents apiece they can be discarded rather than cleaned.
For larger parts, as in 1/48 scale, 2 ounce plastic bathroom cups, or those used
for dispensing potions and pills for assorted ills are perfect.
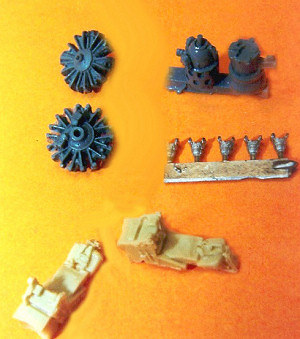
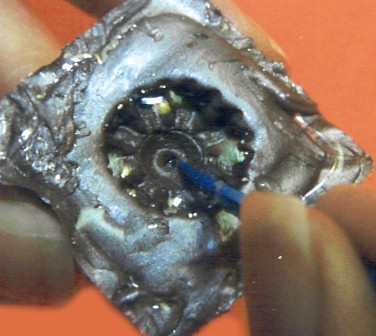
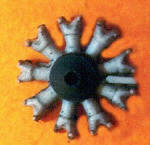
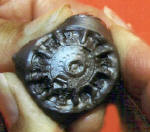
The first step in the two-part process is selection of a
master to copy, a radial engine for example. Superior results can be achieved,
particularly in larger scales, by carving away pushrods or wiring harnesses,
casting just the crankcase and cylinders, then replacing the details with wire or sprue. A generic part can often be
made by combining the cylinders from one engine with the crankcase of
another. Clean off any flash and seams, then give it a spritz of silicone
lubricant and let that dry. The mold release oil will help even with all
the greasy stuff in the rubber compound. Mix up the latter in a disposable
cup. First melt the petroleum jelly in Mom’s microwave oven, then mix in
the anti-seize compound. Add the RTV then STIR, STIR, STIR; because it is not
very miscible with the greasy stuff (or much else on this planet). When the glop
is uniform in color and consistency, spoon it into the proper size container,
avoiding the formation of bubbles and voids. A few sharp raps on the table will
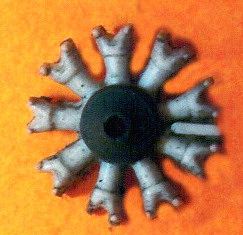
bring air to the top. Carefully submerge the master form a millimeter or two
beyond its midline. The flexibility
 of
the cured mold will allow it to be removed. Save a spoonful of excess mold
compound to judge its setting time.
of
the cured mold will allow it to be removed. Save a spoonful of excess mold
compound to judge its setting time.
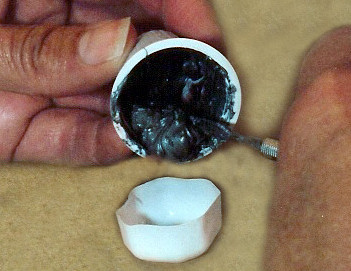
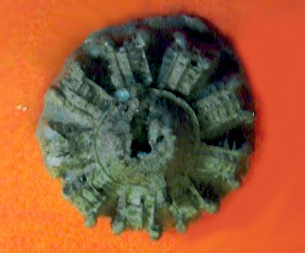
Set the mold aside in a warm place for
at least a full day, t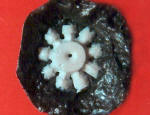 hen if the test glob of rubber indicates setting,
carefully cut away the plastic tub and let it sit another 24-48 hours. RTV
cures by exposure to air so even if the outside is firm, the inside is
likely still liquid-ish. The best clue to curing is the complete lack of
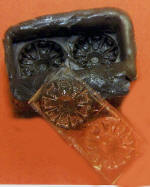
any odor from the rubber. Carefully peel away a corner (or cylinder head)
and see if the mold is ready to release the master. If the proper
proportions have been used and adequate time allowed, it should pop out
easily leaving a precise detailed female impression. Allow that still one
more day to cure open to the air. If any rubber sticks to the master, the
job has been boogered and a new mold must be tried with a greater
proportion of slick stuff.
hen if the test glob of rubber indicates setting,
carefully cut away the plastic tub and let it sit another 24-48 hours. RTV
cures by exposure to air so even if the outside is firm, the inside is
likely still liquid-ish. The best clue to curing is the complete lack of
any odor from the rubber. Carefully peel away a corner (or cylinder head)
and see if the mold is ready to release the master. If the proper
proportions have been used and adequate time allowed, it should pop out
easily leaving a precise detailed female impression. Allow that still one
more day to cure open to the air. If any rubber sticks to the master, the
job has been boogered and a new mold must be tried with a greater
proportion of slick stuff.
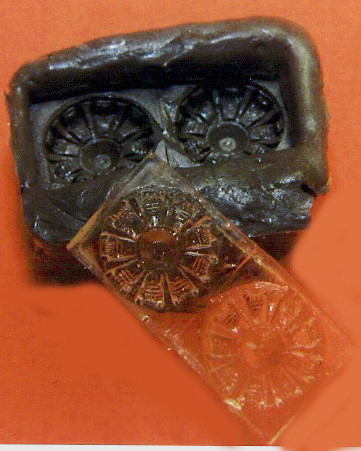
Casting the Duplicate
The master can be replicated using any hardening compound, but 2-part epoxies
give the best results. Automotive
 polyester
resin is difficult to use in such small quantities because the amount of
hardener is impossible to judge. Water or solvent based putties, such as wood
fillers or “Liquid Steel” shrink considerably as the carrier evaporates, and the
acetone/toluene solvent may attack the mold. A variety of epoxies
with various properties are available in any department store for only a few
dollars, usually packaged in twin syringes that automatically dispense equal
(more or less) amounts of parts A and B. Some harden in as little as a minute;
some remain flexible; some are specifically formulated to bond plastic. For
copying fine details the best choices are low viscosity and hard setting, which
generally require a cure time of at least several hours. Any of them should be
allowed to set overnight to assure a smooth tack-free surface. The
liquidity and reaction time of
polyester
resin is difficult to use in such small quantities because the amount of
hardener is impossible to judge. Water or solvent based putties, such as wood
fillers or “Liquid Steel” shrink considerably as the carrier evaporates, and the
acetone/toluene solvent may attack the mold. A variety of epoxies
with various properties are available in any department store for only a few
dollars, usually packaged in twin syringes that automatically dispense equal
(more or less) amounts of parts A and B. Some harden in as little as a minute;
some remain flexible; some are specifically formulated to bond plastic. For
copying fine details the best choices are low viscosity and hard setting, which
generally require a cure time of at least several hours. Any of them should be
allowed to set overnight to assure a smooth tack-free surface. The
liquidity and reaction time of all these glues can be improved by first warming the separate
components in nearly boiling water, combining and pouring while still hot.
all these glues can be improved by first warming the separate
components in nearly boiling water, combining and pouring while still hot.
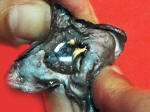
The
bugaboo of any casting is bubbles, caused by stirring and air trapped in
the mold. Professional pourers pop them with either vacuum or centrifugal
force. I tried both, first building a vacuum chamber,
 which was
ineffective, then converting an upturned bicycle to a centrifuge, which
turned near deadly when the casting came loose from the wheel and became a
missile. Both proved unnecessary, as bubbles can be minimized, if not
eliminated, by everting and flexing the mold while pouring. Any that remain
can be coaxed out by poking with a pin or toothpick.
which was
ineffective, then converting an upturned bicycle to a centrifuge, which
turned near deadly when the casting came loose from the wheel and became a
missile. Both proved unnecessary, as bubbles can be minimized, if not
eliminated, by everting and flexing the mold while pouring. Any that remain
can be coaxed out by poking with a pin or toothpick.
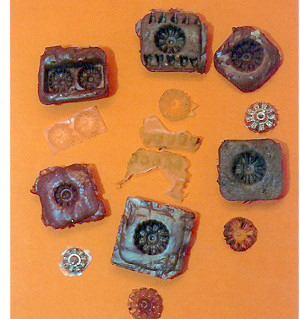
Allow the pour to sit at warm room
temperature at least overnight, which is the full curing time for even
“instant” epoxies. By then the surface should lose all stickiness and
easily pop free from the mold. The extra time is necessary also to produce
a hardness which can be sanded, smoothed and drilled. Minor imperfections
can then be corrected with additional epoxy or cyano-acrylate gel.
The mold should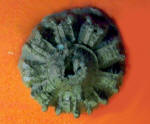 last for about a half dozen pours, but by then tiny bits and pieces have worn
away and the casting quality has deteriorated to the point that a new mold
is in order.
last for about a half dozen pours, but by then tiny bits and pieces have worn
away and the casting quality has deteriorated to the point that a new mold
is in order.
 This technique will not lead to fortune
and fame; nor may it save much over the cost of ready-made replacement
parts; but it will add an air of accomplishment in mastering a new niche in
modeling.
This technique will not lead to fortune
and fame; nor may it save much over the cost of ready-made replacement
parts; but it will add an air of accomplishment in mastering a new niche in
modeling.
Joel Hamm