 The cockpits:
| KIT #: | |
| PRICE: | $ |
| DECALS: | |
| REVIEWER: | Pablo Calcaterra |
| NOTES: | Comparison of three older kits |
A Study on three different P-40 Bs in 1/48th scale
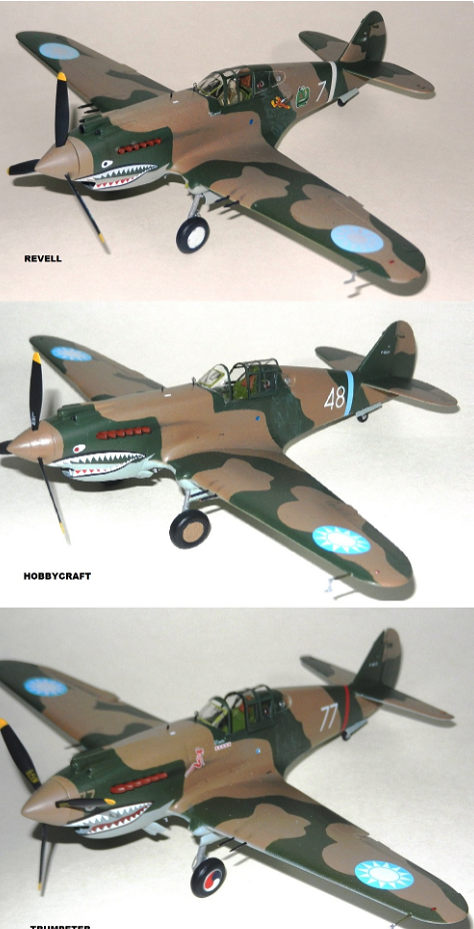
As seen on the 3 articles previously published the 3 old P-40B kits in 1/48 had problems that rendered each one falling short from expectations. It has historically and generally been considered that out of the three (Revell, Hobbycraft and Trumpeter) the first one was still the best one in terms of shape…even being 40+ years old it was better than the two newest offerings.
This study supplements my three previous articles in terms of showing in detail the differences and fixes.
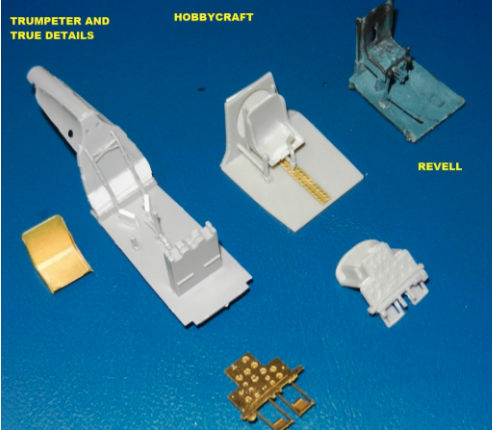
The cockpits:
Starting in the order we would build a kit I will focus on the cockpits first. On this picture you can appreciate that major surgery is needed for the Trumpeter kit. As they have designed the cockpit too shallow (sitting too high in the fuselage) the seat and panels are too small. The only way to fix this is to supplement the back of the fuselage, use a photoetched seat (True Details in this case) and create a support to hold the seat in place. Hobbycraft’s is better but lacks the central structure on the floor and needs to have the oval section covered with plasticard. Also the top of the seat is originally rounded in the kit and needs to be cut flat. Finally on the right you can see the much simpler but somehow effective Revell with correct profile for the seat.
Fuselage:
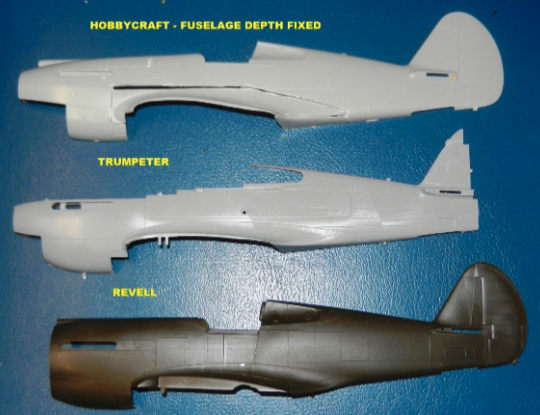 From the top you can see
Hobbycraft’s with the surgery to correct its depth already started. This will
help extend the panel line from the tail to the engine panels instead of
stopping at the wing/fuselage union. Then it is the Trumpeter kit with the
somehow odd position of the cockpit opening that seems to be slightly ahead of
the two other kits. Also evident are the raised hatches/doors that need to be
sanded flush with the surface of the fuselage skin. Finally at the bottom you
can see the Revell version which has no issues except for the raised panels and
rivets.
From the top you can see
Hobbycraft’s with the surgery to correct its depth already started. This will
help extend the panel line from the tail to the engine panels instead of
stopping at the wing/fuselage union. Then it is the Trumpeter kit with the
somehow odd position of the cockpit opening that seems to be slightly ahead of
the two other kits. Also evident are the raised hatches/doors that need to be
sanded flush with the surface of the fuselage skin. Finally at the bottom you
can see the Revell version which has no issues except for the raised panels and
rivets.
Once these issues have been fixed you can appreciate the eliminated rivets and the required fixes to the joints of some parts for Trumpeter (top), the fixed depth of the fuselage for Hobbycraft (middle and using plasticard) and the rescribed panel lines and massive amount of putty required for Revell (bottom).
Wings:
Moving on to the wings you can see the skinny nun hat for Hobbycraft on the top (especially closer to the front of the engine) with the basic wheel wells. Then in the middle the more complex and accurate undersides of the Trumpeter kit and finally on the bottom the too wide front of the nun hat for Revell along with the devoid of detail wheel wells.
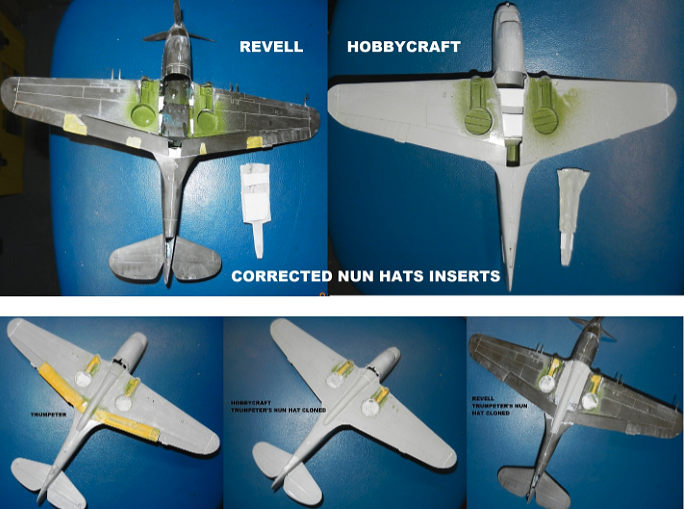 I removed the “offending”
nun hats (Hobbycraft and Revell) replacing them with clones made with 2 part
epoxy copied on casts made on Plaster of Paris copied from the Trumpeter kit.
These were inserted by removing the wrong shaped parts after the wings had been
installed and then using a lot of putty and sandpaper to fix the gaps and
unions.
I removed the “offending”
nun hats (Hobbycraft and Revell) replacing them with clones made with 2 part
epoxy copied on casts made on Plaster of Paris copied from the Trumpeter kit.
These were inserted by removing the wrong shaped parts after the wings had been
installed and then using a lot of putty and sandpaper to fix the gaps and
unions.
The solution to fix the lack of details in the wheel wells for Revell are plasticard rings for the walls and on top of the locating pins for the wheels
Finally, the kits have different panel lines. The Hobbycraft required some new panels missing in the kit, Trumpeter the elimination of the rivets (putty and sandpaper) and Revell with its raised panel lines (that need to be rescribed) and rivets (that need sanding).
Another area that requires attention, this time only for Hobbycraft, is the position and shape of the landing gear knuckles. Some intensive sanding helps to improve this area
Tail:
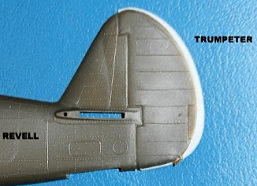 Finally the other major
area to pay attention is the tail. Trumpeter’s rudder is too long and needs
sanding.
Finally the other major
area to pay attention is the tail. Trumpeter’s rudder is too long and needs
sanding.
The rudders are missing the
hinge. Easy to do in Trumpeter as the rudder is a separate piece but on
Hobbycraft and Revell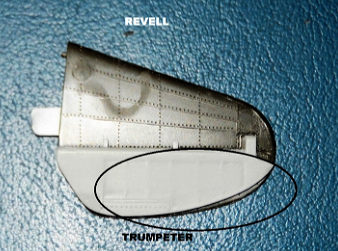 a drill and sanding sticks are required to open the hole
and then add the hinge.
a drill and sanding sticks are required to open the hole
and then add the hinge.
Last but not least the shape of Trumpeter’s horizontal moveable surfaces is wrong but unless you buy an aftermarket part these are almost impossible to fix.
Conclusion:
 Overall it is a matter of preference. The three kits need major surgery.
Probably Trumpeter’s is the closest to the final shape (no issues with fuselage
depth, better nun hat) but the interior is terrible. If I had to build a new one
I would probably go with Hobbycrafts’. The depth of the fuselage is not THAT
hard to fix and the panel lines are decent and there is not a massive amount of
rescribing or sanding of panels or rivets…
Overall it is a matter of preference. The three kits need major surgery.
Probably Trumpeter’s is the closest to the final shape (no issues with fuselage
depth, better nun hat) but the interior is terrible. If I had to build a new one
I would probably go with Hobbycrafts’. The depth of the fuselage is not THAT
hard to fix and the panel lines are decent and there is not a massive amount of
rescribing or sanding of panels or rivets…
Then of course there is the new Airfix but I don’t have that one. Having seen a couple I believe it is exquisite in several areas (cockpit for instance) but I particularly don’t like the built in non-slipping surfaces at the wing roots. Besides there is some criticism about the nose being in the wrong angle and I have seen that the CAF star is missing one point (11 instead of 12). But as I don’t have one to make a direct comparison I won’t dwell into it.
In the end, as Tom Cleaver once said…good enough is good enough. Pick the one you like the best and fix it if you feel like doing it.
Pablo
Calcaterra August 2018 If you would like your product reviewed fairly and fairly quickly, please
contact
the editor or see other details in the
Note to
Contributors. Back to the Main Page
Back to the Review
Index Page
Back to the Previews Index Page