Modeling
Tools and Equipment
Brian R. Baker
Introduction
Recently,
a pilot friend of mine told me that since he retired, he was going to get back
into modeling. He had built some
models in the past, but since moving, he has to set up an entirely new work
area, and acquire new tools and equipment.
I pondered the issue, and since I have only been building model airplanes
for at least sixty years, I thought I could pass some information on to him. In
fact, I feel that other modelers could also benefit from this, as we can all
profit from new information.
One
of the main principles in my modeling is to try to stay organized, and have a
place for things, and put them back there from time to time.
I did this by building a workbench.
This is not a custom designed job, but just a “fit it into the space”
affair. I have one room in the
house (a bedroom) devoted to all of my airplane hobbies, which also include a
large aircraft photo collection and a library that I’ve collected over the past
fifty years. Seeing as how I don’t
have a bed in there, I took the sliding doors off of the closet and built a
workbench inside it. This is just
made of particle board and an old formica sink cutout, but the old table saw I
have out back has been sufficient for making workbenches and model display
cases, which are another story. Any space not devoted to working area is either
filled with unbuilt kits, books, periodicals, my computer, or model display
cabinets. Having over 1,000
built-up 1/72 scale models in one small bedroom taxes the imagination, I know,
but so far I have always made space when that new kit comes out. It’s like the
inside of a submarine.
I’ll
gloss over such issues as airbrush location and the related problems associated
with the fumes. I have a
compressor, and also an exhaust fan from an old range-oven combination that I
scrapped years ago, and I am able to use enamels and lacquers right on the
bench, not in the garage, which at the moment, is more that 100 degrees in the
Arizona summer. I have set up
shelves for paint, with everything identified and in order, which saves a lot of
time searching for particular colors. I also have containers and racks on the
bench for various tools, so that they are easily found when needed.
I also put them back when I’m done. I also have a small pad stuck to a
shelf, where I note things I need when I next visit the hobby shop, such as
paint, glue, etc. Another essential is a powerful flashlight.
This is essential when I drop a small part on the floor, and have to look
for it. Even though I have one of
those office-chair plastic floor covers, parts can bounce and go amazing
distances (I think they are self-propelled) so a light is helpful in locating
these items.
The
Tools
The
obvious things, like sharp Xacto style knives, drills, files, a razor saw, a hot
knife, scissors, and pliers don’t need much discussion, except that I buy things
like knife blades when I find them on sale, so I always have one when I need it.
Several sets of tweezers are also needed, but be sure to get sharp pointed ones,
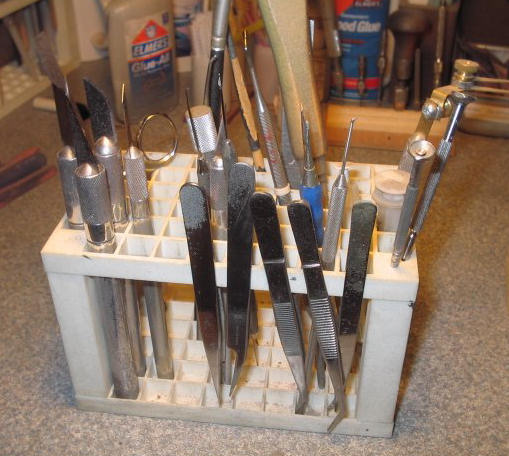
not the blunt edge type. As far as storing the tools on the workbench, I have
some plastic containers that were originally designed for tall, thin objects of
some kind. They are kind of like honeycombs, and allow files, Xacto knives,
picks, and other long, thin tools to be stored upright.
I have to be careful because the knife blades stick straight up, but I
can see what tool I’m getting.
I made a similar unit for storing paintbrushes out of plastic tubing and
a piece of flat Plexiglas. You
could also use some empty 35 mm film containers superglued to a flat piece of
wood or plastic. I use one of these for storing wooden stirring sticks, pipe
cleaners, and short sanding sticks.
 I
will list and explain some tools that some readers may not have thought of.
One thing I have always done is try to think outside of the box.
When I’m in a hardware, electronics, or sewing
supply store with my wife, I look at stuff displayed on the walls, and say to
myself “How could I use this in modeling?”
The result has been a number of things that have turned out to be useful,
including those small fiber cutting boards sold in fabric stores that are marked
off in square inches, which are very useful when cutting small parts off of a
sprue. When I go to the dentist, I always ask “do you have any dental tools that
you’re throwing away”, and this has resulted in some very useful tools,
including dental picks scrapers, and drill bits.
Even small dishes or containers for water for decals or wet sanding, or
thinners for airbrush cleaning can be obtained free. I once picked up some small
aluminum throw-away ashtrays from Taco
Bell,
and have been using them for years, since they quit giving them out when they
outlawed smoking in restaurants here.
I often use superglue or white glue for attaching small parts, and the
most effective way to do this is to place a small amount of glue in a tiny
receptacle and apply it with a dental pick.
An ideal medium for this was discovered in church communion cups, small
clear plastic cups that are thrown away after use.
I just put a bunch of them in a plastic bag, take them home, wash them
out, and they make ideal glue receptacles when turned upside down. The bottoms
have just enough depression to hold a few drops, enough glue for most
applications, and they are stable and not easily upset. And I just discard them
when they need replacement.
I
will list and explain some tools that some readers may not have thought of.
One thing I have always done is try to think outside of the box.
When I’m in a hardware, electronics, or sewing
supply store with my wife, I look at stuff displayed on the walls, and say to
myself “How could I use this in modeling?”
The result has been a number of things that have turned out to be useful,
including those small fiber cutting boards sold in fabric stores that are marked
off in square inches, which are very useful when cutting small parts off of a
sprue. When I go to the dentist, I always ask “do you have any dental tools that
you’re throwing away”, and this has resulted in some very useful tools,
including dental picks scrapers, and drill bits.
Even small dishes or containers for water for decals or wet sanding, or
thinners for airbrush cleaning can be obtained free. I once picked up some small
aluminum throw-away ashtrays from Taco
Bell,
and have been using them for years, since they quit giving them out when they
outlawed smoking in restaurants here.
I often use superglue or white glue for attaching small parts, and the
most effective way to do this is to place a small amount of glue in a tiny
receptacle and apply it with a dental pick.
An ideal medium for this was discovered in church communion cups, small
clear plastic cups that are thrown away after use.
I just put a bunch of them in a plastic bag, take them home, wash them
out, and they make ideal glue receptacles when turned upside down. The bottoms
have just enough depression to hold a few drops, enough glue for most
applications, and they are stable and not easily upset. And I just discard them
when they need replacement.
Even
a trip to the dollar store can be useful.
I bought a cheap set of drill bits years ago, and although they would
dull in a minute if used on metal, they have lasted a long time on plastic.
I bought some small clamps that I use quite often.
Even cheap wire cutters work ok on plastic.
Emery boards are also available there, and they are very useful. Dollar
stores often have plastic
 containers of different sizes, and these are very
useful for storage. I use them to
store decals, scrap model parts, and extra tools and equipment.
They are easily labeled, and generally airtight.
containers of different sizes, and these are very
useful for storage. I use them to
store decals, scrap model parts, and extra tools and equipment.
They are easily labeled, and generally airtight.
Over
the years, I have accumulated a couple of magnetic kitchen knife holders. These
are normally mounted to the wall, and hold half a dozen small knives.
I use them for any kind of metal tool, including files, pliers, and other
tools. They are extremely useful.
Painting
And Glue Application Equipment
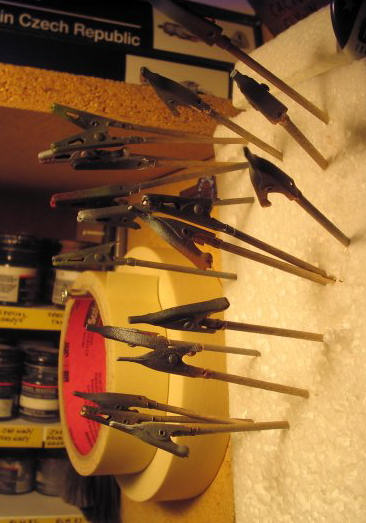
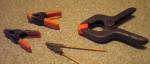 One
thing I have evolved over the years is a method of holding small parts while
painting. I originally bought some electronic wire clips, those little
jagged-toothed alligator clips used to temporarily hold electrical connections
together, and found that if you attach them to a round toothpick and clamp them
on, I had a ready-made clamp that I could use to attach small parts. Cracker
Barrel toothpicks are great for this, because they are pointed on one end and
blunt on the other. At Radio Shack, I
found some copper clamps that don’t have the jagged jaws, but just two smooth
“jaws” that clamp together. This
leads to another technique.
One
thing I have evolved over the years is a method of holding small parts while
painting. I originally bought some electronic wire clips, those little
jagged-toothed alligator clips used to temporarily hold electrical connections
together, and found that if you attach them to a round toothpick and clamp them
on, I had a ready-made clamp that I could use to attach small parts. Cracker
Barrel toothpicks are great for this, because they are pointed on one end and
blunt on the other. At Radio Shack, I
found some copper clamps that don’t have the jagged jaws, but just two smooth
“jaws” that clamp together. This
leads to another technique.
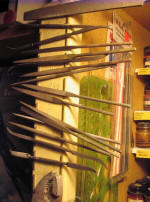
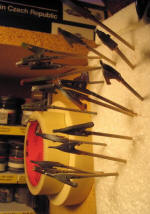 I
always save some old Styrofoam from packing boxes, and glue a section, maybe six
inches square, on one of the sides of my workbench.
When the part is painted, I just stick the part and clamp into the
Styrofoam, and it stays there nicely until dry. I also store the clamps there.
When the Styrofoam wears out, I simply replace it with another piece.
I
always save some old Styrofoam from packing boxes, and glue a section, maybe six
inches square, on one of the sides of my workbench.
When the part is painted, I just stick the part and clamp into the
Styrofoam, and it stays there nicely until dry. I also store the clamps there.
When the Styrofoam wears out, I simply replace it with another piece.
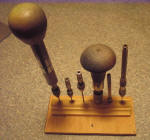
We
are all familiar with paintbrushes, so I won’t elaborate on these, except that
the larger craft stores and artist
supply houses sometimes have good sales on these. Little wooden coffee stirrers
are useful for hand-stirring paint, or for applying putty to fill seams. One
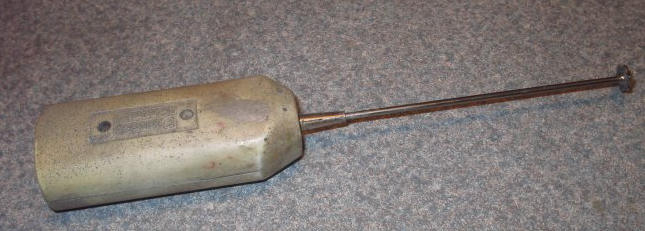
thing I
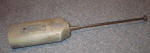 obtained from Squadron a couple of years ago is a battery operated paint
stirrer, which operates on the principle of a cocktail stirrer.
It has a small rotary tip that stirs paint around very nicely without
allowing it to splash the paint around. Be sure to turn it completely off before
removing it from the paint bottle, however, or you’ll have paint all over the
place. I really don’t know how I ever got along without this little gem.
I bought some pipe cleaners at a local
craft store, and use these for cleaning out my airbrush.
These have many craft uses now, and are available in many colors, but
color is not essential. They should
be nylon or something besides cotton, and can be cleaned off by dipping them in
thinner and wiping them off on a Kleenex.
I’ve had less use for the abrasive type of cleaner, with small bristles,
but I still use them occasionally. The small “eye droppers” that come with eye
or nose drops are also useful in dispensing thinner. I also have a number of
small individual maple syrup bottles taken home from restaurants. I use these to
keep small quantities of water for use in decals and wet sanding. It just saves
me from getting up and going to the sink every time I need a small quantity of
water.
obtained from Squadron a couple of years ago is a battery operated paint
stirrer, which operates on the principle of a cocktail stirrer.
It has a small rotary tip that stirs paint around very nicely without
allowing it to splash the paint around. Be sure to turn it completely off before
removing it from the paint bottle, however, or you’ll have paint all over the
place. I really don’t know how I ever got along without this little gem.
I bought some pipe cleaners at a local
craft store, and use these for cleaning out my airbrush.
These have many craft uses now, and are available in many colors, but
color is not essential. They should
be nylon or something besides cotton, and can be cleaned off by dipping them in
thinner and wiping them off on a Kleenex.
I’ve had less use for the abrasive type of cleaner, with small bristles,
but I still use them occasionally. The small “eye droppers” that come with eye
or nose drops are also useful in dispensing thinner. I also have a number of
small individual maple syrup bottles taken home from restaurants. I use these to
keep small quantities of water for use in decals and wet sanding. It just saves
me from getting up and going to the sink every time I need a small quantity of
water.
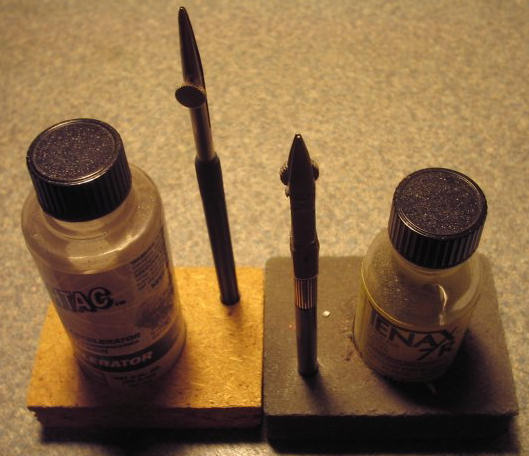
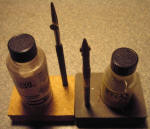 For
glue application, I have several tools.
For Tenax liquid solvent, I use an old drafting pen. This is dipped into
the solution, and moves onto the joint by capillary action. This also works for
superglue accelerators. For
superglue adhesives, I use the pointed end of a dental pick. For white glue, the
dental pick also works best, especially in applying rigging wires where small
quantities of glue are required.
For
glue application, I have several tools.
For Tenax liquid solvent, I use an old drafting pen. This is dipped into
the solution, and moves onto the joint by capillary action. This also works for
superglue accelerators. For
superglue adhesives, I use the pointed end of a dental pick. For white glue, the
dental pick also works best, especially in applying rigging wires where small
quantities of glue are required.
Drills
and Files.
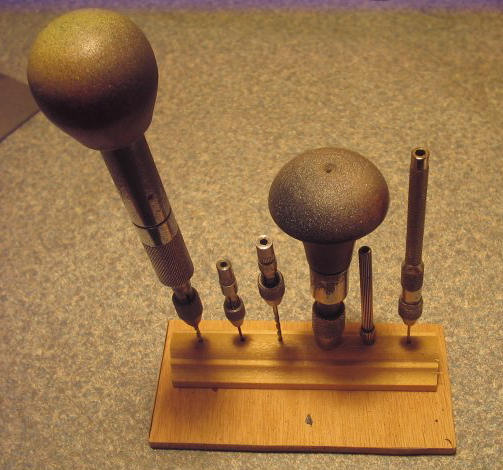
 I
have a set of cheapo drill bits that I use occasionally to enlarge holes.
I also have a number of very small hobby-type drill bits that fit into
some hand-drill holders that I’ve accumulated over the years.
In addition, I have some dental drill bits, round and other shapes,
that fit into some of the hand drill
holders I have. They are very
useful at times. I have several sets of small files, and also some soft sanding
sticks of various grades for finishing. I also have a Dremel tool, but although
I bought a sewing machine foot pedal to vary the speed, I have used it very
little in modeling, although it has been very useful in working on the real
airplane’s aluminum skin. I also have a hand drill with a small pointed tip from
a set of dividers. It is great for marking drill hole locations.
I
have a set of cheapo drill bits that I use occasionally to enlarge holes.
I also have a number of very small hobby-type drill bits that fit into
some hand-drill holders that I’ve accumulated over the years.
In addition, I have some dental drill bits, round and other shapes,
that fit into some of the hand drill
holders I have. They are very
useful at times. I have several sets of small files, and also some soft sanding
sticks of various grades for finishing. I also have a Dremel tool, but although
I bought a sewing machine foot pedal to vary the speed, I have used it very
little in modeling, although it has been very useful in working on the real
airplane’s aluminum skin. I also have a hand drill with a small pointed tip from
a set of dividers. It is great for marking drill hole locations.
Measuring
Tools and Templates
A
good set of steel rulers is very useful.
I have several, and also have a couple of sets of dividers, which are
actually drafting compasses with pointed tips on both sides.
I also have a paper 1/72 scale ruler stuck onto one of the shelf facings
on my bench, and this is handy at times. Tracing
templates and erasing shields are also useful.
I use a circle template all the
time to mark off masking tape circles for wheel hubs or cowling faces.
Lighting
A
model workbench has to be well lighted.
I have a florescent unit mounted above, but also have a moveable light
that can be placed in any position. In addition, I have a circular florescent
magnifying glass unit that also adjusts to any position.
These get in the way at times, but I can always see what I’m doing, and
the magnifying glass converts 1/72 scale into 1/48 when I really need to see the
detail. They make small magnifying glass stands with clamps, and these are
available cheaply in tool supply houses. I have one, but have never used it. I
even have a desk mounted magnifying glass that I sometimes use when I’m working
on a model on a folding TV tray in the family room, but I don’t do this often.
Cleaning
Tools
Obviously,
Kleenex and paper towels are essential on any modeling bench.
Other things, such as Q-tips and pipe cleaners are also useful.
My wife recently bought me a small battery powered hand vacuum, intended
for cleaning computer keyboards. It
does, however, suck up the debris from a model bench, and I have found it to be
a welcome addition. Another useful
item is a can of dust remover, which is expensive but sometimes useful in
removing unwanted materials from the insides of a model. I use old toothbrushes
for cleaning debris out of panel lines, and other types of brushes for lighter
dusting off.
Safety
Equipment
The
only safety equipment I have includes a fire extinguisher mounted underneath my
workbench, a few band-aids on a shelf, and some paper masks for painting, which
I probably should use more often than I do. I don’t think OSHA would like my
setup.
Conclusion
These
are some of the things I have learned in many years of modeling. I hope that
some of these ideas are useful, and that they will help you to make your
modeling more pleasant and efficient. If anyone else has ideas, feel free to
share them, especially ideas that don’t cost a lot of money. Happy modeling!
 containers of different sizes, and these are very
useful for storage. I use them to
store decals, scrap model parts, and extra tools and equipment.
They are easily labeled, and generally airtight.
containers of different sizes, and these are very
useful for storage. I use them to
store decals, scrap model parts, and extra tools and equipment.
They are easily labeled, and generally airtight.
 I
always save some old Styrofoam from packing boxes, and glue a section, maybe six
inches square, on one of the sides of my workbench.
When the part is painted, I just stick the part and clamp into the
Styrofoam, and it stays there nicely until dry. I also store the clamps there.
When the Styrofoam wears out, I simply replace it with another piece.
I
always save some old Styrofoam from packing boxes, and glue a section, maybe six
inches square, on one of the sides of my workbench.
When the part is painted, I just stick the part and clamp into the
Styrofoam, and it stays there nicely until dry. I also store the clamps there.
When the Styrofoam wears out, I simply replace it with another piece.