| DECAL: | Liveries
Unlimited 1/144th scale Piedmont Airlines YS-11 |
| DECAL # | 44-123 |
| PRICE: | US$8.00 |
| MARKINGS: | Piedmont 1968 delivery colors |
| REVIEW & PHOTOS BY: | Andrew Abshier, Oklahoma Historical Modelers Society (OHMS) |
| NOTES: | Sold out from the manufacturer, but still available from some dealers |
|
HISTORY |
During the 1960s, North Carolina-based
Piedmont Airlines started a fleet renewal program to replace their aging Martin
404 and DC-3 airliners. Piedmont originally ordered the Fairchild F-27 and
stretched FH-227 turboprops, but found that the aircraft were too small for
their routes. When NAMC offered their higher gross weight 60-seat
YS-11A-500, Piedmont became one of only two U.S. airlines to order the
Japanese-built transport (the other U.S. airline was Reeve Aleutian Airways).
Ultimately Piedmont ordered 19 aircraft, and acquired two more second-hand as
spares sources. First service with Piedmont was in 1968, and the YS-11s
flew with Piedmont until 1981. About half of Piedmont's fleet went to
Airborne Express, where they flew cargo flights until 1997.
|
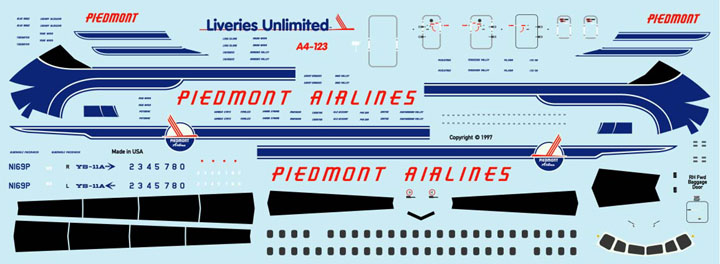
THE SHEET |
Decal scan courtesy Airway Graphics International; used by permission
This is a typically very fine decal from Liveries Unlimited (LU). Printing is very sharply done on Microscale decal film with spot-on register. The decal includes extra numbers and Pacemaker names so that any of Piedmont's 21-strong fleet of YS-11s (including the two spares aircraft, Yajima and Ito Tai). There are also some interesting extras, including a series of what look like quotation marks just below the right forward fuselage stripe; these appear to be decal representations of vortex generators.
What the sheet does not include are propeller
markings or wing exit walkways. These are included with the kit decals in
the Hasegawa YS-11 airliner kits; as I mentioned in my YS-11 kit review, you may
want to purchase the ANK/Air Nippon, Japan TransOcean, or Southwest Air Lines
(no, not THAT Southwest Airlines) boxings, which come with LU decals and all the
accessories you need. For my model, I salvaged the extra markings I needed
from other YS-11 decal sheets that I had on hand.
|
APPLICATION |
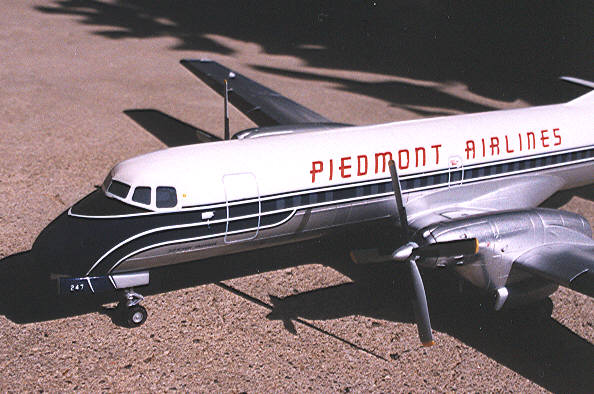
All of that blue stripe had to be fitted around the
nose--quite a challenge, but it came out well!
This was a complex decaling job requiring planning, patience, and plenty of Micro Sol! Since I would be building a YS-11 I flew on, Old Hickory Pacemaker, I had some cutting and pasting of both the Pacemaker name and aircraft registration to look forward to.
My decaling plan was to first apply the nose section of the cheatline to both sides. After that I would add the rest of the decals for the livery to one side at a time. Since there were a number of decals to put on top of other decals, I planned to apply my layers in this order: 1) aft section of stripe, all titling, and the first part of the registration, fleet number (the tiny numbers on the nosewheel doors) and "Pacemaker" name; 2) door outlines, other half of the "Pacemaker" name, and second part of the registration and fleet number; 3) cabin windows, third part of the registration and fleet number, and 4/5) last two parts of the registration. Once all that was dry, I would do it all over again for the other side! Then, I still had the de-icer boots to do, not to mention the sixteen (!) decals needed for the propellers.
Before applying the forward fuselage stripes, I trimmed all of the excess decal film away from the edges where they would meet on the centerline, as well as the diagonal "darts" given on the sheet to help ease the decal around the nose. I started with the left side first. The nose area initially didn't want to conform at all, and it took repeated applications of Micro Sol to get it to begin laying down. I also discovered that the "darts" given on the sheet weren't deep enough, so I extended these using needlework scissors. It also took considerable supervision to keep the stripe line straight. Eventually, the decal did lay down mostly well, but it did have a few raised knots where the corners of the darts were.
The decal was allowed to dry overnight, then any knots were very carefully trimmed away using a fresh #11 scalpel blade. I ended up revealing some of the white underneath, which I addressed later.
Once this decal was completely dry, I repeated the procedure for the right side.
After that, most of the decaling was pretty straightforward, following the plan I made earlier with the exception of constructing the registration number and Pacemaker name. Aligning those tiny numbers was a hairy exercise of the first order, but was eased somewhat by allowing the preceding number or letter to dry completely before attempting the next one. Even then I still ruined a number 4, but was fortunately rescued by an Airline Modeling Digest member who sent me replacements!
One problem I had with the decal was entirely self-inflicted. Most YS-11s operated in the United States were delivered with forward boarding doors that were wider and taller than the standard YS-11 door, as scribed on the Hasegawa kit. I didn't catch on to this until I actually applied the door outline decal, and found that it was too large! Some frantic decal quartering ensued, and I had quite a merry time aligning all 4 quarters to fit over the scribed door. Learn from your reviewer's mistake: when building a YS-11 for this scheme, be sure to fill in the scribed door outline on the Hasegawa kit and sand it smooth! The contrasting door outline decal is sufficient for most people to represent the forward door.
Doing the livery decals took me a full 5 days to do, counting drying time. Once everything was dry and washed off per Microscale decaling system instructions, I carefully touched up any mars in the blue with Testor's Insignia Blue FS35044, which happily turned out to be an exact match for the decal!
The de-icer boots given fit superbly. For mine, I cut all off the excess decal film away from each boot, and sprayed a light coat of Badger AccuFlex Clear Satin on all boot decals to eliminate the unrealistic gloss. Once the semi-flat coat was completely dry, the boots were applied to the model in the standard manner. Despite the clear coat, the decals laid down superbly, and the contrast between the semigloss of the boots and the different glosses of the paint and natural metal really enhanced the look of the model.
Overwing exit walkway markings came from one of my spare YS-11 decals. I used the same technique as used on the boots to de-gloss the decal. The decals snuggled into the panel lines with no problems.
The propeller decals, like the overwing
exits, came from another YS-11 decal. Before applying the decals, I
trimmed all excess film away from the decals, especially around the propeller
tips and de-icer boots. These decals were applied in the standard manner
to one side of the propeller at a time, allowing each side to dry before
continuing. When decaling the props, be sure to wick out all of the liquid
you can from underneath the decal once it is on. I didn't, and as a result
my propeller boots floated a bit off the centerline, leaving a gap.
Fortunately it was an easy matter to paint in the gap using gloss black paint.
After all that was dry, I satin coated the props, and they looked great!
|
CONCLUSIONS |
You should definitely be very good at decaling techniques before tackling this livery! Planning and patience will win the day--or days in this case--but be prepared for some tricky areas. You can ease your woes significantly by building the "Albermarle Pacemaker", N169P, since both the name, fleet number, and registration are given intact--using those decals will save you a number of alignment issues and time.
The work was all worth it, though. The classic Piedmont livery looks great on the YS-11, and I was very pleased with the final results. So were the judges at our local model contest, who gave it a first place award in its category just days after the model was completed!
This decal is no longer available from the manufacturer, but can still be found at some dealers. There is a distinct possibility that this decal will be reprinted, since it is a very popular scheme for the Hasegawa YS-11 kit, so if you want one, I suggest visiting the Airway Graphics International site and letting them know!