|
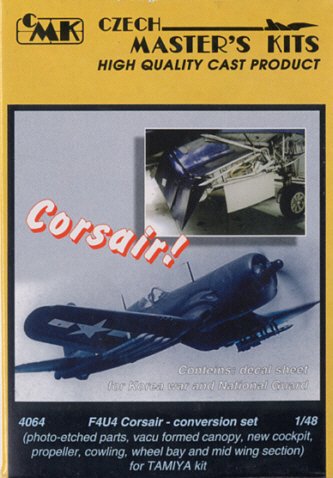
KIT: |
CMK 1/48 F4U-4 Conversion |
|
KIT # |
4064 |
|
PRICE: |
$25 |
|
DECALS: |
"White 416" of VF-114, USS Philippine Sea, Korea, 1950; "Black 11" of NARU, Olathe, Kansas, 1956 |
|
REVIEW & |
Ray Peterson |
|
NOTES: |
For Tamiya 1/48
Corsairs In-Progress Review |
|
HISTORY |
I will not bore you with a long re-hash of the Corsair’s history, that has been covered many times. I will just give you some highlights on the –4.
The F4U-4 Corsair differed from the F4U-1D in two major ways. First, it used the Pratt & Whitney R2800-18W, later upgraded to the R2800-42W. This engine required more air, creating the need to re-design the nose with the distinctive chin intake. The exhaust system was also re-designed with exhaust outlets both above and below the wings. The other major change was a complete re-design of the cockpit, making it more ergonomic. This included a new cockpit floor, new consoles, re-designed instrument panel, and a simplified seat which consisted of a bucket-type base and a flat armored plate for a back rest. Later in the production run, the canopy was also changed with a flatter, armored windscreen. The first 1000 (and 1050 total, out of 2356) craft had the earlier, rounded windscreen. Approximately 140 cannon armed –4B’s were also produced.
The F4U-4 first saw combat at the battle for Okinawa in 1945. For the most part, the –4’s were given the fighter role while the –1D dropped ordnance on the Japanese. The –4 also saw combat in Korea, relegated to the close-support roll along with the F-51 Mustang, the jets now taking over the fighter duties.
To the men that flew the different variants, the –4 is usually their favorite. It was the fastest, best dogfighter of the series. The Corsair was definitely the longest-lived of the Navy fighters of WWII, its last combat sortie being in 1971 with El Salvador, and the F4U-4 was considered the ‘ultimate’ Corsair.
|
THE SET |
 For quite
awhile, the best F4U-4’s available in 1/48th scale have been the
Hasegawa and Academy kits. However, each has its problems. The Hasegawa kit is
one of their older kits, having raised panel lines, an incorrect engine front
and a little scarce in detail in the cockpit and wheel wells. (It is also an
old Mania molding, Ed) The Academy kit is basically a copy of the Hasegawa
kit with engraved panel lines. Academy also changed the upper fuselage shape
towards and around the cockpit. Why, I don’t know as it is totally incorrect,
introducing a flat top to the fuselage just in front of the windscreen and
causing the canopy and cockpit area to be too wide. In summary, both kits can
make nice models, but both need work.
For quite
awhile, the best F4U-4’s available in 1/48th scale have been the
Hasegawa and Academy kits. However, each has its problems. The Hasegawa kit is
one of their older kits, having raised panel lines, an incorrect engine front
and a little scarce in detail in the cockpit and wheel wells. (It is also an
old Mania molding, Ed) The Academy kit is basically a copy of the Hasegawa
kit with engraved panel lines. Academy also changed the upper fuselage shape
towards and around the cockpit. Why, I don’t know as it is totally incorrect,
introducing a flat top to the fuselage just in front of the windscreen and
causing the canopy and cockpit area to be too wide. In summary, both kits can
make nice models, but both need work.
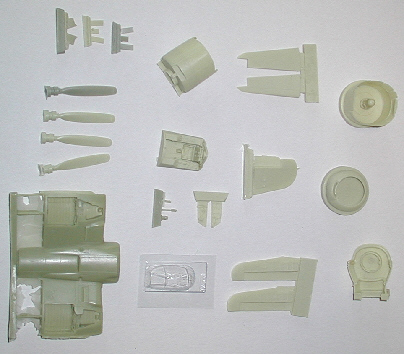
Now there is a new entrant, CMK’s new resin conversion set
for Tamiya’s very nice F4U-1D. It is composed of 30 cream-colored resin parts,
17 photo-etched parts and a new set of decals. Also included is a vac-formed
flat-type canopy. Combined with the Tamiya kit this allows the builder the
choice of building either an early or late –4. Inexplicably, not included is
the distinctive cylindrical engine front for the R2800-18W engine. Considering
the Tamiya engine has a separate front piece, this would have been an easy
addition and in my opinion is a major fault for 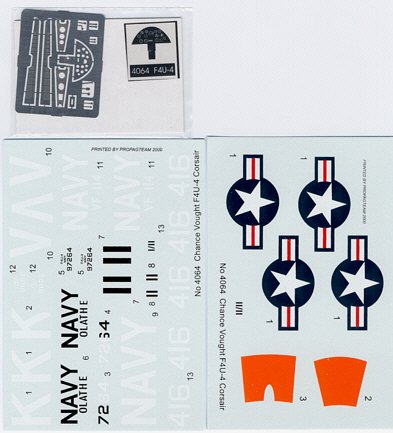 an otherwise well detailed set and will
require the purchase of an after-market engine to rectify.
an otherwise well detailed set and will
require the purchase of an after-market engine to rectify.
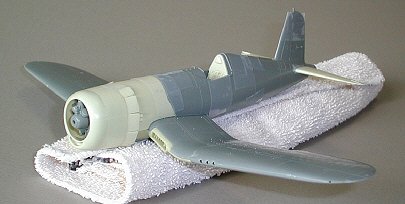
The detail of the set is very good. Then engraved lines appear to match Tamiya’s fine lines very well. I have found maybe one small bubble. I have no idea how they cast that wheel well detail with all the undercuts, it is really nice. The decals, printed by Propag Team, look very thin. I have never used their decals, and don’t plan on using them on my –4 so I will not be able to comment on their use.
|
CONSTRUCTION |
The largest piece in the set is the lower center wing piece. It is designed to replace the kit part and includes molded on wheel well detail that is beautiful. Also good are the wing leading edge intakes. Since the wheel wells are already included, you must remove all wheel well detail from the Tamiya kit upper wing inner sections. This means scrape, scrape, scrape, test fit, scrape, scrape, scrape, test fit, etc. I have already completed the modifications on the wings and have glued all this together. It fit pretty well, actually near perfect on one side, however the other side has a small step at the under wing joint. This may not be a problem on all copies as my set looks like a small mold defect, such as being slightly short shot, might be there. The resin wing does appear to be a little short, both sides have gaps at the flap area. Fortunately, it will be behind the flaps and with a little filler it should not be noticeable without very close inspection.
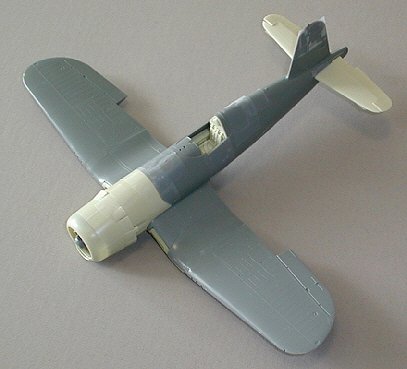 The
new front fuselage and cowl area will be the most work. As you can see, I have
already cut off the areas required on the Tamiya kit, and have dry-fitted
everything together with tape. The new cowl section is made up of 4 parts,
consisting of the new front fuselage piece, a new cowl with very thin cowl
flaps, a bulkhead with exhaust piping detail, and a new nose. I have already
attached the new nose to the cowl, fit here is good. The front fuselage section
where it connects to the Tamiya fuselage is not too bad, but there are some
small steps and gaps that need to be fine-tuned or filled. I had to do some
heating and bending already and I will need to do some more. I will also
probably add a little styrene shim at the point where the attachment angles
back. Still, I am reasonably satisfied with the fit in this area. Since the
entire cowl area is hollow cast, I knew it wasn’t going to be a perfect fit
with all those curves. I have yet to find any kind of resin conversion, or resin
kit for that matter, that didn’t need a little work in areas to make it fit. I
have placed the kit engine in the cowling to check for size. It fits pretty
well, the set being designed for it, but it might require the mount to be moved
slightly to the left as it looks a little off center to me. I will replace the
kit engine front later with one cut from an Engine & Things or Hi-Tech late
R2800 engine.
The
new front fuselage and cowl area will be the most work. As you can see, I have
already cut off the areas required on the Tamiya kit, and have dry-fitted
everything together with tape. The new cowl section is made up of 4 parts,
consisting of the new front fuselage piece, a new cowl with very thin cowl
flaps, a bulkhead with exhaust piping detail, and a new nose. I have already
attached the new nose to the cowl, fit here is good. The front fuselage section
where it connects to the Tamiya fuselage is not too bad, but there are some
small steps and gaps that need to be fine-tuned or filled. I had to do some
heating and bending already and I will need to do some more. I will also
probably add a little styrene shim at the point where the attachment angles
back. Still, I am reasonably satisfied with the fit in this area. Since the
entire cowl area is hollow cast, I knew it wasn’t going to be a perfect fit
with all those curves. I have yet to find any kind of resin conversion, or resin
kit for that matter, that didn’t need a little work in areas to make it fit. I
have placed the kit engine in the cowling to check for size. It fits pretty
well, the set being designed for it, but it might require the mount to be moved
slightly to the left as it looks a little off center to me. I will replace the
kit engine front later with one cut from an Engine & Things or Hi-Tech late
R2800 engine.
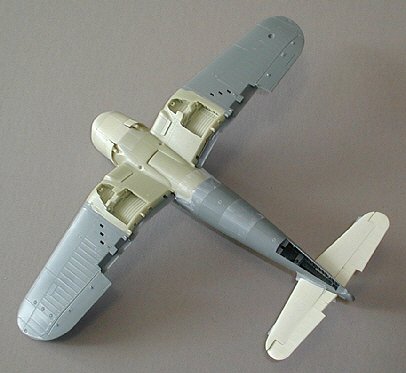 I also
have shaved off the interior Tamiya cockpit sidewall detail and have dry fitted
the cockpit. Here, the fit is perfect and no extra work should be required. The
cockpit looks well detailed, the only inaccuracies being the consoles which
extend all the way to the front wall of the cockpit and the rudder pedals are
only provided as relief on the front wall. In all fairness, I don’t think it
will really be visible looking into the small cockpit once completed. The
instrument panel is also a little flat, being photo-etch + film, and may need
some styrene rod bits to give it a little more relief.
I also
have shaved off the interior Tamiya cockpit sidewall detail and have dry fitted
the cockpit. Here, the fit is perfect and no extra work should be required. The
cockpit looks well detailed, the only inaccuracies being the consoles which
extend all the way to the front wall of the cockpit and the rudder pedals are
only provided as relief on the front wall. In all fairness, I don’t think it
will really be visible looking into the small cockpit once completed. The
instrument panel is also a little flat, being photo-etch + film, and may need
some styrene rod bits to give it a little more relief.
The set also provides new tail control surfaces. They look very nice, although the elevators have a slight warp to them and will need to be heated and bent gently back into shape, I really don’t see too many problems. Fit here to the fuselage is very good. I have not cut off the kit’s rudder yet, that is really an option left to the modeler as the Tamiya rudder looks really nice.
|
CONCLUSIONS |
 In
conclusion, I think this model will come out very nice. The CMK set does a very
good job of matching Tamiya’s petite detail and engraving. Much of the
detailing, like the wheel well and cockpit detail is really delicate and fine. I
definitely would rather see Tamiya do a complete –4 as fitting the resin parts
will take a lot more work, but you can get there. My two biggest complaints are
the lack of the proper engine front and cost. To do such nice detail work and
miss a major recognition point of an F4u-4 is a big goof. Also, at $25 +or-(not
including postage from NKR Models) and adding the near $20 for the Tamiya kit,
plus a new engine front, makes for an expensive F4u-4. Yet, for those wanting
more than what the Hasegawa kit offers and willing to put up the dollars and the
effort, the CMK conversion with the Tamiya kit should provide for a very nice
model.
In
conclusion, I think this model will come out very nice. The CMK set does a very
good job of matching Tamiya’s petite detail and engraving. Much of the
detailing, like the wheel well and cockpit detail is really delicate and fine. I
definitely would rather see Tamiya do a complete –4 as fitting the resin parts
will take a lot more work, but you can get there. My two biggest complaints are
the lack of the proper engine front and cost. To do such nice detail work and
miss a major recognition point of an F4u-4 is a big goof. Also, at $25 +or-(not
including postage from NKR Models) and adding the near $20 for the Tamiya kit,
plus a new engine front, makes for an expensive F4u-4. Yet, for those wanting
more than what the Hasegawa kit offers and willing to put up the dollars and the
effort, the CMK conversion with the Tamiya kit should provide for a very nice
model.
Review sample courtesy of the reviewer’s wallet!
If you would like your product reviewed fairly and quickly by a site that has over 1,500 visits a day, please contact me or see other details in the Note to Contributors.