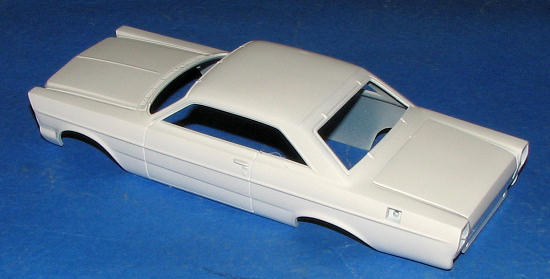
Today's edition is going to concentrate on a subject that many of us have found to be a fun aspect of this hobby and that is repainting cars. Often times, we want something just a bit different from the other guy or from what we can get from the manufacturer. This requires stripping the paint from the car and sometimes from the interior to make a more detailed replica.
Fortunately, there are a few places that produce aftermarket decals for various cars. Most of these entrepreneurs do their printing with an ALPS printer. There are pluses and minuses to this form of decal. The plus is that there are additional markings available that we'd not otherwise have. The minus is that the level of detail and clarity is not always up to the level of the standard decal. Another problem is that some manufacturers simply copy and resize markings that were for other kits. The results of this are that the markings do not fit the slot cars onto which you will be placing them. Pattos in Australia is one who does this as none of the markings I've bought from him that require fitting to a body will actually fit. His markings are also not very clear and one set I used had some sort of contaminant in the clear paper that made the clear surrounds to the markings look dirty.
When Monogram recently brought out its 1965 and 1963 Ford Galaxie, I had the opportunity to get some markings for them from a couple of sources, both in the UK as it seems that for 1/32 cars, there is extremely little to be had in the US.
But now, onto the steps required for a repaint.
 Step
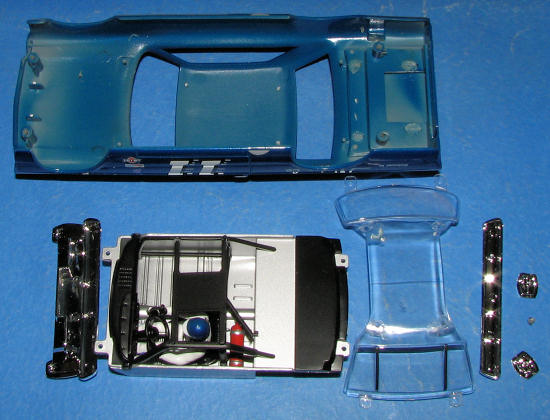
#1 in the job is to remove all the bits that can be removed. Slot cars are, for
the most part, kits where various pieces are attached to a one-piece body. At
the factory in China where almost all cars are made, these pieces are melted
into place. By this, I mean that the piece is attached and from the back, the
stub is melted. It is quick, it ensures that the part will stay on, and it works
well. This means, however, that one has to chip away the melted part and push
out the piece. It also means that it has to be glued back on as there will no
longer be a stub to melt down. Some parts are easy to remove and others more
difficult. (Thank you, Mr. Obvious)
Step
#1 in the job is to remove all the bits that can be removed. Slot cars are, for
the most part, kits where various pieces are attached to a one-piece body. At
the factory in China where almost all cars are made, these pieces are melted
into place. By this, I mean that the piece is attached and from the back, the
stub is melted. It is quick, it ensures that the part will stay on, and it works
well. This means, however, that one has to chip away the melted part and push
out the piece. It also means that it has to be glued back on as there will no
longer be a stub to melt down. Some parts are easy to remove and others more
difficult. (Thank you, Mr. Obvious)
 For
the first two repaints, I used Easy Lift Off as for some reason, Strip A Kit
would not work. ELO is a real mess as it basically melts off the paint. You have
to use gloves and several applications. Gloves are needed or you will get paint
on your hands and have to scrub it off as it is quite tenacious. It took me
several days to strip the bodies of the 1965 Fords used for the first job.
Eventually, I was rewarded with a somewhat grey body. The ELO does leave
blemishes in the plastic for some reason. When I did the 1963 Ford that was
originally purple, I soaked it in a beaker filled with 91% Rubbing Alcohol.
Overnight it removed both paint and decals. No muss, no fuss. This only worked
on the Monogram cars. Other brands seemed to be impervious to the alcohol unless
there were decals, which the alcohol removed.
For
the first two repaints, I used Easy Lift Off as for some reason, Strip A Kit
would not work. ELO is a real mess as it basically melts off the paint. You have
to use gloves and several applications. Gloves are needed or you will get paint
on your hands and have to scrub it off as it is quite tenacious. It took me
several days to strip the bodies of the 1965 Fords used for the first job.
Eventually, I was rewarded with a somewhat grey body. The ELO does leave
blemishes in the plastic for some reason. When I did the 1963 Ford that was
originally purple, I soaked it in a beaker filled with 91% Rubbing Alcohol.
Overnight it removed both paint and decals. No muss, no fuss. This only worked
on the Monogram cars. Other brands seemed to be impervious to the alcohol unless
there were decals, which the alcohol removed.
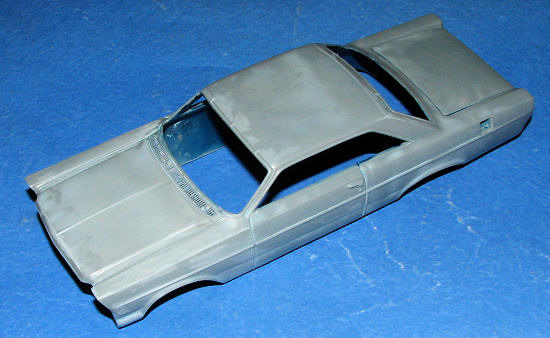
So we now have an unpainted body. Next job is to give it a coat of primer. This shows up the mold seams and those can then be tackled if you wish. Almost all of the slot cars you buy have these pesky things. Some are near invisible, while some are quite obvious. Unless the car is to be repainted, we leave them as is, for trying to clean them up will damage the paint.
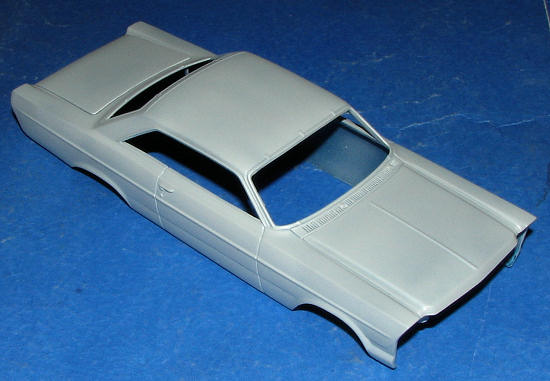 For
primers, I use just about anything that is matte enamel that I have laying
about. For the 65 Ford shown in this article, it was RLM 76. As the interior
color on this car was fine, that was not disassembled, but to do the #29 Ford
you see in the opening image, I had to repaint the red interior in a grey.
Taking apart the interior is no more difficult than removing body bits.
For
primers, I use just about anything that is matte enamel that I have laying
about. For the 65 Ford shown in this article, it was RLM 76. As the interior
color on this car was fine, that was not disassembled, but to do the #29 Ford
you see in the opening image, I had to repaint the red interior in a grey.
Taking apart the interior is no more difficult than removing body bits.
 I
had decided to do Fred Lorenzen's #28 (a few weeks after doing this car I found
out that this is part of next year's releases, but at least I have one now). DMC
decals in the UK does these markings as their lone 65 Ford offering and these
are standard water slide markings. For this, I painted the car body in white and
gave it a couple of gloss coats. The wheels, backlight, as well as the headlight
and tail light openings and the fuel filler opening were painted a light blue to
match the light blue on the markings.
I
had decided to do Fred Lorenzen's #28 (a few weeks after doing this car I found
out that this is part of next year's releases, but at least I have one now). DMC
decals in the UK does these markings as their lone 65 Ford offering and these
are standard water slide markings. For this, I painted the car body in white and
gave it a couple of gloss coats. The wheels, backlight, as well as the headlight
and tail light openings and the fuel filler opening were painted a light blue to
match the light blue on the markings.
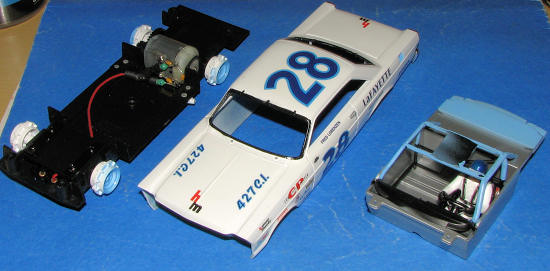 I
made a mask out of a piece of sheet plastic to protect the slot car chassis from
overspray while doing the wheels on this and the other two stock cars I've
redone. Works quite well.
I
made a mask out of a piece of sheet plastic to protect the slot car chassis from
overspray while doing the wheels on this and the other two stock cars I've
redone. Works quite well.
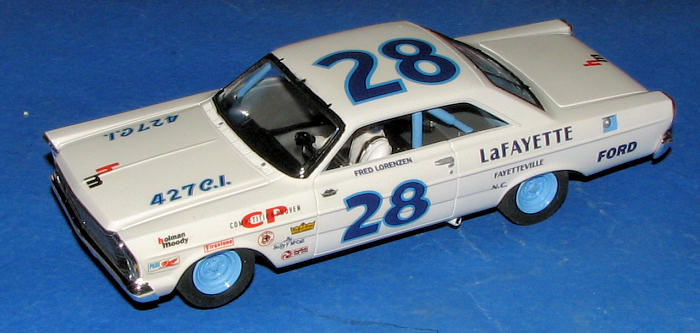 Application
of decals was pretty straight forward as DMC offers a photo of the restored car
as a guide. The markings aft of the door are all too small when compared to
photos. The body was then given several coats of Future to protect it from the
inevitable crashes and rolls that are standard when one is playing with slot
cars.
Application
of decals was pretty straight forward as DMC offers a photo of the restored car
as a guide. The markings aft of the door are all too small when compared to
photos. The body was then given several coats of Future to protect it from the
inevitable crashes and rolls that are standard when one is playing with slot
cars.
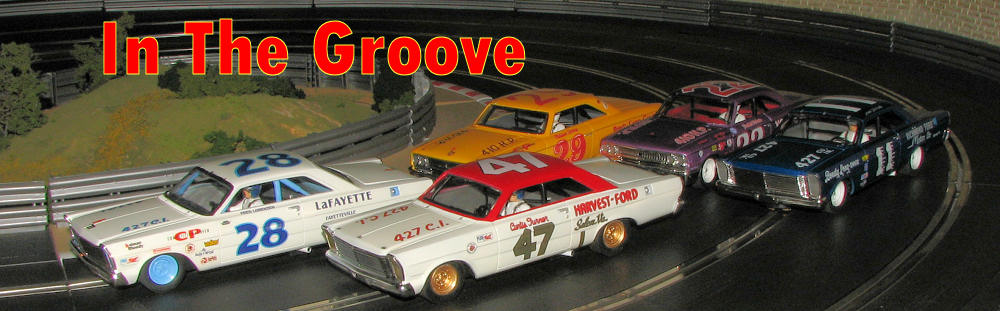
In all, this is an interesting part of the hobby. It is one that I particularly enjoy as it combines scale modeling with slot cars. In effect, you get to have your model building experience and play with it later! So far, only two cars in this series have been released, the dark blue #11 1965 Ford, and the purple #22. You can see the three redone cars and the two originals in the opening image. The other two repaints were using Darkside decals. These are also ALPS printed, but to a higher quality, and they are from the UK so not inexpensive.
Well, that is about it for this session. I hope you learned a bit and if you have any questions or wish to share your experiences or images of your track, I'd like to hear from you on the subject so please e-mail me at mmreaders@aol.com.
Scott