 This particular image was 850 x
1750 pixels, but has been reduced for the purpose of this article.
This particular image was 850 x
1750 pixels, but has been reduced for the purpose of this article. How to make your own decals
From time to time, folks ask me how to make decals. While I tell them it is simple and give general info, the truth is that if you've not done something, then it is not simple.
So here goes.
First thing is that you will be making mistakes, both when learning and later when doing projects. It just happens and so one has to be prepared for that. But not trying gets nothing done so better to experiment and get what you want than to do without.
Second is that you'll need some sort of master from which to make your decal. If you have talent and can draw in a computer program, then you will be doing great. The rest of us have to find the image we need from somewhere. That may include books, other decal sheets, or on-line images. For the purpose of this short article, I've used an on-line image. I enjoy putting cartoon warrior women on the hoods of my slot cars, so have found several image galleries that include such things. I also try to find the largest and crispest image I can to start out with.
GETTING STARTED
This particular image was 850 x
1750 pixels, but has been reduced for the purpose of this article.
Now that I have an image, I need a way to print it. For that, I use a standard inkjet printer that is able to print photo quality images. This is important as you need good ink saturation when doing a decal. There are many brands out there and they are not expensive. I have an older HP Deskjet 6940 that I use. It has a photo quality setting.
PAPER
Next, you need paper. There are many brands and all seem to work well. The paper needs to be relatively fresh as older paper can be a problem. I get mine from the local hobby shop and use Bare Metal Foil brand that comes in standard 8.5 x 11 inch paper, though there are others. I get both white and clear paper in three packs as that seems to be the most cost effective.
LIMITATIONS ON PRINTING COLORS
An important thing to know is that unless you have an ALPS type printer that uses wax cartridges, an inkjet or laser printer will not print white. Other colors such as yellow and red will be near transparent. One has to realize that when printing photos, they will be on white paper. Now if your application background is white, then no worries. If you are just printing letters and numbers, then using a dark color, like black, for instance, you can put that on backgrounds such as red or light blue or others.
However, if putting decals on an intense background or one where the background color is dark. You have to use a white background paper.
USING WHITE PAPER
This brings with it some other problems. One is that even white backing paper is semi-transparent. That can be overcome by layering several decals. On some applications, this may mean three layers. This also brings into focus the problem of all that white around your decal. If it is a geometric marking, such as a roundel, you can carefully trim around each marking. If it is against a more intense colored background, here is something I do and it takes a bit of work.
 MATCHING BACKGROUNDS
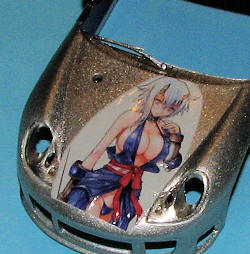
T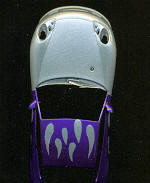 his has some success as one
never really seems to be able to get an exact match, but first, I place the
model on my scanner and scan the area where the decal will go. In this case, it
is a metalflake silver. Not an easy color to match to be sure, but you can get
close. Then, going into my imaging program, I then use the 'flood' tool and
replace the white parts of the image with the new color. There is a 'replace'
option that works for some, but since the image has white for highlights, using
this will not work. As you can see from the new image, the background is a very
light bluish grey, yet the highlights are still white. You can also see that I
cropped some of the original image as I wanted it to fill more of the available
space.
his has some success as one
never really seems to be able to get an exact match, but first, I place the
model on my scanner and scan the area where the decal will go. In this case, it
is a metalflake silver. Not an easy color to match to be sure, but you can get
close. Then, going into my imaging program, I then use the 'flood' tool and
replace the white parts of the image with the new color. There is a 'replace'
option that works for some, but since the image has white for highlights, using
this will not work. As you can see from the new image, the background is a very
light bluish grey, yet the highlights are still white. You can also see that I
cropped some of the original image as I wanted it to fill more of the available
space.
GETTING READY TO PRINT
The next thing I do, is to estimate how large the image needs to be for a
particular application. For this one, I initially e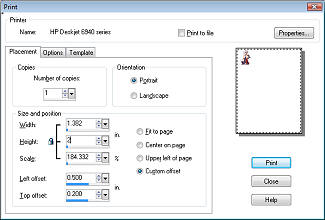 stimated
about 2 inches in height. Opening up the print window, I was able to custom size
the image to that height. Now the original was still huge, but the printer
software allows for these adjustments. Thanks to keeping the main image large, I
was able to reduce pixillation to a minimum. Then I did a test print on some
scrap sheets. I always keep paper with a clean side or a large clean area just
for this.
stimated
about 2 inches in height. Opening up the print window, I was able to custom size
the image to that height. Now the original was still huge, but the printer
software allows for these adjustments. Thanks to keeping the main image large, I
was able to reduce pixillation to a minimum. Then I did a test print on some
scrap sheets. I always keep paper with a clean side or a large clean area just
for this.
If you look in the lower left side of the print menu shown at the left, you can see where I am able to put in the height of the image and how large the image will be on the paper. Now I print that at regular settings to see if the image will be the right size.
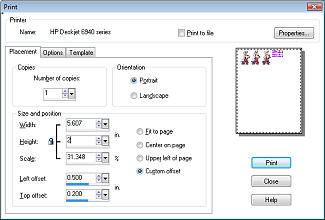
In this case, it seemed to be so opening a new window in my imaging software (I use Paint Shop Pro 10) I make a new image area that will fit four of the images side by side. I then copy and past three images into the window and use the remaining area to print letters/numbers.
This image to the right is actually 3600 pixels a cross.
I print multiples of what I need as if I don't, I'll screw something up. I then
set up my printer to print photo quality and ensure that the paper is listed as
the proper size (or close to it as long as the width is the same), and that it
is portrait alignment.
cross.
I print multiples of what I need as if I don't, I'll screw something up. I then
set up my printer to print photo quality and ensure that the paper is listed as
the proper size (or close to it as long as the width is the same), and that it
is portrait alignment.
 As you can see, there is still
some white left to the right and I basically leave that alone. I chose to print
these images on clear paper first in the hopes that the resulting decal would be
color saturated enough. Once the decals were printed, I leave them to dry for
about an hour. Then, using Testors Metallizer Sealer (which is a lacquer that
dries very thin and very quickly), I spray on several light coats, one right
after another. The decals are then left to dry for about another hour.
As you can see, there is still
some white left to the right and I basically leave that alone. I chose to print
these images on clear paper first in the hopes that the resulting decal would be
color saturated enough. Once the decals were printed, I leave them to dry for
about an hour. Then, using Testors Metallizer Sealer (which is a lacquer that
dries very thin and very quickly), I spray on several light coats, one right
after another. The decals are then left to dry for about another hour.
Now you can use other things to seal in the decals, but you do have to apply it in thin coats as pooling will cause the inks to run. NEVER brush on a clear coat as that is guaranteed to make a mess. This is something you just have to experiment with. I also only spray over the decal area. If there is no decal, I don't clear coat it as that will make the paper so coated unable to hold ink and so useless.
APPLYING THE MARKING
Once it is dry, I cut out the decal and then dip it in water. As this is clear paper, I don't sweat cutting it real close as it won't be needed. Once I slid it off the backing paper, it was obvious that there were two problems. One is that it wasn't dense enough ink and the other was that it was too tall.
 BACK TO THE PRINT
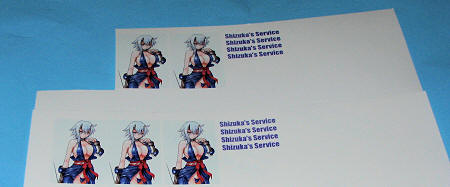
So, moving to white paper, I reduced the height of the image to 1.8 inches. Now I kept the clear sheet as I could still use the letter portion of it (you'll notice I did several of that as well). I then reprinted the decals using the new setting on white paper. In case it isn't apparent, I save all of the variations of the original image as a new file with a new letter or number after the file name in case I need to use it again. It is just the wise thing to do. I now have the second, smaller set of decals on white paper. In this image, the older set with the experimental marking gone is the clear paper and the slightly smaller new set on the bottom is the white paper.
 The usual sealing with Metallizer
Sealer has been done and I'm ready to cut out the test marking. This is done
leaving a bit around the main figure and then slid onto the model.
Unfortunately, I totally missed on the background color, but all is not lost as
it matches a bunch of other cars so decorated with light surrounds to the
figure. Once in place, a coat of Microsol (red bottle) is applied and the
marking is left to dry. Thanks to the light background, one decal seems to be
dense enough. Not knowing how well the first marking will cover is another
reason to do multiples.
The usual sealing with Metallizer
Sealer has been done and I'm ready to cut out the test marking. This is done
leaving a bit around the main figure and then slid onto the model.
Unfortunately, I totally missed on the background color, but all is not lost as
it matches a bunch of other cars so decorated with light surrounds to the
figure. Once in place, a coat of Microsol (red bottle) is applied and the
marking is left to dry. Thanks to the light background, one decal seems to be
dense enough. Not knowing how well the first marking will cover is another
reason to do multiples.
Meanwhile, the names on the clear were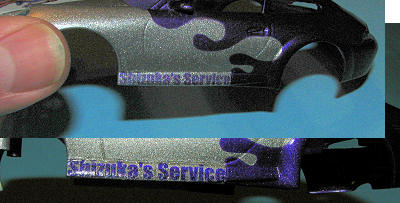 cut and placed on the car. As expected, these were pretty translucent so a
second decal was very much needed. I'm not sure how well this comes across in
the photo to the right as using flash sometimes makes things like this darker.
But I found that stacking two of these decals really helped. The single layer is
the top image while the double is the lower section. Back at the front, I
trimmed the portion of the hood decal that went below the front hood hinge line.
The sealer really makes these decals tough and you need to use a brand new
scalpel blade to cut through things. I use a curved blade and rock it back and
forth in the seam to cut the decal.
cut and placed on the car. As expected, these were pretty translucent so a
second decal was very much needed. I'm not sure how well this comes across in
the photo to the right as using flash sometimes makes things like this darker.
But I found that stacking two of these decals really helped. The single layer is
the top image while the double is the lower section. Back at the front, I
trimmed the portion of the hood decal that went below the front hood hinge line.
The sealer really makes these decals tough and you need to use a brand new
scalpel blade to cut through things. I use a curved blade and rock it back and
forth in the seam to cut the decal.
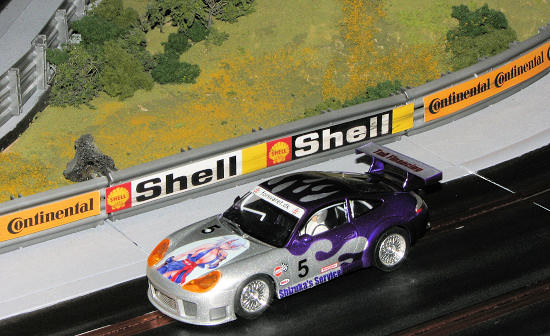 Once the
markings were put on the car, the body was then sealed with Testors one-coat
gloss clear. This is very tough lacquer and will withstand the inevitable
crashes and roll-overs that a slot car will go through. Like the rest of the
line, it is dry to the touch in under a half hour, but I like to give it at
least 12 hours to harden . Once that was done, the rest of the car was assembled
and it was ready for the track.
Once the
markings were put on the car, the body was then sealed with Testors one-coat
gloss clear. This is very tough lacquer and will withstand the inevitable
crashes and roll-overs that a slot car will go through. Like the rest of the
line, it is dry to the touch in under a half hour, but I like to give it at
least 12 hours to harden . Once that was done, the rest of the car was assembled
and it was ready for the track.
Now I know that it would have been great if the background matched, but I've come to find out that unless you are trying to duplicate a solid color, you'll fail as metal-flake and pearls are actually somewhat multi-hued. Regardless, the procedure is the same for all home made decals.
You probably have all the hardware needed and only require the paper and the will.
