| KIT #: | 72206 |
| PRICE: | $22.98 SRP |
| DECALS: | Four options |
| REVIEWER: | Scott Van Aken |
| NOTES: | New tool kit |
| HISTORY |
The Temco Model 51 had been initially proposed to the US Air Force in response to an Air Force competition for a jet-powered primary trainer, which was won by the Cessna T-37 Tweet. The concept behind the Model 51 was an attempt to provide primary training in a jet-powered aircraft. The official name for the Model 51 was the Pinto.
The Pinto was a mid-wing, tricycle landing gear trainer with an enclosed cockpit powered by a single Continental Motors J69-T-9 (license-built Turbomeca Marboré) jet engine. The aircraft carried no armament.
 The TT-1s were equipped with many of the same
features found in operational jets, including ejection seats, liquid
oxygen equipment, speed brakes, along with typical flight controls and
instrument panels. Although the flight characteristics were considered
good, the "wave off" capability was rated marginal due to being slightly
underpowered.
The TT-1s were equipped with many of the same
features found in operational jets, including ejection seats, liquid
oxygen equipment, speed brakes, along with typical flight controls and
instrument panels. Although the flight characteristics were considered
good, the "wave off" capability was rated marginal due to being slightly
underpowered.
After its first flight in 1956, the prototype was sent to the Naval Air Test Center (NATC) Patuxent River to be evaluated alongside the Beech Model 73 Jet Mentor. Fourteen of the aircraft, designated TT-1, were produced between 1955 and 1957.
In 1959, these aircraft served in the Air Training Command at Pensacola, Florida and used in a training program demonstration testing the feasibility of using a jet-powered trainer for primary flight training.
In March 1959, Aviation Cadet E. R. Clark soloed in a TT-1, the first student in Naval Aviation history to solo a jet without previous experience in propeller aircraft. By the end of 1960, TT-1s were phased out of operations in the naval training command and sold as surplus.
| THE KIT |
It
is nice that Special Hobby decided to kit this aircraft. While not all that
well known, it has not been well served by kit makers, the only other
injected plastic kit being done by Aurora way back in the 1960s. It is
obvious when looking at the two injected sprues that this is going to be
used for another version as there are several parts not applicable to this
boxing. Indeed, a civil super Pinto is boxed that will use the tip tanks,
weapons pylon and different intake to name a couple of things.
Molding is pretty good though detail is a bit soft, as is the norm for low
pressure moldings like this. There are ejector towers in most of the lar ge
parts, but removal will be pretty easy. One will also have to clean up all
the parts as the mold seams are rather pronounced. There are two separate
cockpit moldings for this and both are identical. The seats are rather
generic and could use some belts and harnesses to spice them up. Though I am
sure one will not be done, it could use an aftermarket cockpit and a lot
will be visible under the one-piece, and very clear canopy.
ge
parts, but removal will be pretty easy. One will also have to clean up all
the parts as the mold seams are rather pronounced. There are two separate
cockpit moldings for this and both are identical. The seats are rather
generic and could use some belts and harnesses to spice them up. Though I am
sure one will not be done, it could use an aftermarket cockpit and a lot
will be visible under the one-piece, and very clear canopy.
The other clear bit is a nose cap that could benefit from an MV Products
lens as there will be nothing behind it but the nose gear well. Speaking of
the nose gear, this is the lone option in the kit as one of them has some
sort of protective fence around it. Both of the nose gear options have the
wheel incorporated with the gear leg.
Instructions
are well done, as usual with Special Hobby/MPM/Azur, and offer color
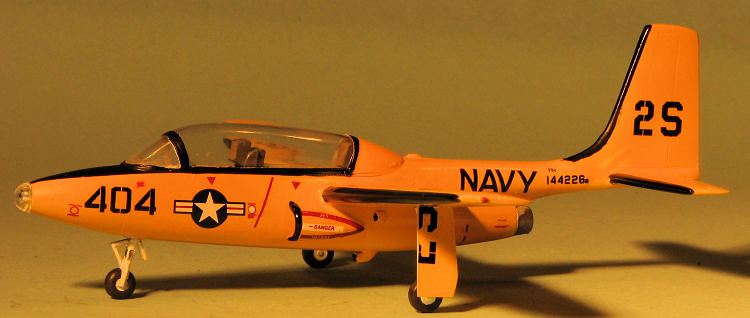
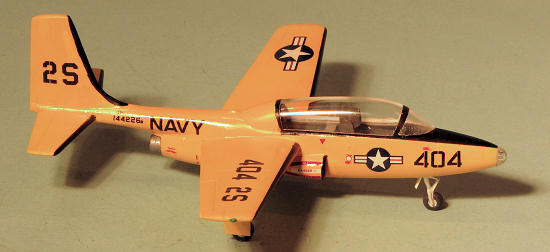
information using Gunze paints. There are four markings options, all of them
in Trainer Yellow with Black anti-glare nose panels. A full color painting
and markings guide is on the back of the box with four options. One is the
box art plane with NATC in Flight Test or Service Test markings from 1958.
Next is the first of the fourteen production aircraft with just base
markings from 1957. The third option is one of the service aircraft based at
Saufley Field in 1960. The final option is another NATC plane from March
1958. This is the scheme with which one would use the optional nose gear.
Decals are superbly printed by Aviprint and should work very well.
| CONSTRUCTION |
No real subassemblies on this one aside from the wings, so I started by building up the two cockpits. Not sure why these are separate unless the COIN version is going to be done, but it does not make things easier. The two tubs have different front and rear sections with the forward tub having a little tab on its front piece that is where the nose gear attaches. Be sure this is on very strong and also drill out the mounting hole for the nose gear (there isn't even a depression, but drill the hole in the middle. I did not and when it came time to install the nose gear I had major problems.
 When the two tubs were complete, they were glued into
the fuselage and some weight stuck in the nose to ensure it would not tail sit.
Then the halves were glued together. Fit is only fair. I then assembled the two
wing halves for either side. Be sure to remove every hint of sprue attachment on
the mating surfaces or the parts will not fit well. While doing this, be sure
not to take off too much or, like me, you will get some long gaps that need
filled. The wings and tail planes were then glued into the slots in the fuselage
once the mating holes were opened up a bit. The flat tail plane inner surface
does not conform to the very curved aft fuselage so filler is a given. One other
thing; be sure to drill out the mounting hole for the intakes before attaching
the wings as it will be a bit difficult to do later.
When the two tubs were complete, they were glued into
the fuselage and some weight stuck in the nose to ensure it would not tail sit.
Then the halves were glued together. Fit is only fair. I then assembled the two
wing halves for either side. Be sure to remove every hint of sprue attachment on
the mating surfaces or the parts will not fit well. While doing this, be sure
not to take off too much or, like me, you will get some long gaps that need
filled. The wings and tail planes were then glued into the slots in the fuselage
once the mating holes were opened up a bit. The flat tail plane inner surface
does not conform to the very curved aft fuselage so filler is a given. One other
thing; be sure to drill out the mounting hole for the intakes before attaching
the wings as it will be a bit difficult to do later.
The engine inlets need to have the mounting hole enlarged and deepened which is why I mentioned doing it before attaching the wings. There is no actual alignment marking for getting these on straight so you will need to eyeball it. Do not forget to install the small scoop on the underside of the fuselage. The main nose gear door is to be glued shut. It is a tad smaller than the opening, but having the open nose where the landing light will go, does help to get it properly in place while the cement sets. While I was waiting for glue to dry, I cemented the small 'pip' on the inside of the exhaust piece.
I then glued on the canopy. This turned out to be a bit oversize for the area it has to fit so you will find parts of it hanging over the edge by about 1/64 inch or so. This was then masked and the kit was prepared to paint.
| COLORS & MARKINGS |
You would think that overall Insignia Yellow would be
pretty easy. Perhaps. I first painted it white as yellow needs a white
background. Then I sprayed on the Insignia Yellow, using Model Master enamels.
Well, for whatever reason, the white did not stick well to the plastic and I had
many issues of the paint pulling away when the masking that was required for the
black leading 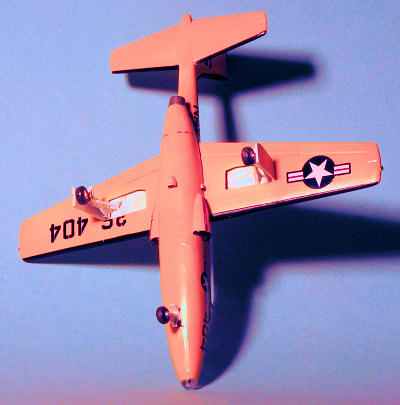 edges was removed. It meant a lot of touch up and it seemed every
time I did this I only made things worse. After several days of frustration, I
tossed in the towel and accepted what it had become. I should also mention that
masking the leading edge of the fin was a pain as there are no guide lines (or
the ones there are so faint as to be useless).
edges was removed. It meant a lot of touch up and it seemed every
time I did this I only made things worse. After several days of frustration, I
tossed in the towel and accepted what it had become. I should also mention that
masking the leading edge of the fin was a pain as there are no guide lines (or
the ones there are so faint as to be useless).
With the yellow painted and the black done, I went to put the kit on its gear. The nose gear fits into the small opening onto a tab that was glued to the forward cockpit section. When drilling a hole in this tab (there is none if you recall), the tab broke away. Well, now I was scrooched. With nothing there where I could attach the nose gear, I ended up taking scrap plastic card and making a box into which the nose gear was placed. This was then sanded down to fit into the hole where the nose gear goes. It isn't pretty, but it worked. The main gear also have no pin on them to fit into the wing spots. Not an issue as the hole to receive these non-existent pins was filled in. These are a very tight fit and so it was not an issue to get them to fit. Once put on its gear, I found I had, indeed, put in sufficient nose weight.
The gear and wells were brush painted white with the miniscule main wheels then attached. These happen to be a real pain to clean up because they are so small and the attachment points so large.
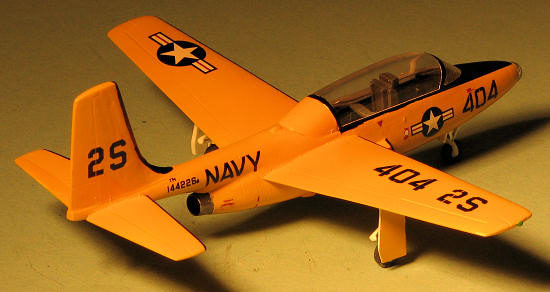
I then gloss coated the kit and applied the decals. I chose the markings of the operational aircraft. The decals are thin to the point of making them a real pain to install. Be sure to gently slide the marking from the paper onto a slick surface. I found adding the aft fuselage markings to be particularly difficult as the area there is so small. In fact I totally hosed the serial decals and had to use one of the other sets. The markings that fit over the gear door need to be cut by the modeler prior to use. Fortunately, it is a pretty straight forward process.
| FINAL CONSTRUCTION |
With the decals in place, I gave the kit another coat
of clear to make sure they stayed there and removed the masking. Much to my
 lack
of delight, I got some overspray onto the inside of the forward canopy. I then
did some touch up painting, glued on the main gear doors and also glued on the
clear nose light. This piece was also difficult to clean up prior to
installation. The last piece was the exhaust. This is a tad smaller than the
rear opening.
lack
of delight, I got some overspray onto the inside of the forward canopy. I then
did some touch up painting, glued on the main gear doors and also glued on the
clear nose light. This piece was also difficult to clean up prior to
installation. The last piece was the exhaust. This is a tad smaller than the
rear opening.
| CONCLUSIONS |
Typical of many short run kits, the low parts count does not mean a quick build. At least not for me. This one took considerably longer than I had originally anticipated, much due to the screwups when painting and due to the decals. However, now that it is done, I am glad I built it. I have always liked the TT-1 and now have one in my collection.
| REFERENCES |
http://en.wikipedia.org/wiki/Temco_TT_Pinto
November 2012
Copyright ModelingMadness.com. All rights reserved. No reproduction in any form without express permission from the editor.
If you would like your product reviewed fairly and quickly, please contact the editor or see other details in the Note to Contributors.