
Roden 1/48 AU-23A Peacemaker
| KIT #: | 439 |
| PRICE: | $49.95 MSRP |
| DECALS: | Three options |
| REVIEWER: | Scott Van Aken |
| NOTES: | New mold kit |
| HISTORY |
The first prototype of the Pilatus PC-6 made its maiden flight on 4 May 1959 powered by a 254 kW (340-shp) piston engine. The first Turbo Porter, powered by a turboprop, flew in 1961. The Turbo Porter received an engine upgrade in 1963, which increased its power to its present value of 410 kW (550-shp).
 In the United States, the Porter was manufactured under license by Fairchild Hiller. In service with the U.S. Air Force, it received the designation AU-23A Peacemaker. In U.S. Army use, it was designated UV-20 Chiricahua.
The PC-6 is noted for its Short Take-off and Landing (STOL) performance on almost any type of terrain - it can take-off within a distance of 195 metres (640 ft) and land within a distance of 130 metres (427 ft) while carrying a payload of 1,500 kg (3,300 lb) (The length of a soccer field is enough, Pilatus test pilots were able to land on not much more than 50 metres (164 ft) of space). Thanks to its STOL performance, the PC-6 holds the world record for highest landing by a fixed wing aircraft, at 5,750 metres (18,865 ft), on the Dhaulagiri glacier in Nepal.
| THE KIT |
Nice to see this aircraft kitted in this scale as the PC-6 and its multiple variants, have been widely used by both civilian and military services over the years. This is the first mainstream injected kit that I've seen for this aircraft. There have been short run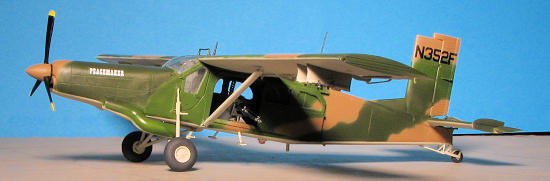 and resin kits in 1/72, but basically nothing in 1/48 at all. It is not surprising that Roden would choose the gunship variant as their first offering. Generally those variants that are perceived as 'least desirable' are chosen for the initial release of a kit that will undoubtedly be brought out in many different versions.
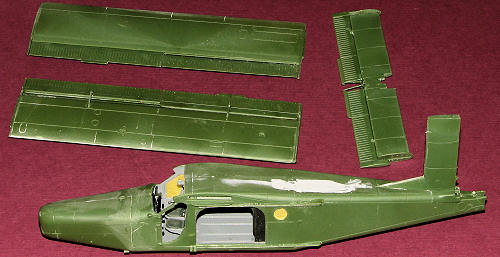
So let's take a look at the sprues. Molded in green plastic, there are nine total sprues, all of them with very nice surface detailing. Two of them are duplicated (the one with the weapons and the one with the wheels) and one is clear. I found some flash on parts as well as sink areas on the ones that are really thick. A few were also suffering from mold misalignment (notably the control sticks), and anything of any size had ejector pin marks or towers on one side. This means that a few parts (like the doors) will need some additional attention.
The cockpit and cabin areas are nicely detailed with the cockpit being well appointed with four-piece seats, control sticks, rudder pedals and so on. The cabin has a three barrel mini-gun that itself is a small kit. Though there is a door for the gun side, that 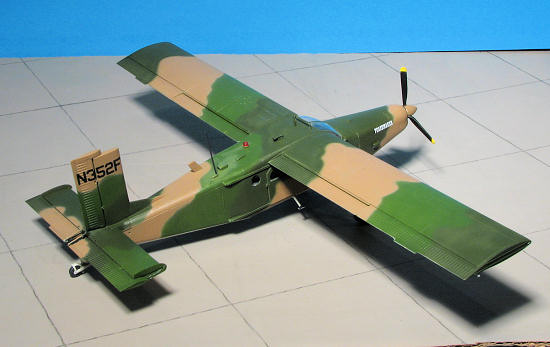 would normally be removed or slid back aft. Separate door rails are provided as apparently the other versions to be kitted will not have this feature. There are separate elevators, ailerons and flaps. However, these are to be constructed in the neutral position otherwise the various actuating rods won't fit. There is a separate lower fuselage section on which the landing gear will be attached. Not sure why this wasn't part of the fuselage halves, but there you have it. Of course, the engine assembly is separate to the rest of the airframe and is to be attacked near the end of construction. For weapons there is a pair of rocket pods and a dispenser of some sort.
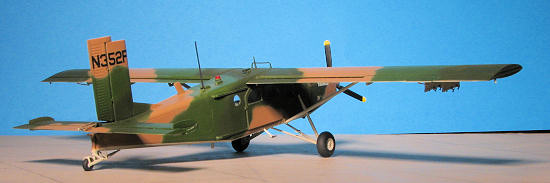
Instructions are well done with color references in FS 595, Testors Acrylic and Testors Model Master references. The instructions also have two diagrams to show where to drill various holes for the antennas and such. None of these holes are started so the measurements are quite exact as to placement. Markings are provided for three planes. One is a USAF version in overall Olive Drab as shown on the cover. The other two are Thai planes in the standard SEA camouflage. One is the initial plane with US civil registration and the other is complete with a neat looking shark mouth. The decals are fairly well printed, though the Thai insignia is a bit off-register. Roden decals have not been very good on older kits, so it is unknown if these will be any better or not. One could hope so as there aren't any aftermarket options.
| CONSTRUCTION |
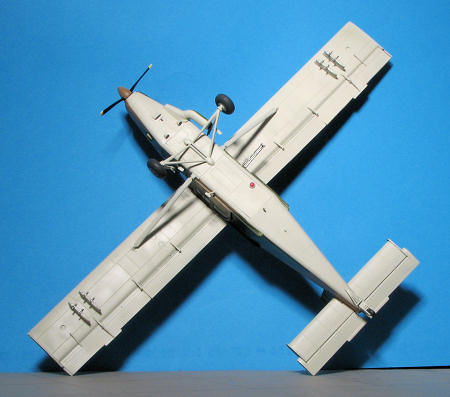
I figured I'd build this one just like most kits and start with sub-assemblies. This meant gluing the wings together as well as the horizontal stab halves and as much of the interior that would be painted in Dark Gull Grey as I could. I also glued together the wheels and some other smaller two-part bits.
The seats in the cockpit are made up of four parts; a seat bottom, seat back and two very spindly and probably quite scale seat supports. These and other very fine parts proved to be most time consuming to remove from the sprues and clean up. Roden chose the thinnest section of the various parts in which to introduce the sprue gate. Thanks to the soft plastic and its tendency to break by thinking about it, this turned into quite a chore. Not only this particular assembly, but many of the others suffered because of the soft plastic and what seems to me to be poorly though out sprue gates. Building was also slowed as there was a lot more flash on parts than I'd have expected from a new mold.
 Eventually, I got the interior bits cemented onto the floor section. There is a decal for the instrument panel, but to get it to fit, you'll have to cut it into sections. Once in place, it looks just fine. I had decided to not install the gun bits in the back until after the fuselage halves were cemented in place. A bad move as it is somewhat difficult to get the very large ammo bin in place.
During this time, I worked on the wing. Thanks to a brain fart, I forgot to drill out the holes for the wing racks. The attachment of the flaps and ailerons was a bit fiddly due to the inexact placement of the parts and the need to attach the various hinges. Since one cannot pose these surfaces in anything but the neutral position, I'm wondering why more positive attachment points couldn't have been provided. It is the same for the horizontal stab and elevators. Th flimsy of a construct, though once all the bits are installed, it is more sturdy.
Back at the fuselage, I had to install the rear windows from the inside and used clear paint or standard cement for these. I also put the windows in the doors. The cockpit doors are separate, but designed to be installed closed. You'll have to cut the hinges from the doors to get them to fit and even then, the fit isn't very good until you cut and trim the areas on the door edges where the sprue attachment points invade the indented door frame. Assembly of the nose section was next and it wasn't anything major in terms of problems. I don't like that the design is such that you'll have a large and nearly impossible to fill seam where the engine intake is located. With the cowling together, it was cemented to the rest is is even moreof the fuselage and with the help of filler, faired into place. There are two exhaust scoops that I originally thought went on the upper cowling, but later realized it was the underside to which they fit. Super glue filler to take care of the upper surface holes and after sanding, the scoops were placed on the lower side. Be sure to leave room for the exhaust.
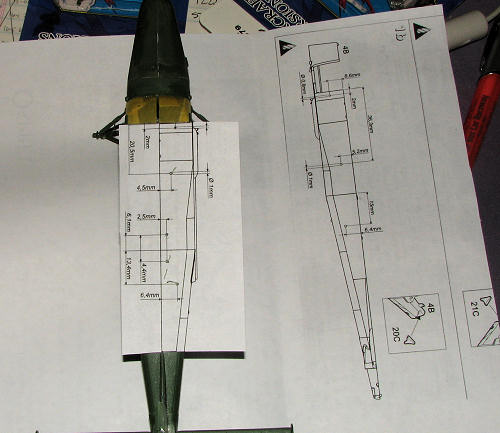 With the fuselage sort of complete, I attached the horizontal tail surfaces. There is trimming needed to get it to fit properly as the stub on the rear fuselage is too large in width and height. With that in place, I masked all the clear bits in preparation for painting. The next thing I did was to build up the landing gear. The tail gear wasn't a problem. The main gear is not the most positive fitting assembly, and it wasn't helped by the main gear legs being warped. Eventually, all was cemented in place and after it dried, it turned into a strong assembly. The windscreen was then attached. This required some careful trimming to get it to fit properly. It was also masked. Then, I drilled out the holes on the upper surface of the fuselage. There are no pre drilled holes for this, but Roden does give a diagram for drilling the holes. So many mm from the edge and so many mm up. That is too much work for me so I simply copied the diagram from the instructions and used it as a template. Worked perfectly. I also glued on most of the various antennas and the steps. Then the wing racks were glued into place. Simply removing the pins and sanding on the mating surface gave good results (if you recall, I forgot to drill these holes in the wing). Later, when test fitting, I found I'd glued these to the wrong end of the wing. After much muttering and grumbling, I simply snapped off the racks and hit the join areas with sandpaper until smooth. The racks were then glued on the outer wings as they should have in the first place.
| COLORS & MARKINGS |
At that point, I started painting. I painted the wings separately as I had to get to the fuselage under them and the join area is such that this would work out. Now the kit provides three options. I wanted to do one of the SEA camouflage versions, but knew that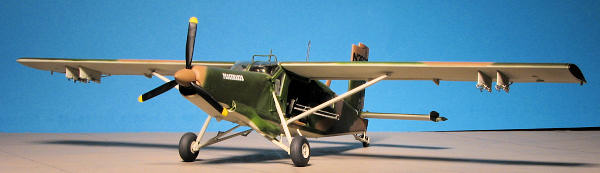 the Roden decals would not be the greatest. This led me away from the shark mouth version that ended up in service with Thailand and to the demonstrator. The demonstrator only has five decals and I figured I could get those to fit without silvering. I knew I'd never get the shark mouth to fit properly.
All of the colors used in painting are Testors Model Master enamels thinned with lacquer thinner. It took a while as there was the usual back and forth, but eventually, I got it all done. I did the underside first and then masked that off. I knew that the main gear struts would suffer from overspray, but thankfully, the paint turned out to be the same exact shade when I later brush painted them as it was when sprayed.
| FINAL CONSTRUCTION |
With the painting done, it was time to attach the ammo container and the gun mount. To say it was a pain getting the container in place is an understatement. After much fiddling, during which I broke the ammo belt, I got it in place. I then glued on the wings and wing struts. I used regular Tamiya glue for the wing, but when it came to the struts, I used super glue and accelerator to keep things straight. More antennas were attached as were the wheels. Main wheels needed reamed out a bit to fit on the axles. I also 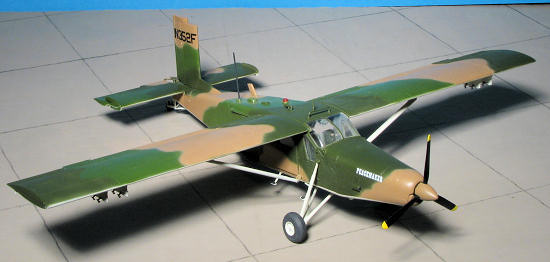 assembled the prop and spinner, then glued them in place. Next, the multi-piece gun was attached. This was also a bit of a pain to assemble. I used super glue and accelerator once again on the ends of the barrels to get them properly attached. This was then glued to the mount and the broken half of the ammo belt was attached. No way would I have the nice curve in the belt after it had broken, so it has a 90 degree bend to it.
Then it was time for the decals. Despite putting down a puddle of Solvaset, applying the decal, then putting on more Solvaset, I got silvering and a lack of propensity to snuggle into nooks and crannies. Over the next several days, I applied more Solvaset and pushed down on the decals, then applied more Solvaset and pushed on the decals and on and on. I would not doubt that there were 10 or more applications of Solvaset per decal. Even Champ didn't really seem to affect the decals at all. Eventually, the markings seemed to be free from air pockets and I sprayed a semi-matte clear on the aircraft. It is a demonstrator so I figured it would be kept somewhat clean. The last bits were glued in place, touch up painting was done for vents and such, masks taken off the windows and the left cabin door glued in place.
| CONCLUSIONS |
 I have to thank Roden for producing this one and knowing what I know now, any additional Pilatus kits will be easier. If Roden can make improvements anywhere, it is in their decals. They are nicely printed, but their lack of performance with solvents is a real drawback to making them useful. I know there are Czech companies that can produce the sort of decals needed as we use them all the time.
Total build time was about a month. Somewhat slower than I could have built a standard single engine prop kit, but the need to clean up all the parts before use, the need to use a lot of filler, and the rather fiddly construction of some areas lengthened the build time. Despite all that, the end result is worth the effort and I'm sure that is the most important part.
| REFERENCES |
http://en.wikipedia.org/wiki/AU-23_Peacemaker
April 2010
Copyright ModelingMadness.com. All rights reserved. No reproduction in any form without express permission from the editor.
If you would like your product reviewed fairly and fairly quickly, please contact the editor or see other details in the