
| KIT #: | AZ 7426 |
| PRICE: | £9.99 |
| DECALS: | Four options |
| REVIEWER: | Scott Van Aken |
| NOTES: | Short run |
| HISTORY |
In 1960, the United States Army issued Technical Specification 153 for a Light Observation Helicopter (LOH) capable of fulfilling various roles: personnel transport, escort and attack missions, casualty evacuation and observation. Twelve companies took part in the competition and Hughes Tool Company's Aircraft Division submitted the Model 369. Two designs, those submitted by Fairchild-Hiller and Bell, were selected as finalists by the Army-Navy design competition board, but the U.S. Army later included the helicopter from Hughes as well.
The first Model 369 prototype flew on 27 February 1963. Originally designated
as the YHO-6A according to the Army's designation system, the aircraft
was redesignated as the YOH-6A in 1962 when the Department of Defense
created a Joint designation system for all aircraft. Five prototypes were built,
fitted with a 252 shp (188 kW) Allison T63-A-5A, and delivered to the U.S. Army
at Fort Rucker, Alabama to compete against the other 10 prototype aircraft
submitted by Bell and Fairchild-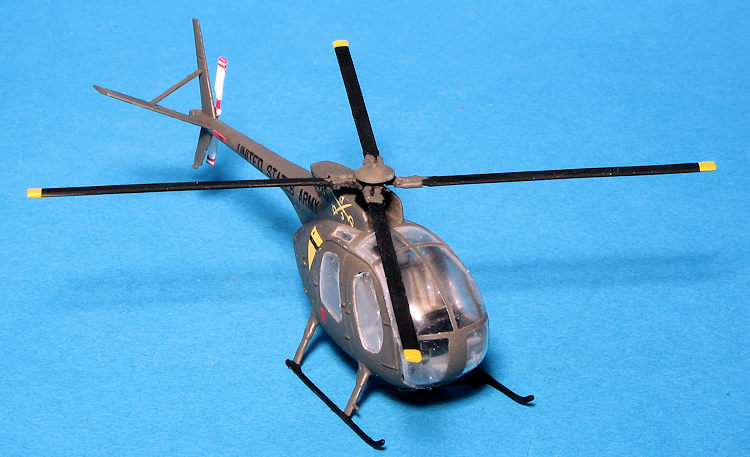 Hiller. During the course of the competition,
the Bell submission, the YOH-4, was eliminated as being underpowered (it used
the 250 shp (186 kW) T63-A-5). The bidding for the LOH contract came down to
Fairchild-Hiller and Hughes. Hughes won the competition, and the Army awarded a
contract for production in May 1965, with an initial order for 714 that was
later increased to 1,300 with an option on another 114. Hughes's price was
$19,700 per airframe, less engine, while Hiller's price was $27,000 per
airframe, less engine. The Hiller design had a boosted control system, while the
Hughes design did not. This would account for some of the price difference.
Hughes is reported to have told Jack Real that he lost over $100 million in
building 1,370 airframes. It was reported that Howard Hughes had directed his
company to submit a bid at a price below the actual production cost of the
helicopter in order to secure this order, resulting in substantial losses on the
U.S. Army deal, with the anticipation that an extended production cycle would
eventually prove financially viable.
Hiller. During the course of the competition,
the Bell submission, the YOH-4, was eliminated as being underpowered (it used
the 250 shp (186 kW) T63-A-5). The bidding for the LOH contract came down to
Fairchild-Hiller and Hughes. Hughes won the competition, and the Army awarded a
contract for production in May 1965, with an initial order for 714 that was
later increased to 1,300 with an option on another 114. Hughes's price was
$19,700 per airframe, less engine, while Hiller's price was $27,000 per
airframe, less engine. The Hiller design had a boosted control system, while the
Hughes design did not. This would account for some of the price difference.
Hughes is reported to have told Jack Real that he lost over $100 million in
building 1,370 airframes. It was reported that Howard Hughes had directed his
company to submit a bid at a price below the actual production cost of the
helicopter in order to secure this order, resulting in substantial losses on the
U.S. Army deal, with the anticipation that an extended production cycle would
eventually prove financially viable.
In 1968 Hughes submitted a bid to build a further 2,700 airframes. Stanley Hiller complained to the U.S. Army that Hughes had used unethical procedures; therefore, the Army opened the contract for rebidding by all parties. Hiller did not participate in the rebidding, but Bell did, with their redesigned Model 206. After a competitive fly-off, the Army asked for sealed bids. Hughes bid $56,550 per airframe, while Bell bid $54,200. Reportedly, Hughes had consulted at the last moment with his confidant Jack Real, who recommended a bid of $53,550. Hughes, without telling him, added $3,000 to the bid and thus lost the contract.
| THE KIT |
There are times when one forgets that one has preordered something. Such is the case with this kit, so it was a rather pleasant surprise when it arrived in the mails. However, it does allow me to compare it to the previous standard for this aircraft in this scale and that is the Italeri kit.
 Considering the considerable time period between the
two, it is not surprising that this one has better surface detail, but really,
not by all that much. Both have a nice interior and this one has separate foot
pedals. The kit also is such that a number of other variants can be built from
what comes in the box, but those 'additional' bits are blanked out on the sprue
diagram. Basically, you can do the pointy nosed, t-tailed version though you are
on your own in regards to attaching the tail pieces.
Considering the considerable time period between the
two, it is not surprising that this one has better surface detail, but really,
not by all that much. Both have a nice interior and this one has separate foot
pedals. The kit also is such that a number of other variants can be built from
what comes in the box, but those 'additional' bits are blanked out on the sprue
diagram. Basically, you can do the pointy nosed, t-tailed version though you are
on your own in regards to attaching the tail pieces.
Unlike the Italeri kit, this one is not armed so you
have no mini-gun and no ammo storage bin for the back seat. This one also does
not have separate doors, though I think that for most of us, this isn't that
much of an issue. One thing I did notice is that the frame lines in the nose of
the standard round nose version are not as well defined as on the other. As with
the Italeri kit, finding room for nose weight will be an issue. The kit also
comes with both the 'short' and 'tall' landing skids. In fact, it is on
 these
pieces that I found the only sink areas on the entire kit.
these
pieces that I found the only sink areas on the entire kit.
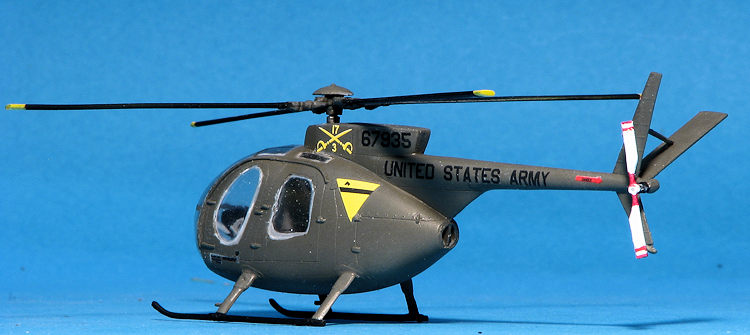
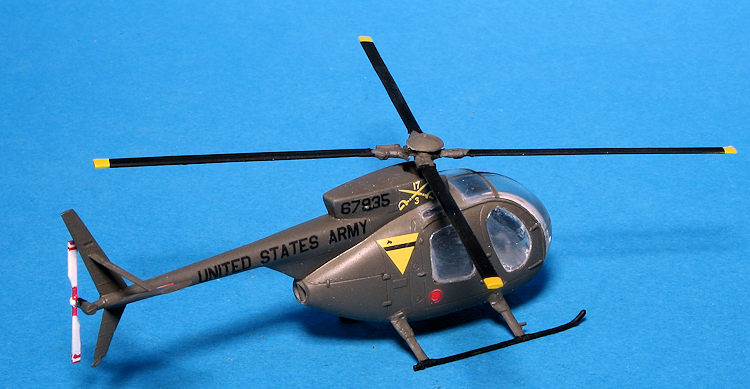
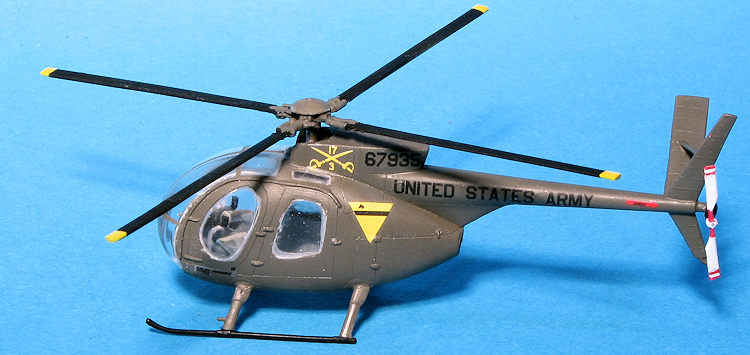
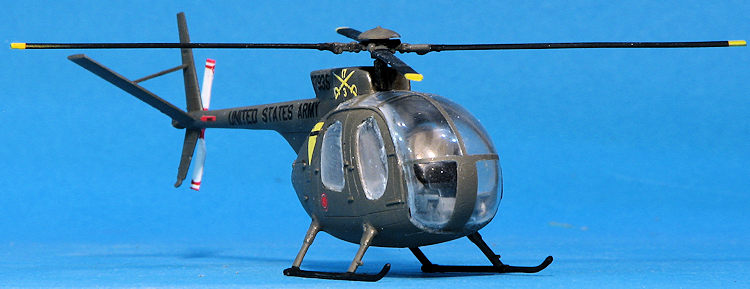
Instructions are made for multiple versions of this kit so there are sections that one needs to ignore for doing the Vietnam era aircraft. There are apparently other versions that include resin pieces, but this one does not. Markings are include for four overall olive drab helos. None are identified, but one is an early version with insignia and a big yellow band on the rear. This one is probably gloss OD. The other three are in the later markings with black 'United States Army' on the boom and various unit bits. One is the required shark mouth version 'Miss Clawd IV'. The small decal sheet is quite nicely printed and is undoubtedly very thin so care will be needed with application.
| CONSTRUCTION |
I have built AZ Models short run kits before. I expected this to be just as difficult a build as their others and I was not disappointed. Let me just start out by saying that nothing fits without some adjustment. The parts have large mold seams, there are no specific fitting location guides, and often one has to modify bits in order to get them to fit.
I started this with the interior. Probably the biggest
building hassle with this is trying to remove the large mold seams from the very
thin pieces like the cyclic and collectives. I basically did minimal work on
these for fear they would break during the process. It is imperative that all
the mold seams get thinned
 down or the parts will not fit. I did not attach the
far aft bulkhead until I was ready to put the cockpit in the fuselage halves.
One also has to be very careful of just where parts fit. I put the floor console
too far back the first time and had to cut it away and place it in the more
forward position later. This was so I could mount the instrument panel. The
lower part of this panel needs to be severely cut back to allow the main
transparency to fit. I discovered this late in the build, but a wise builder
will do this at this stage.
down or the parts will not fit. I did not attach the
far aft bulkhead until I was ready to put the cockpit in the fuselage halves.
One also has to be very careful of just where parts fit. I put the floor console
too far back the first time and had to cut it away and place it in the more
forward position later. This was so I could mount the instrument panel. The
lower part of this panel needs to be severely cut back to allow the main
transparency to fit. I discovered this late in the build, but a wise builder
will do this at this stage.
With the cockpit built up, I used tape for seat harnesses and set it aside. My next project was to get the clear bits to fit. I was not totally successful. The openings have quite a bit of flash and have to be carefully trimmed with lots of test fitting. Even then, I was unable to get a decent fit, though they are in there to some extent. Once those were installed, the interior was glued in. I attached it to one half along with the far aft bulkhead and did a lot of test fitting of the other fuselage half to get it into place. Once in place, I was able to squeeze some flat weight under the floor so that it will sit solidly on its landing skids.
 While all the fuselage seam work was being done, I
assembled the main rotor. This also takes some care in assembly. The kit has
parts for the later T-tailed, five rotor version with the pointy nose, but none
of those are needed. Note that all the rotor head parts will need to have the
center bits drilled out to fit the shaft. After several filler applications, the
fuselage was done and the rotor shaft installed. I also glued on the landing
skids. Note that the instructions have you install the tall skids, while it
seems like the short ones are proper for Vietnam-era Loaches. There are
attachment points indicated on the fuselage, but they are shorter than the
distance between the vertical braces on the skids.
While all the fuselage seam work was being done, I
assembled the main rotor. This also takes some care in assembly. The kit has
parts for the later T-tailed, five rotor version with the pointy nose, but none
of those are needed. Note that all the rotor head parts will need to have the
center bits drilled out to fit the shaft. After several filler applications, the
fuselage was done and the rotor shaft installed. I also glued on the landing
skids. Note that the instructions have you install the tall skids, while it
seems like the short ones are proper for Vietnam-era Loaches. There are
attachment points indicated on the fuselage, but they are shorter than the
distance between the vertical braces on the skids.
Moving to the back, all the parts for the tail assembly are butt fit with no part location guides. I simply started with the two vertical pieces, then glued on the tail rotor shaft part. This was followed by the left side stabilizer and its brace. I then masked all the windows and stuffed tissue in the front opening. I did this as I was unable to get the main canopy piece to fit well. It is simply too large in some areas and too small in others.
| COLORS & MARKINGS |
Painting this is simple: overall olive drab. I have several shades of OD but what I ended up doing was taking Testors Faded OD and mixing in some of their Helo Drab until I got a darkis OD that would be appropriate for one that was not all that weathered. The rotor head was painted OD while the blades are black with yellow tips. The tail rotor is white with red warning stripes.
I picked a nice set of markings for this one. I'm not
sure of the unit as the instructions do not say. The decals are thin, but no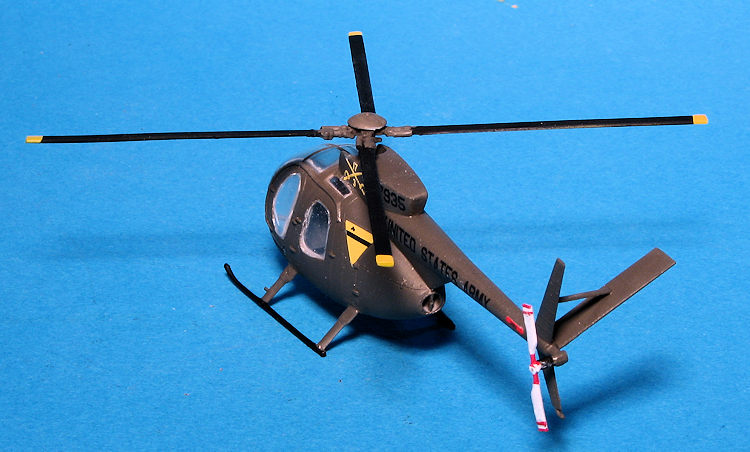 t
too thin and went down well with some Microsol setting solution. Based on the
placement drawings, the markings seem a bit oversized. I should mention that I
gloss coated the airframe prior to decal application and then flat coated it
afterwards.
t
too thin and went down well with some Microsol setting solution. Based on the
placement drawings, the markings seem a bit oversized. I should mention that I
gloss coated the airframe prior to decal application and then flat coated it
afterwards.
Then I attached the main canopy section. It sort of fits. I had to hold it in place with tape while the cement dried to reduce the gaps. Most of it is too wide and so does not fit within the forward fuselage, but sort of sits atop it. If you don't look too close, it is OK, but not a contest model. I then removed all the masking and did some additional touch up painting.
I had to drill out the center pieces of the rotor assembly and somewhere along the way, the lower piece went missing. The rotor shaft also had to be reduced in height as it is far too tall. The white painted tail rotor was going to get red stripe decals for the prop tip warnings, but after many failures (decals kept breaking even after being coated), I ended up applying the outer ones with a red Sharpie. This was also used for the red part near the hub. The main rotor was then glued in place and that was it.
| CONCLUSIONS |
I hesitate to recommend this one. I found it generally more of a challenge than I really like, but I also acknowledge that there are folks who really like these sorts of kits. So let me say that you'll be in for extra work compared to some other manufacturer's Loach. The end result looks like an OH-6A and is definitely what one would call a 6-footer, even if it is so tiny. The only other early OH-6 kit of which I am aware is one by Italeri and at least that one lets you leave off the doors, which was pretty much standard in Vietnam. I did save the rest of AZ's decals for that build.
| REFERENCES |
https://en.wikipedia.org/wiki/Hughes_OH-6_Cayuse
6 December 2017
Copyright ModelingMadness.com. All rights reserved.
If you would like your product reviewed fairly and fairly quickly, please contact the editor or see other details in the Note to Contributors.
Back to the Main Page Back to the Review Index Page Back to the Previews Index Page