Academy 1/72 F-8E Crusader
| KIT #: | 1615 |
| PRICE: | $22.00 MSRP |
| DECALS: | Two options |
| REVIEWER: | Scott Van Aken |
| NOTES: | New (2003) Mold |
| BACKGROUND |
For the US Navy, the F-8 Crusader was often referred to as the 'Last of the Gunfighters'. This was because at the time, the latest and greatest fighter in the fleet, the F-4 Phantom II, had no gun and relied solely on missiles for its offensive weapons. As often happens, the war the F-4 was involved in wasn't one where missiles were really that effective a weapon. Sure, they knocked down quite a few enemy planes, but had they a gun, they'd have bagged a lot more. This was as much due to the very tight and specific firing requirements for the missiles of the day as it was to anything else. Nowadays with 'fire and forget' missiles, pilots are almost assured of a hit. Back then, they were almost assured of a miss.
 The Crusader, while it did carry
Sidewinder missiles like its F-4 brethren, also had a backup called a 20mm
cannon. Many of the F-8s air to air victories was
the result of this cannon. Since the F-8 was on the way out, it was only
aboard the smaller carriers where the Phantom II could not operate. These
old, but updated WWII Essex class carriers were not equipped to handle the
F-4, but the F-8 worked out just great. Crusaders flew from these carriers
until the end of the war, however, they lost out on all the plum
assignments to the longer legged and newer F-4s once the Phantom became
entrenched on the larger fleet carriers.
The Crusader, while it did carry
Sidewinder missiles like its F-4 brethren, also had a backup called a 20mm
cannon. Many of the F-8s air to air victories was
the result of this cannon. Since the F-8 was on the way out, it was only
aboard the smaller carriers where the Phantom II could not operate. These
old, but updated WWII Essex class carriers were not equipped to handle the
F-4, but the F-8 worked out just great. Crusaders flew from these carriers
until the end of the war, however, they lost out on all the plum
assignments to the longer legged and newer F-4s once the Phantom became
entrenched on the larger fleet carriers.
For the Marines, however, it was another story. Their F-8s rarely had an air to air mission. They didn't get to escort bombing raids into North Vietnam were all the enemy aircraft were. They were pretty well confined to moving mud; and lots of it. Their F-8s were equipped with bomb racks that were able to handle just about every air carried weapon that the Navy had. In place of the nose mounted Sidewinders, they often carried Zuni tubes and up to eight total missiles. These were especially good and knocking out trucks and air defense systems. However, like the Navy, the Marines eventually got the F-4 with its more prodigious carrying capabilities and their well worn F-8s were sent state-side to the reserves, where they soldiered on until the end of the 1970s. They too, were replaced by the F-4, assuming the unit wasn't disestablished.
| THE KIT |
 For a look at what comes
in the box and for a brief history, please
visit the preview. To say that this kit has not been well anticipated
by this builder would be an understatement. I've been waiting for several
years for it to appear, ever since I saw it in a catalogue as 'new' about
three or four years ago. Well, it finally made it and while I quickly
bought one when it first appeared, it has taken me an overly long amount of
time to get started on it. If you have read the preview, you know that it
is state of the art and aside from not having true deployable slats and no
separate flaps or folding wings, it is just superbly done.
For a look at what comes
in the box and for a brief history, please
visit the preview. To say that this kit has not been well anticipated
by this builder would be an understatement. I've been waiting for several
years for it to appear, ever since I saw it in a catalogue as 'new' about
three or four years ago. Well, it finally made it and while I quickly
bought one when it first appeared, it has taken me an overly long amount of
time to get started on it. If you have read the preview, you know that it
is state of the art and aside from not having true deployable slats and no
separate flaps or folding wings, it is just superbly done.
| CONSTRUCTION |
Like any good modeling drone, I thought about starting with the interior, but instead, chose the wings. They are two part with a full upper and partial lower wing (minus slats). The fit is very tight and one could be forgiven for thinking that glue wasn't necessary. What is necessary is that the lower insert be sanded down somewhat on the ends as it is a bit thicker and so stands a bit proud on the outer joins. A few minutes of concentrated sanding is all that is really needed to fix this. It is then that the wing halves are glued together. At the same time, I glued on the upper wing hump, which is also a very solid fit, and the forward wing bulkhead (the part you see when the wing is raised).
 I then turned to building up the
seat. It seems like the same one that is in the F-4 so I'd have to take a
look at references to see if this is appropriate. While it is fairly well
done, it wouldn't be a bad idea to replace it with a more detailed resin
version. I then glued the rear bulkhead to the cockpit tub, making sure it
fit properly in the fuselage and letting it dry while so fitted. Then it
and the inner cockpit walls were brush painted with ModelMaster Dark Gull
Grey enamel. When dry, I applied the instrument panel and console decals.
These refused to succumb to any of the setting solutions that I have. Even
Solvaset and Champ were ineffective in getting these decals to snuggle
down. What is worse, it seemed to prevent them from properly sticking at
all! I can only hope that this trait does not extend to the rest of the
sheet as the markings are placed on a smooth surface!
I then turned to building up the
seat. It seems like the same one that is in the F-4 so I'd have to take a
look at references to see if this is appropriate. While it is fairly well
done, it wouldn't be a bad idea to replace it with a more detailed resin
version. I then glued the rear bulkhead to the cockpit tub, making sure it
fit properly in the fuselage and letting it dry while so fitted. Then it
and the inner cockpit walls were brush painted with ModelMaster Dark Gull
Grey enamel. When dry, I applied the instrument panel and console decals.
These refused to succumb to any of the setting solutions that I have. Even
Solvaset and Champ were ineffective in getting these decals to snuggle
down. What is worse, it seemed to prevent them from properly sticking at
all! I can only hope that this trait does not extend to the rest of the
sheet as the markings are placed on a smooth surface!
While that was all sorting itself out, I turned to some of the subassemblies that will fit into the fuselage. There are no less than six different bits that fit into the fuselage halves before they are to be cemented together. One is the main gear well. This has six pieces that includes the gear uplock mechanisms. Then there is the upper fuselage area that you see under the wing when it is raised. This gets on part glued on, a bulkhead. The nose gear well/intake trunking is a single assembly that has positive locators on the fuselage interior to make sure it fits well. The other three parts are the cockpit tub, the tail hook well and the speed brake well. All of these parts except the cockpit were painted white either before or after the bits were assembled. I also painted all the gear doors, tail planes and a plethora of other bits white. If nothing else, they'll show where mold seams and sink areas are so I can fix those before they are used.
 I then glued all of them into the
left fuselage half. The fit is very snug for most of them. There is room in
the nose for weight and while the instructions don't call for any, I wasn't
taking chances. When test fitting the other fuselage half to make sure the
parts glued while properly aligned, I came to realize that once this part
was on, it wasn't going to be easy to remove. So that sort of messed up my
plan to photograph the open fuselage with all the subassemblies in place,
so I continued and glued it shut. I had to do quite a bit of fiddling with
them to get them all properly in place so one does have to be very patient
and careful about the whole thing. The end result is a very solid feeling
fuselage. (What I didn't realize at this time, was that I'd not drilled out
any of the holes in the fuselage for the missile rails, ventral strakes or
afterburner cooling intakes. This would cause me some consternation later.)
I then glued all of them into the
left fuselage half. The fit is very snug for most of them. There is room in
the nose for weight and while the instructions don't call for any, I wasn't
taking chances. When test fitting the other fuselage half to make sure the
parts glued while properly aligned, I came to realize that once this part
was on, it wasn't going to be easy to remove. So that sort of messed up my
plan to photograph the open fuselage with all the subassemblies in place,
so I continued and glued it shut. I had to do quite a bit of fiddling with
them to get them all properly in place so one does have to be very patient
and careful about the whole thing. The end result is a very solid feeling
fuselage. (What I didn't realize at this time, was that I'd not drilled out
any of the holes in the fuselage for the missile rails, ventral strakes or
afterburner cooling intakes. This would cause me some consternation later.)
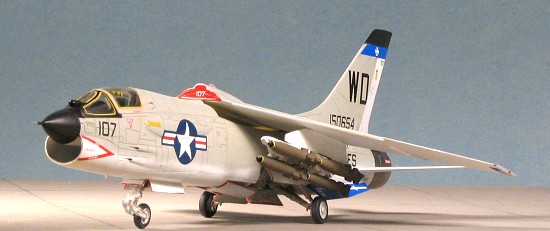
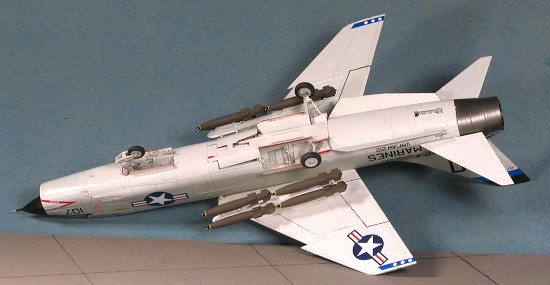
After the usual application of filler on some seams, I set the fuselage aside to cure and went to work on the more tedious portions of the kit. Yep, the ordnance. After cleaning up all the racks, Zunis, snakeyes, and MERs, I started gluing bits together. The forward fuselage racks are tough to properly get assembled, but by looking at the instructions several times, you can figure out how these go. I also glued the MERs onto the wing pylons, making sure they are properly aligned. Once these were glued, I attached them to the underside of the wings, since they'd be painted white anyway. It was then that I realized that I didn't need to have drilled out the holes in the wings for the pylons as they are butt joins, and not very good ones as there are gaps.
 Returning to the fuselage, I sanded
the filler and rescribed lost panel lines. I then removed the clear bits
from the sprues. The attachment points are cleverly situated so that one
doesn't have to gouge up or sand the clear bits to remove the little stubs.
Good move, Academy. I masked the windscreen and canopy using Tamiya tape. I
also put too much stress on the windscreen as it broke in two during
handling. I'd had this problem with Fujimi's A-7 Corsair kits so it has to
be endemic in the design (sure...). With no replacement, I had no choice
but to continue to use the broken part. The canopy can really only be
displayed in the closed position as it will not fit any other way. The fit
of both the canopy and windscreen is exceptional. Once it was glued down, I
realized that I'd forgotten the back section of the canopy! Fearing more
breakage, I left it as was. I doubt if anyone will really notice as there
is 'stuff' back there to make it look busy.
Returning to the fuselage, I sanded
the filler and rescribed lost panel lines. I then removed the clear bits
from the sprues. The attachment points are cleverly situated so that one
doesn't have to gouge up or sand the clear bits to remove the little stubs.
Good move, Academy. I masked the windscreen and canopy using Tamiya tape. I
also put too much stress on the windscreen as it broke in two during
handling. I'd had this problem with Fujimi's A-7 Corsair kits so it has to
be endemic in the design (sure...). With no replacement, I had no choice
but to continue to use the broken part. The canopy can really only be
displayed in the closed position as it will not fit any other way. The fit
of both the canopy and windscreen is exceptional. Once it was glued down, I
realized that I'd forgotten the back section of the canopy! Fearing more
breakage, I left it as was. I doubt if anyone will really notice as there
is 'stuff' back there to make it look busy.
It was at this time that I'd realized that I'd not drilled the holes in the fuselage. Fortunately, the exhaust was still not installed, so taking a strong light, I shone it up the fuselage. This was enough to allow me to see where the holes were for the ventral fins and the afterburner cooling scoops. Those were duly drilled out. The missile rails were an impossibility thanks to all the subassemblies blocking the light so those were left off. I can understand the cooling scoop attachment holes being blocked, but not the ventral fin holes. Those early F-8s that didn't use the ventral fins had a different nose so it isn't like this fuselage can be used for an early F-8. Anyway, with those opened, the parts were glued in place and it was time to think about some paint.
| COLORS & MARKINGS |
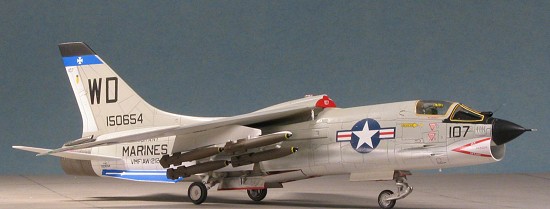
Colors are easy on an F-8. Nearly all
of them were in overall Glossy Light Gull Grey and White. Of course, this
means masking as the flight control surfaces are white. Those and the
underside were painted with Floquil Reefer White. After they were masked,
the rest was painted Light Gull Grey using Testors Model Master enamels. I
then went back with the white for the fuselage demarcation line. This is
shown as a clean, straight line in the instructions, but in service, this
was a ratty and somewhat oversprayed line. After all, much of it was
touch-up by Marines and Sailors using rattle cans, so neat doesn't
 count!
Once the main colors were on, the kit was given a gloss overspray in prep
for decals. I also painted the snakeyes using RLM 81 as I had some left in
the bottle and it is pretty close to OD.
count!
Once the main colors were on, the kit was given a gloss overspray in prep
for decals. I also painted the snakeyes using RLM 81 as I had some left in
the bottle and it is pretty close to OD.
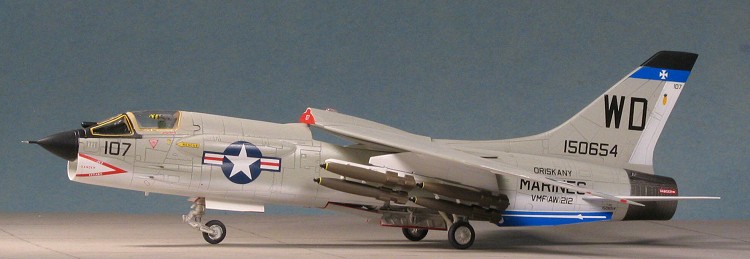
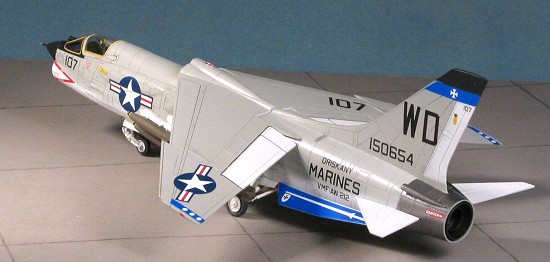
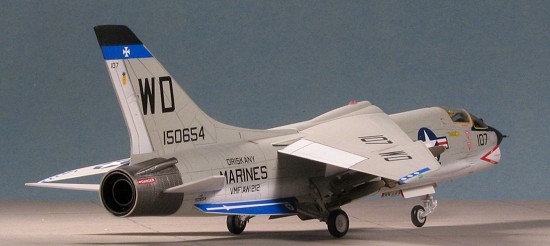
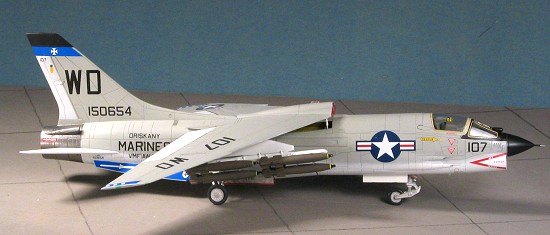
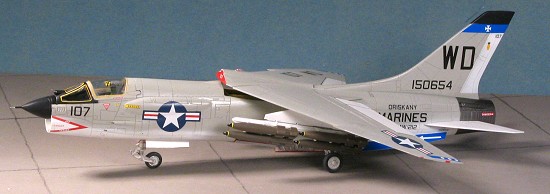
For markings, I wanted to do a USMC F-8 so chose the VMF-212 markings from Superscale 72-833, a recent new sheet. These aren't as flambouyant as some others, but they are markings I've not see much of and they are tastefully done. They require the nose cone and fit tip to be painted black so that was done. I also painted the windscreen flat black as I wasn't sure how well the Academy decals would work. My experience with the instrument panel decals was not encouraging.
Generally, the Superscale decals went on well and it took little more than Microsol and Microset to get them to snuggle down. I did find that though the Academy kit was the one designed for the decals, the wing tip stripes did not go fully across the wing as shown in the instructions. They reached from the back to the where the slat was located and that was it. The ventral fin decals were a perfect match and the others also fit well. I did not use the kit decal placement guide as the Academy kit provides smaller national insignia and some of the other decals are not the same style as noted in the Superscale instructions. With the decals on, the kit was given another coat of clear to seal them.
| FINAL CONSTRUCTION |
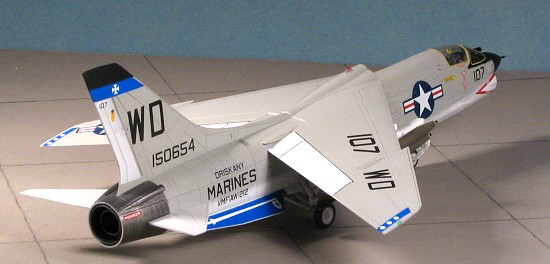
Here is where I had another surprise
awaiting me. You see, I really wanted to build this kit with the wings
lowered. However, it was soon obvious that this isn't how it is designed
and to do so would mean more work trimming and then repainting to get
things to look proper. So, I installed the aft brace as called for in the
instructions. While this was drying, I glued on the main
 wheels and glued
on the lower section that includes a couple of gear doors. All the doors
had the edges painted red (a very time consuming process) while the decals
were drying so they were ready to glue on. This lower section, however,
didn't fit particularly well. I think the very aft attachment area needs
trimmed down and this is something that has to be done before the gear are
installed. I put in the main and nose gear early as they were to be painted
the same color as the underside so why not. Be forewarned to test fit this
piece prior to installing the gear. Anyway, I flooded the join with glue
and clamped it allowing the glue to 'melt' things up and give me a better
fit. It also produced the expected ooze that needed to be sanded down and
the area repainted. When I glued on the speed brake, I shortened the
actuating piston and displayed the brake barely open. This was not an
uncommon position for this feature.
wheels and glued
on the lower section that includes a couple of gear doors. All the doors
had the edges painted red (a very time consuming process) while the decals
were drying so they were ready to glue on. This lower section, however,
didn't fit particularly well. I think the very aft attachment area needs
trimmed down and this is something that has to be done before the gear are
installed. I put in the main and nose gear early as they were to be painted
the same color as the underside so why not. Be forewarned to test fit this
piece prior to installing the gear. Anyway, I flooded the join with glue
and clamped it allowing the glue to 'melt' things up and give me a better
fit. It also produced the expected ooze that needed to be sanded down and
the area repainted. When I glued on the speed brake, I shortened the
actuating piston and displayed the brake barely open. This was not an
uncommon position for this feature.
I then glued on the main wheels, the rest of the main wheel gear doors, the other bits to the nose strut, the nose wheel and the nose gear doors. Then I pushed in the horizontal stabs as they are a very tight fit. My next move was to fit on the wing to make sure all was OK. It wasn't. As you recall, I originally intended to mount the wing flush so didn't open up the mounting holes in the back of the wing. A bad move, as it turns out. Now it would make sense to me, that these holes would be normally opened at the factory, because if you are doing wing up, you need them open and if doing wing down, you won't see them. Now, I have no solid attachment in the back as I ended up cutting the struts off so that the wing wouldn't sit too high.
 While fuming about that, I put the
decal on the tail hook and miraculously, it succumbed to Microset and
wrapped around. Why this didn't work with the instrument panels I'll never
know. I then did some detail painting on the bombs in preparation to gluing
those on the MERs. There were a number of small teardrop light housings
that needed glued in place. Those were attached carefully as was the seeker
head on the front of the windscreen. I also put on the windscreen and
canopy sealant decals. These really help make the aircraft look so much
better. I also found that the ones for the windscreen seemed a bit
oversize, but you wouldn't notice it thanks to the black surround.
While fuming about that, I put the
decal on the tail hook and miraculously, it succumbed to Microset and
wrapped around. Why this didn't work with the instrument panels I'll never
know. I then did some detail painting on the bombs in preparation to gluing
those on the MERs. There were a number of small teardrop light housings
that needed glued in place. Those were attached carefully as was the seeker
head on the front of the windscreen. I also put on the windscreen and
canopy sealant decals. These really help make the aircraft look so much
better. I also found that the ones for the windscreen seemed a bit
oversize, but you wouldn't notice it thanks to the black surround.
The bombs were glued to the racks and the wing gently attached. It is a most wobbly affair without the rear brace. The nose pitot tube was glued on and painted. Then I did some of the usual touch-up painting and general fiddling and the kit was done.
| CONCLUSIONS |
Thanks to me and my penchant for USN/USMC aircraft for this one. Thanks to Superscale for the decals used in this review.
November 2004
#1338 in a series
Copyright ModelingMadness.com. All rights reserved. No reproduction in part or in whole without express permission.
If you would like your product reviewed fairly and fairly quickly, please contact the editor or see other details in the Note to Contributors.