PH Models 1/72 MiG-21 I-2 Analog
| KIT #: | 72110 |
| PRICE: | $23.41 from www.hobbyshop.cz |
| DECALS: | One option |
| REVIEWER: | Scott Van Aken |
| NOTES: | Resin with vacuformed canopy |
| HISTORY |
Initially designed as a fast interceptor for the Soviet Air Force, the MiG-21 was adapted to a fairly acceptable fighter bomber after the initial production variants. Though always a bit short on range, thanks to the need to keep weight down, the MiG-21  performed admirably in various conflicts and wars, though it always seemed as if it was second-best to the opponents it faced. This could easily have been due to the difference in the general quality of pilots and the tactics used.
Regardless, it was one of the most successful Soviet fighters of the 1960s and was a huge success in the export market. Many are still flying today and thanks to various systems upgrades, are still viable aircraft.
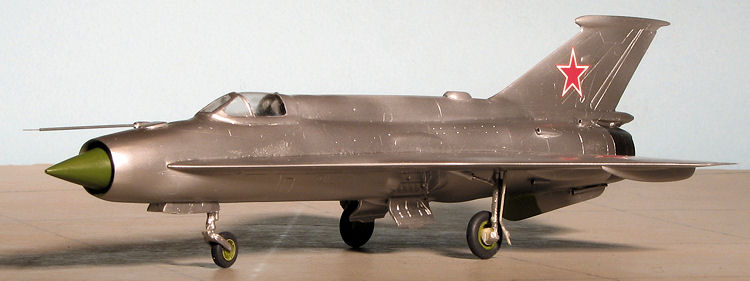
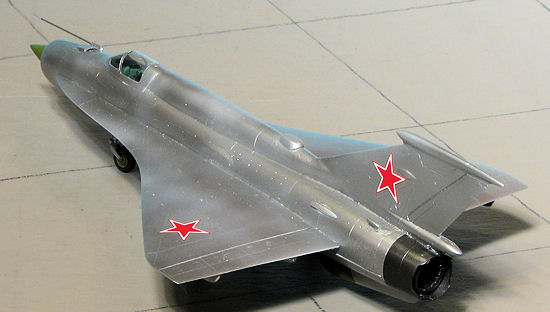
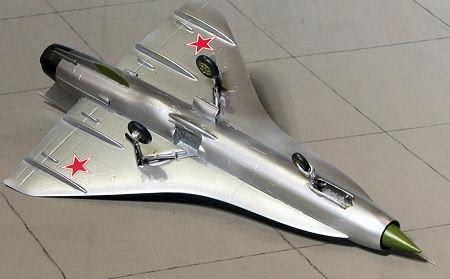
Not surprisingly, the MiG-21 was used for various test programs. One of the more unusual uses for the MiG-21 was in the MiG-21 I-2 "Analog". This aircraft seems to be a standard MiG-21 MF that had its horizontal flying surfaces replaced with replicas of the wings to be used on the Tu-144 SST. The aircraft was used to test the wing before it was used on the Tupolev airframe to ensure that there were no major problems with this particular design. Apparently all went well and the Tu-144 was built using this shape wing. It was other problems that eventually grounded the 'Concordski' and it never enjoyed the success of the Anglo-French SST.
To my knowledge, the 'Analog' is in one of the various museums in Russia.
| THE KIT |
Cast in a standard cream resin, the kit is very nicely molded and though the sprue attachment stubs seem large, they are actually quite thin and should remove nicely. The kit is quite complete and includes not only the rather unusual wings for this version but also a nicely done cockpit complete with tub, control stick, seat and instrument panel. The tub and panel all have very nicely done raised detail. I did notice that most of the little cooling vents on the kit are separate pieces and while it would have been nice to have these molded on, it shouldn't present too much hardship. There is a single vacuformed canopy that is only of fair qual ity and if one can find a better replacement, it would probably be a good idea
One thing that I will praise PH Models for is that they have molded the landing gear around strong sections of piano wire. This will prevent the weight of the model from causing the landing gear to buckle over the years. I only wish that everyone who did resin kits was so thoughtful.
The rest of the kit is pretty well straight-forward with no real challenges or surprises for anyone who has built a number of resin kits. The instructions are on a folded sheet of paper. One side has a very nicely done three view drawing of the aircraft with markings placements (a bunch of red stars) and any painting that needs to be done (which isn't much as it is unpainted metal with green dielectric sections). The instructions are basically a couple of exploded views intermixed with a parts drawing of the little bits. Some things are omitted (like the cockpit construction), but again, those of us who have built a few models won't find this troubling at all.
| CONSTRUCTION |
Having completed a semi-frustrating Amodel kit, my bench was now clear for another, and short run resin kits will usually fill that gap. Looking about for something I have taken from the shelves several times, yet rather quickly replaced, I decided that now was the time and pulled this PH Model kit from the stacks. First step was to remove the major bits from the resin blocks and clean them up. This was generally painless, though one fuselage half had a rather thick attachment area and was not an easy removal. I also noticed quite a few air pockets near these resin blocks and so there will be filling needed to cure these. Fortunately, none of 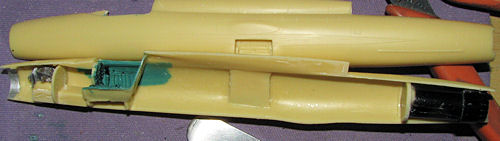 these are out near the tips of the wing or the tail, which is always problematic to deal with.
When removing the resin pour stub from the bulkhead of the cockpit, this bulkhead snapped away. It was repaired once the pour stub was removed. The cockpit was then painted blue-green using Testors enamels. I had to brush on two coats to get good coverage. Once that was done, I added the control stick and painted that as well. The exhaust area was assembled and painted Alclad II Jet Exhaust. There were quite a few holes in these pieces and a chunk missing from the attachment area of the exhaust, but since those will be hidden when done, no worries. I painted the inside of the intake and exhaust area with aluminum. The nose gear well has a bulkhead just behind the wheel hump to help align it in the fuselage. These assemblies were then glued into the right fuselage side. The exhaust back plate needed quite a bit of sanding down as it is too large. When those were in place (and I installed each one separately, taping the fuselage halves together to ensure proper alignment), a bit of weight was added above the nose gear well, just to be sure it would not tail sit.
An issue that we sometimes have with limited run resin kits is that the parts may not always be the same size if molded on one day compared to the next. There are a variety of reasons for this, but most manufacturers will try to match up things to prevent this from being an issue. Well, I guess PH models did not do a great job of matching as one fuselage half is shorter than the other.
I had to make a choice of where to match things. It seemed to me that it would be better for me to match up the nose section as I had to install the intake radome prior to gluing the halves and there is a ring that fits in this place. This meant that the rear of the spine and the very aft section would need some sanding to match things. It also meant that panel lines would become more and more distant from each other as one went from nose to tail, but that is the price one pays sometimes. Of course, I could fill and rescribe all those lines, but I am far too lazy to do that. It also did not help that the sprue attachment point on one half was much thicker than on the other, requiring a lot of sanding on the upper half of one side, resulting in the expected gaps as I was unsuccessful in having things sand straight. However, super glue is an excellent filler and eventually that took care of those pesky gaps. I also had to deal with some air pockets. You can see several just beneath the surface near the rear on the image above.
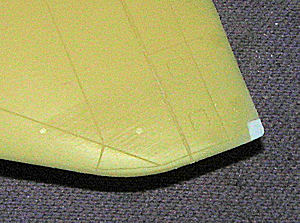 Once all of that was squared away, so to speak, the fin was glued in place. It became obvious that I had not removed enough from one fuselage half as the fin was too narrow where it joined the rest of the spine. This would plague me when it came time to attach the canopy. Out comes the filler and sanding sticks to get them to match. The nose ring was a bit better fit, but still a bit too small. The wings are a very long attachment point and getting them in place required me to get one installed and then match up the other side. There are engraved locating marks on the fuselage to help. One of the wing tips had a chunk missing from it and so that was repaired using plastic card. When repairing things like this, it is best to make the damaged area into a shape more easily repaired than a ragged break.
With all that done, I painted and installed the seat. This seat was from the Zvezda MiG-21 reviewed a while back and I used the Zvezda seat in this one after making a harness out of blue strips of masking tape. Then came the canopy. As mentioned, the fuselage was a bit too wide and getting the canopy to fit was a bit of a chore. Especially since the vac plastic was brittle and it cracked near the front when trimming it down. A spare was not provided. Eventually, the canopy was smoothed in place, but it is not as pretty as I would like. It also nearly caused the project to stall out completely.
 There are a myriad of scoops for the rear section and no locating areas shown on the fuselage. Fortunately, there is a well done four view on the back of the instruction sheet so it makes it easier to get a decent placement. The lower ventral fin is a separate piece and that was attached. Also glued in place was a largish antenna housing on the spine and the small vent on the nose. I was going to glue on the long pitot tube, but noticed that this part was not included in the kit. A rather major error if you ask me.
Since most of the parts are based on the Zvezda kit, if you have a MiG-21bis kit, it includes the early pitot used on the PFM and that can be adapted. Or you can make one from tubing or plastic rod. I have not yet decided. With all those bits on and things sort of cleaned up, I gave it a coat of primer grey using Tamiya extra-fine in a rattle can to see what needed to be done before painting. A few areas were found and cleaned up, but it was soon to be apparent that more work was needed. Once I had decided to go ahead and paint the airframe, I cleaned up and installed the landing gear. These are reinforced with wire so should not have any issues with long time resin sag that we often run into. I also took the time to install the inner gear doors for the MLG and the nose wheel doors.
| COLORS & MARKINGS |
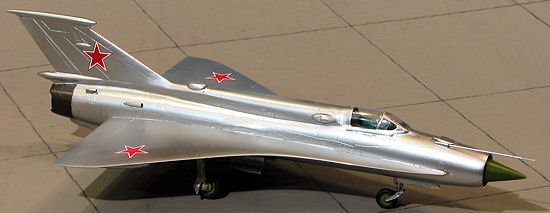 Typical of 50s and 60s Soviet planes, it was overall unpainted metal. I used Alclad II Aluminum and was shocked to see how much additional work would be needed to take care of all the glitches. At this time, I had come to the realization that if I stopped to fix everything, this kit would end up as a long time resident of the shelf of doom. So I made up my mind to bite the bullet and simply finish it up best I could without all the additional sanding and scraping.
On the last MiG-21 I built, it was felt that the color I used for the radomes was too bright so I went with a less bright shade. Not sure it is bright enough, but it is different. I used AKAN paint for this one and while marked 'Bright Green', it really isn't all that bright. The rear exhaust area was painted using Alclad II Steel.
| FINAL CONSTRUCTION |
Though it was painted, it was still missing things. As mentioned earlier, there is no pitot tube provided and this is a rather prominent piece. I sanded a bit of sprue to a fair representation of the mount and drilled a hole in it for a piece of small stainl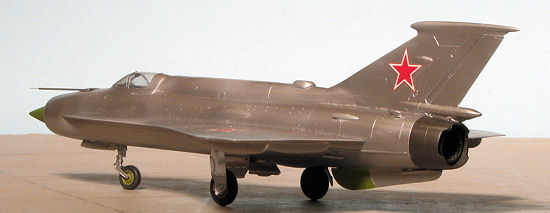 ess steel tubing. With that in place a piece of even smaller wire was placed in the tip. One of the main omissions in the kit is a lack of retraction struts for the landing gear. The nose gear was left as is and using some Contrail tubing and bronze wire, struts for the main gear were fabricated. The wheels were painted and glued in place as were the main landing gear doors.
It was at this time that I finally added the decals. Just six Russian red stars on the fin and wings. The decals are very good and quite thin. No setting solution was required and it very much seems as if they have no carrier that extends beyond the decal itself. I used no clear coat over them. The masking was removed from the canopy, a bit of touch up painting was done (scoops, you know), and that was it.
| CONCLUSIONS |
 It is thanks to the MiG-21 PD that I even bothered pulling this one from the shelf. Either my patience or skills were not really up to the task that this kit required, and I'm leaning towards patience as I can sand with the best of them! The end result is not all that pretty, but it isn't horrible either. It is a kit that belongs in any MiG-21 collection and though its availability is unknown, is one worth seeking if you have to have one.
January 2013
Thanks to my masochistic tendencies for this one.
Copyright ModelingMadness.com. All rights reserved. No reproduction in part or in whole without express permission from the editor.
If you would like your product reviewed fairly and fairly quickly, please
contact the editor or see other details in the