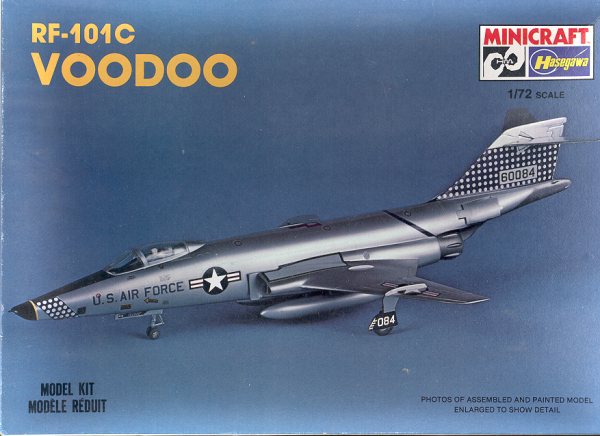
Minicraft/Hasegawa 1/72 RF-101C Voodoo
| KIT # | 1037 |
| PRICE: | $5.00 in 1984 |
| DECALS: | One aircraft |
| REVIEW: | |
| NOTES: | Reboxed Hasegawa kit |
| BACKGROUND |
Take a look at the preview for more information on this model.
| CONSTRUCTION |
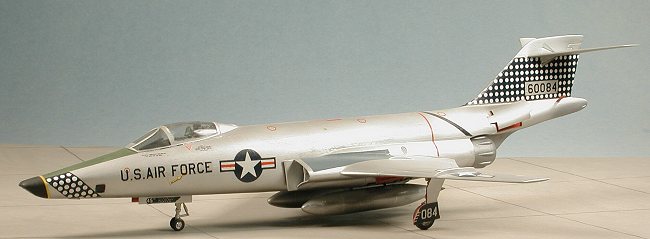
For those of you who want to widen your history of model companies, here is a bit of background on Minicraft. Minicraft started out being the importer of an upcoming Japanese model maker called Hasegawa in the 1960's. Initially, the kits were identical to those being produced in Japan, however, the box top was different and had the combined Minicraft and Hasegawa logos on them. The box top was also in English, unlike the home-brewed Japanese kit. Everything inside was the same, including the Japanese language instruction sheet. This wasn't and still isn't a problem unless you want to read the history as most everything could be figured out. This kit is one of the earlier generation of models done by Hasegawa. The outline and general look of the kit when finished is quite good. However, the level of detail is no where near as high as today's kits and the plastic is very thick. When I built this kit in 1986, it was a speedy and pleasant build. Construction on this starts with the interior, of course, but there isn't much to it. Just a simple floor with side consoles, a seat shape, and a pilot. These were painted dark grey. A bit of nose weight was added just in case it decided to be a tail sitter and the fuselage was glued together, trapping the interior. The rest of the kit is pretty simple as there are not that many parts and none of the fiddly bits that are so prevalent in modern kits. The design of the lower fuselage and wings is such that getting a poor fit takes some effort! I did have to use some filler on the seams, but it was minimal. This kit has a single tailplane that fits atop the fin and then the fin cap is a separate item that goes above it. I found this to be a slight bit thinner than the lower fin, but again, filler fixes many evils! The inside of the speed brake wells was painted red and the brake tacked into place over it for painting. Turning to the front of the kit, the nose was glued in place along with the canopy and the canopy masked. Landing gear are fair and fit well, all except the nose gear. Many of these older Hasegawa kits with twin nose wheels had a problem with misaligned axles and so does this one. While it fits fairly well, were there any replacement nose gear available, I'd buy it.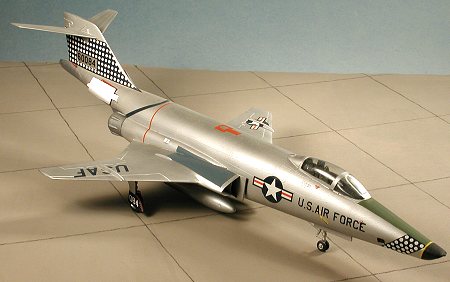 Later, Minicraft started reboxing the kits in its own box with decals by Scalemaster and revised instructions in English. The Scalemaster decals were much thinner and better printed than the Hasegawa offerings and in some cases offered markings that were not the same as the Hasegawa ones. This isn't the case with this particular kit. Later, they stopped importing Hasegawa kits entirely and turned to bringing in Academy kits from Korea and eventually their own line.
| PAINT & DECALS |
Then it was onto the decals. I used kit decals as I didn't want to do an SEA scheme and the kit ones looked pretty nice. They fit well with no hassles at all. It was particularly nice to have the upper insignia split for the wing fence. I did scrounge the wing walk decal from the Matchbox F-101B kit as I did that rather sad model in another scheme. 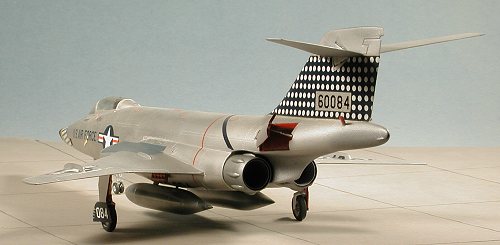 This kit is easy to paint. A simple overall aluminum scheme with an olive drab anti-glare panel. The entire plane was painted with Testors Metallizer and then the OD section painted with Gunze acrylics. Afterburner sections were painted a darker metallic color and the nose with flat black.
| CONSTRUCTION CONTINUES |
With the decals on, the wheels, landing gear doors and drop tanks were added to the kit. The areas where the cameras are was painted gloss black and the clear windows inserted. Trying to fill the seams on the lower ones is futile. A neat trick would be to use a small piece of film cut to size and inserted. It would do a good job of covering the seam. The masking was then taken off the canopy and there it is.
| CONCLUSIONS |
November 2001
Copyright ModelingMadness.com. All rights reserved. No reproduction in part
or in whole without express permission. If you would like
your product reviewed fairly and fairly quickly, please
contact the editor or see other details in the Back to Reviews Page
2021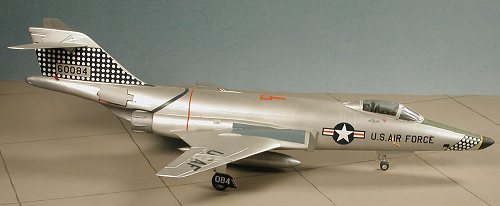 OK, so it isn't a modern kit. OK, so it is pretty basic. However, if it is an RF-101C that you want and you don't want to do any major work backdating the Revell kit, this is it. It is still being sold and little has changed but the retail price. It is also an easy build providing you don't start obsessing over adding all sorts of detailing to it. I'd be surprised if there wasn't an aftermarket set for this.