
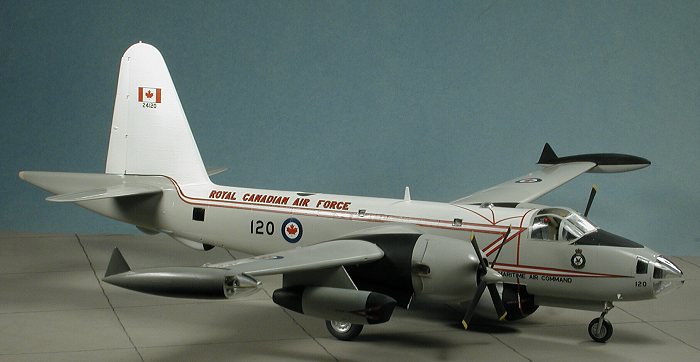
Hasegawa 1/72 SP-2H Neptune 'Canadian AF'
|
KIT # |
0251 |
|
PRICE: |
$39.95 |
|
DECALS: |
One aircraft |
|
REVIEW : |
|
|
NOTES: |
Reissue with new decals |
|
BACKGROUND |
For a short history and a look at the kit in the box, see the preview.
|
CONSTRUCTION |
Construction begins in the usual manner with me and that is
subassemblies. This means the wings, tailplanes, engine pods, main wheels and
tip tanks. Fit is quite good though you will have to remove a small amount of
flash from some parts. You'll also need some filler (well, at least I needed
it), on most of the parts; especially the area on the aft wing where the insert
fits. Doing all of this will destroy the raised panel line and rivet detail. A
decision will have to be made to either remove all this detail and rescribe it,
do nothing or something in between. What I did was to rescribe the lost panel
lines, but not the rivet detail.
Looking at the addendum to the kit instructions that come with this particular boxing, one notices that several fuselage mounted antenna pods will need to be removed. I clipped these off with my handy Xuron sprue cutters and then sanded the rest of the plastic off. Again, you'll be destroying fuselage detail. The interior (basically seats and the floor/bulkheads) was then glued together and set aside. When dry, all of the interior bits and interior of the fuselage was painted a dark grey color.
Then the various
transparencies were glued in place. Fit was pretty good, though the openings are
actually a touch larger than the transparencies. Once those were installed, the
interior parts were glued in place. Fit was rather good, though you'll find the
forward observers section to be a bit of an 'iffy' fit as the
 only positive join is on the back
against the nose wheel well. With the interior installed, it was time to load up
the weight. You really have to put in quite a bit as the P-2 is a pretty tail
heavy model. I taped on the big pieces to make sure there was enough weight in
there, and added a touch more to make sure. It really adds a lot of heft to the
kit! Superglue was used to hold it in place.
only positive join is on the back
against the nose wheel well. With the interior installed, it was time to load up
the weight. You really have to put in quite a bit as the P-2 is a pretty tail
heavy model. I taped on the big pieces to make sure there was enough weight in
there, and added a touch more to make sure. It really adds a lot of heft to the
kit! Superglue was used to hold it in place.
The upper forward astrodome was added and the fuselage halves glued together. This was rather painless, but it is a long fuselage so it was glued in sections. This variant doesn't use the upper turret. Instead a window is in its place. This can be added later and prevents it from being damaged by the filling and sanding that is needed on the fuselage.
Once the fuselage was done, the wings were attached. I had thought about putting on the nacelles first, but thought it would be easier to do the wing/fuselage joins without them in the way. Fortunately, there wasn't much filler used, so in hindsight, it would have been better to attach the engines and nacelles first.
Meanwhile the engine nacelles were worked on. You have to trap the retracting mechanism of the MLG between the engine nacelles. These were then glued together and cleaned up. When dry, they were glued to the wings. The fit of the nacelles was really very good and only a tiny bit of filler was used on one side. The next part was the worst fitting portion of the entire kit and that was the engines.
 The engines themselves were painted flat black and dry brushed to bring out
detail. Then they were glued to the engine mount. Next the cowlings were glued
in place. Fit wasn't that great but sandpaper and putty works wonders. After
this, the separate engine exhausts and cowl flaps were glued in place. Made darn
sure that everything is totally flush in circumference. You'll find the fit of
the exhausts in particular were not at all good. There were gaps and they would
not fit fully flush. The cowl flaps also did not fit all that well and needed
plenty of glue and filler during construction. Finally, these were attached to
the nacelles and the fit here was poor as well. More sanding and filling was
needed until things were properly smoothed out. During this evolution, all the
detail was removed from the engine cowlings.
The engines themselves were painted flat black and dry brushed to bring out
detail. Then they were glued to the engine mount. Next the cowlings were glued
in place. Fit wasn't that great but sandpaper and putty works wonders. After
this, the separate engine exhausts and cowl flaps were glued in place. Made darn
sure that everything is totally flush in circumference. You'll find the fit of
the exhausts in particular were not at all good. There were gaps and they would
not fit fully flush. The cowl flaps also did not fit all that well and needed
plenty of glue and filler during construction. Finally, these were attached to
the nacelles and the fit here was poor as well. More sanding and filling was
needed until things were properly smoothed out. During this evolution, all the
detail was removed from the engine cowlings.
Once the engines were done, the horizontal stabilizers were glued together and then attached to the fuselage. Meanwhile, the jet pods and wing tip tanks were glued together and cleaned up as were the main wheels. The canopy was glued together and then glued onto the fuselage. Just prior to this I applied the instrument panel and center console decals. I'd suggest removing all detail from these two parts when you do your P-2 as the decals don't come anywhere near matching what is engraved on these items.
The other two transparencies (upper fuselage and nose) were applied and all were masked off, as was the transparancy on the starboard tip tank. I now had enough of the kit built to start painting.
|
PAINTING |
The next areas needing painted were the engine nacelles and a section of radome.
Again, more masking was done and these areas painted flat black. In all, the
painting alone took over a week. Actually, nearly two of them as I had to do
some back and forth and always let any painting dry for a minimum of a day
before attempting any additional painting. Guess that is one reason why it takes
me so long to finish a model. AND THE BEAT GOES ON
At this stage, the landing gear was attached. Those parts already in place in
the main gear wells were painted aluminum. The gear themselves had some Bare
Metal Foil applied to the oleos and then they were all glued in place. Once
glued in the construct is very sturdy, but it is a bit wobbly until the glue has
dried. On the main gear struts the oleo scissors were glued on and then the
wheels. Another day to dry and the plane was up on its struts. Fortunately that
scale ton or two of weight was more than enough to keep it from tail sitting.
Then on to the decals. The sheet is pretty large (DUH!, it's a large plane), but
is mostly stripes and insignia. The first things applied were the fuselage
stripes. These are the moment of truth for any split color paint job!
Fortunately for me, the fit was pretty good. Unfortunately, it seems I painted
the demarcation line a bit high. Oh well, it still looks nice. I did one full
side of stripes and then applied some Sovaset to them. I have had good
With the decals on and the plane wiped down to remove dried glue, the final
pieces were put on. This included the gear doors, the tip tanks and the props.
The exhaust areas on the engine were painted Burnt Iron and Steel with a brush.
Then the kit had the anti-glare panel and the engine areas sprayed with matte
clear. This was to give the pastels something to attach themselves to when doing
engine exhaust stains on the nacelles.
 First thing done was that the inner upper quarter of the tip tanks and
the forward section of the jet pods were painted flat black. When dry, these
parts were masked off. Then the entire airframe was painted FS 16440 using
Testors Model Master enamels. This will provide a nice base on which to paint
the white upper surface. The upper surface white has a few convolutions that
required a mask. One was made for both sides using the kit decal as a master and
transferring that shape to masking tape. Then much of the kit was masked off and
the upper surface white was painted on, again using Testors Model Master
enamels.
First thing done was that the inner upper quarter of the tip tanks and
the forward section of the jet pods were painted flat black. When dry, these
parts were masked off. Then the entire airframe was painted FS 16440 using
Testors Model Master enamels. This will provide a nice base on which to paint
the white upper surface. The upper surface white has a few convolutions that
required a mask. One was made for both sides using the kit decal as a master and
transferring that shape to masking tape. Then much of the kit was masked off and
the upper surface white was painted on, again using Testors Model Master
enamels.
 With the painting pretty well done, it was time to return it to the workbench
for some more construction. In this case, it involved getting it onto its
landing gear so that decals could be applied. I noticed some overspray into the
wheel wells so some Tamiya Flat white was brush painted into that area. Were I
to have this be a contest model, I'd have to add some additional materials to
the gear wells and then repaint it as it is pretty naked in there.
With the painting pretty well done, it was time to return it to the workbench
for some more construction. In this case, it involved getting it onto its
landing gear so that decals could be applied. I noticed some overspray into the
wheel wells so some Tamiya Flat white was brush painted into that area. Were I
to have this be a contest model, I'd have to add some additional materials to
the gear wells and then repaint it as it is pretty naked in there.
 luck with
it in the past on Hasegawa kits, but not on this one. I got the wrinkles and was
unable to completely remove them. One just has to learn that setting solutions
are a crap shoot with Hasegawa and Tamiya decals and I rolled snake eyes on this
one. The rest of the decals went on slowly over a rather long period of time. I
didn't use any setting solution on the rest and things went pretty smoothly. I
did notice that the engine warning stripe was a bit too short to meet at the top
of the fuselage so a piece of red stripe from the spares box was used to fill
the gap.
luck with
it in the past on Hasegawa kits, but not on this one. I got the wrinkles and was
unable to completely remove them. One just has to learn that setting solutions
are a crap shoot with Hasegawa and Tamiya decals and I rolled snake eyes on this
one. The rest of the decals went on slowly over a rather long period of time. I
didn't use any setting solution on the rest and things went pretty smoothly. I
did notice that the engine warning stripe was a bit too short to meet at the top
of the fuselage so a piece of red stripe from the spares box was used to fill
the gap.
|
CONCLUSIONS |
Though it took a while to build, I had a lot of fun putting this kit together. Despite its age, the general fit of the parts is good and any tweaking needed is not beyond the skills of most modelers. The Neptune is a plane that can be done in a number of markings, witness the current version with new decals and the Revell of Germany boxing that has Dutch markings included. If your interest is in relatively large 1/72 planes in general and maritime patrol in particular, this is the kit for you. Those with the willingness to do more can convert this into an OP-2E or AP-2E and there is a Falcon vac conversion to do a P2V-5.
January 2002

|
REFERENCES |
Lockheed Aircraft since 1913, by RJ Francillon, Naval Institute Press, 1987.
Copyright ModelingMadness.com. All rights reserved. No reproduction in part or in whole without express permission.
Review kit courtesy of Marco Polo Importers. Thanks for your support.
If you would like your product reviewed fairly and fairly quickly, please contact the editor or see other details in the Note to Contributors.
Back to Reviews Page 2016