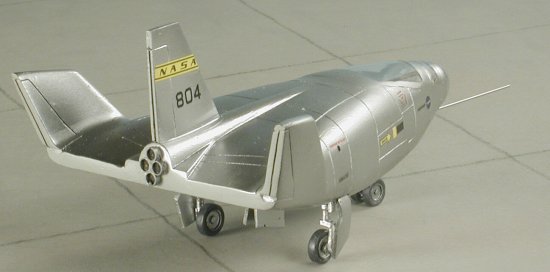
Anigrand 1/72 HL-10 Lifting Body
|
KIT # |
AA-2014 |
|
PRICE: |
$32.50 MSRP |
|
DECALS: |
one option |
|
REVIEWER: |
Scott Van Aken |
|
NOTES: |
Resin kit |
|
HISTORY |
For a nice background history, a look at some photos of the real
plane and a look inside the kit box, please
visit the preview.
|
CONSTRUCTION |
As with all resin kits, stage one is to clean up the parts. You can do it all at once or just do what you need at the time. I took the second approach. If you recall from the preview, there were several air bubble holes that needed fixed. All of these were repaired using superglue and accelerator. The key is to hit the glue with accelerator and then wash the part. Once that is done, sanding should begin to remove the excess. The shorter the period between application and sanding the better as you don't want the glue to cure all the way as it becomes very hard and more difficult to sand.
 Once that was done and I'd cleaned up the large
resin attachment points along the side of the fuselage halves, I cleaned
up the canopy openings. Then I went to work on the seat,
console/instrument panel, and control stick. The control stick almost
looks like a piece of resin sprue so you need to be careful not to toss
it away. The instrument panel piece has some large air holes, but
they will be hidden once construction is done. The instrument panel
itself is a mess. Apparently the mold didn't work well there and the
entire face was covered by a big blob of resin. This part should never
have made it into the kit. However, it did and not wanting to wait for a
replacement, I just started filing on it until it at least had some flat
surfaces to work with. Unfortunately, this kit does not have an
instrument panel decal, so I'll have to search my 'decal bits' box to see
if I can find something to put there before I close up the fuselage.
Once that was done and I'd cleaned up the large
resin attachment points along the side of the fuselage halves, I cleaned
up the canopy openings. Then I went to work on the seat,
console/instrument panel, and control stick. The control stick almost
looks like a piece of resin sprue so you need to be careful not to toss
it away. The instrument panel piece has some large air holes, but
they will be hidden once construction is done. The instrument panel
itself is a mess. Apparently the mold didn't work well there and the
entire face was covered by a big blob of resin. This part should never
have made it into the kit. However, it did and not wanting to wait for a
replacement, I just started filing on it until it at least had some flat
surfaces to work with. Unfortunately, this kit does not have an
instrument panel decal, so I'll have to search my 'decal bits' box to see
if I can find something to put there before I close up the fuselage.
After gluing in the seat (which needed some air bubble repair), stick and console assembly, I painted the interior with a medium grey. Then some of the parts were painted flat black and given a dry brushing to bring out detail. This was followed by gluing the upper and lower fuselage parts together. There was a seam, but that was filled with epoxy putty and sanded smooth.
Next step was to glue in the transparencies. I cut
them as close to the openings as I could then carefully glued them in
with non-fogging superglue. Any gaps were filled and the whole canopy
area sanded smooth. Those two sentences took about a week of constant
fussing and back and forth sanding.
 The fit of the clear bits wasn't as
trouble-free as I'd have hoped and the nose transparency was particularly
troublesome. While the transparency was oval, the area where it was to be
glued had a distinctly flat lower section. This meant a lot of filler and
sanding. Once all of that was done, the clear bits were masked as
well as could be done. I fear that I didn't get them as clear as I would
have hoped after all the sanding that had to be done to them. This may be
a problem with vac canopies that doesn't show up so much with injected
ones.
The fit of the clear bits wasn't as
trouble-free as I'd have hoped and the nose transparency was particularly
troublesome. While the transparency was oval, the area where it was to be
glued had a distinctly flat lower section. This meant a lot of filler and
sanding. Once all of that was done, the clear bits were masked as
well as could be done. I fear that I didn't get them as clear as I would
have hoped after all the sanding that had to be done to them. This may be
a problem with vac canopies that doesn't show up so much with injected
ones.
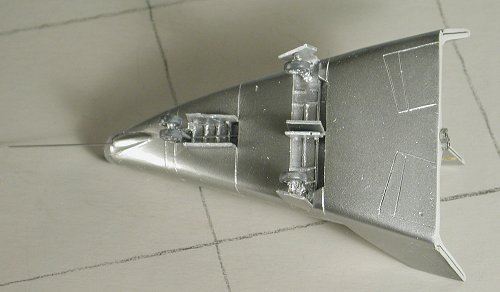
The next step was to glue the center fin in place and then fill in the seam and do a bit more sanding and polishing. Finally, I glued on the gear struts. Note that I didn't say glued in the gear struts. To do that, I'd have to drill holes for short pieces of wire in both the struts and wheel wells. Were I to open the holes in the wells to fit the struts, there would be all sorts of stuff floating in a now sealed fuselage. When you do yours, you need to plan for such things as I didn't so they were butt glued, not the best way to do gear struts. Then it was off for some paint.
|
COLORS AND MARKINGS |
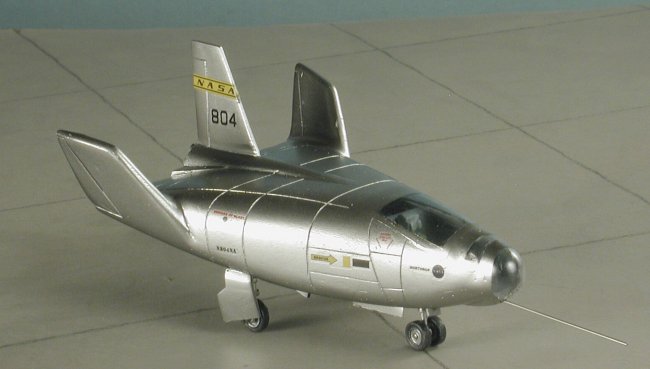
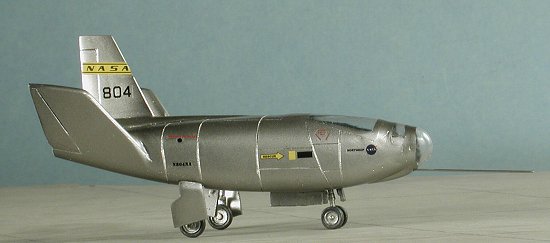
In order to get this kit finished without too much additional fuss (as I'd taken way too long on it already), I decided for the early scheme of bare metal instead of the later one with the cool white areas painted on it as depicted in the kit. Photos showed me that the early version had the rear painted a light grey, so I used Gloss Light Gull Grey for this. Mostly because I already had some mixed up and ready to go! It seems to match fairly well.
 Turning to the rest of the airframe, it was given
several coats of Alclad II gloss black undercoat. This was because I was
going to use polished aluminum. These aluminum coats were misted on both
the airframe, gear and the gear doors. Naturally, every minor pip,, dent,
scratch and defect became glaringly clear! One has to be meticulous about not
having any oils on the airframe, something I must have missed as the
center fin and outer main gear doors fish-eyed something fierce. They had
to be sanded down, cleaned up and repainted. Fortunately, Alclad II can
be handled within a few hours of painting, though it is a touch sticky
and one shouldn't handle it a lot during this time.
Turning to the rest of the airframe, it was given
several coats of Alclad II gloss black undercoat. This was because I was
going to use polished aluminum. These aluminum coats were misted on both
the airframe, gear and the gear doors. Naturally, every minor pip,, dent,
scratch and defect became glaringly clear! One has to be meticulous about not
having any oils on the airframe, something I must have missed as the
center fin and outer main gear doors fish-eyed something fierce. They had
to be sanded down, cleaned up and repainted. Fortunately, Alclad II can
be handled within a few hours of painting, though it is a touch sticky
and one shouldn't handle it a lot during this time.
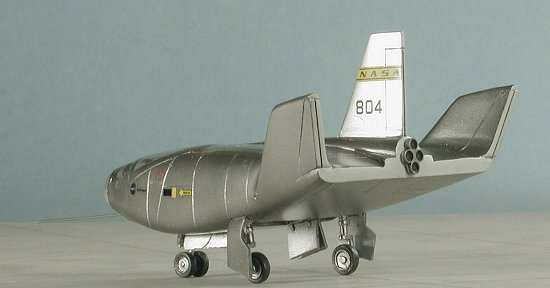
After all the polished aluminum was done, the wheels and inner gear doors were sprayed with regular aluminum and the exhaust nozzle was painted steel. Tires were painted using Floquil Weathered Black and then it was time for decals.
With no other choice but those that came with the kit, I applied the markings. They came off the backing easily and settled into place well. I used some Solvaset to help them attach a bit better to the paint. No clear coat was used as it would dull the finish.
|
FINAL CONSTRUCTION |
 Now for the final bits. Wheels were glued in place and it was then
that I discovered that the wheels were out of round. Not much to do other
than grin and bear it. I also had a bit of trouble with the gear doors.
One of them split when I was cutting it from the others. Meanwhile, the
rocket nozzles were glued in place. I also started looking around for
something to use for the nose probe as it is very prominent. Eventually,
I chose some very small diameter stainless steel tubing I'd mail ordered
from smallparts.com. Cheap it wasn't, but it was what I needed. Cutting
it required the use of a cutting disc on my Dremel. I put a slight bend
in it, drilled a hole in the nose and glued it in place. Last parts to
cement in place were the gear doors. No problems with the nose doors or
inner main doors, but the outer doors are either too large or the wrong
shape as they don't look like the drawing when they are glued in place. I
also had to cut off the few mounting tabs that were left undamaged when
attaching them. Final step was to remove the masking and paint the inside
of the nozzles black.
Now for the final bits. Wheels were glued in place and it was then
that I discovered that the wheels were out of round. Not much to do other
than grin and bear it. I also had a bit of trouble with the gear doors.
One of them split when I was cutting it from the others. Meanwhile, the
rocket nozzles were glued in place. I also started looking around for
something to use for the nose probe as it is very prominent. Eventually,
I chose some very small diameter stainless steel tubing I'd mail ordered
from smallparts.com. Cheap it wasn't, but it was what I needed. Cutting
it required the use of a cutting disc on my Dremel. I put a slight bend
in it, drilled a hole in the nose and glued it in place. Last parts to
cement in place were the gear doors. No problems with the nose doors or
inner main doors, but the outer doors are either too large or the wrong
shape as they don't look like the drawing when they are glued in place. I
also had to cut off the few mounting tabs that were left undamaged when
attaching them. Final step was to remove the masking and paint the inside
of the nozzles black.
|
CONCLUSIONS |
As I have with other Anigrand kits, I'll tell you they are not for bare
beginners, they all have some sort of molding glitches, and they are all
most welcome for who else has taken the time and effort to produce these
kits. For the normal run of resin kit builders, it is the subject that is
important and if the kit builds fairly well, as have all the Anigrand
kits I've done, then we are happy.
March 2004
Copyright ModelingMadness.com. All rights reserved. No reproduction in part or
in whole without express permission from the editor. 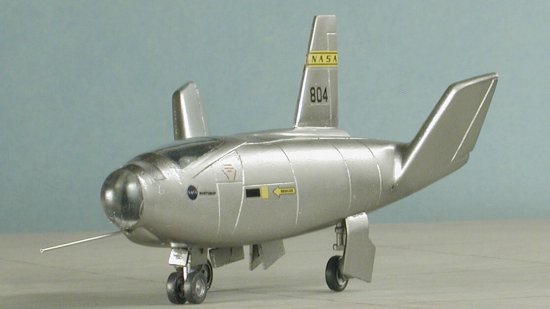 Few parts does not equate to an ultra simple build. I found after
painting the kit that there were myriad small holes where I'd over-sanded
and scratches that I'd missed when polishing the model. However, these
are not insurmountable obstacles to those who are really wanting a show
model. The rest of us who want something nice and a bit unusual for the
shelf will be pleased with the result and have a model that we can tell
our friends about all the trials we needed to overcome during its
construction!
Few parts does not equate to an ultra simple build. I found after
painting the kit that there were myriad small holes where I'd over-sanded
and scratches that I'd missed when polishing the model. However, these
are not insurmountable obstacles to those who are really wanting a show
model. The rest of us who want something nice and a bit unusual for the
shelf will be pleased with the result and have a model that we can tell
our friends about all the trials we needed to overcome during its
construction!
# 1307 in a series
If you would like your product reviewed fairly and fairly quickly, please contact the editor or see other details in the Note to Contributors.