
ESCI 1/72 F-100D Super Sabre
Kit Number: 9022
Price: $5.00
Media: Injected Plastic
Decals: For three different versions: Denmark, France, USAF
Date of Review: 4 January, 1997
The F-100 was America's first truly supersonic fighter (it could break the sound barrier in a straight line, not in a dive as others could). In a day where new aircraft were being designed and flown seemingly every year, the 'Hun' had a remarkably long life. Starting as an interceptor, it was soon shown that this rugged aircraft was well suited for the fighter-bomber role. The F-100D soldiered on in US service until the early 1970's after having seen years of war in Vietnam in the 1960's only to be replace around 1967 by the F-4C Phantom II. It was then used extensively by the Air National Guard until retirement. The Hun served well overseas with many NATO countries including Denmark, France, and Turkey. In Turkish service, it was not until the 1980's that it finally left service. Hundreds of Huns were converted to QF-100 drones and expended as targets.
 The only other F-100D that I have built in 1/72 scale
was the old Hasegawa kit. While it was basically very accurate, it
was an early kit of theirs and suffered from thick plastic, a nearly non-existent
interior, and some very frail undercarriage that was often mis-molded. The
ESCI kit, which came along in the 1980's was a vast improvement. For
one thing it had engraved panel lines, a decent interior and superb underside
molding and landing gear. If it has a downside, then it shares it with
many other F-100 kits and that is a very short intake that does not extend
into the fuselage.
The only other F-100D that I have built in 1/72 scale
was the old Hasegawa kit. While it was basically very accurate, it
was an early kit of theirs and suffered from thick plastic, a nearly non-existent
interior, and some very frail undercarriage that was often mis-molded. The
ESCI kit, which came along in the 1980's was a vast improvement. For
one thing it had engraved panel lines, a decent interior and superb underside
molding and landing gear. If it has a downside, then it shares it with
many other F-100 kits and that is a very short intake that does not extend
into the fuselage.
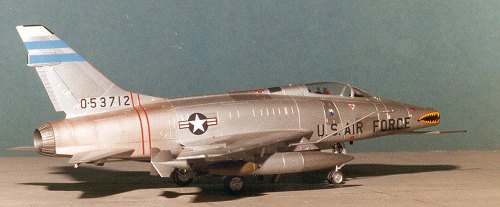
I have built several ESCI F-100 kits and it is too bad the company is out of business. If you see one, buy it. AMT redid the fuselage and made an F-100F two-seater without changing any other parts except the interior and canopy. Like the ESCI kit, it would do well to replace the kit seat shapes with some decent white metal seats from Aeroclub. I did and it adds a lot. Another problem area are the Sidewinder rails. They are molded as a T shape when they should be a Y shape. You can fix this like I did by leaving them off. The general fit of the parts is superb with almost no filler required except under the aircraft at the wing/fuselage join.
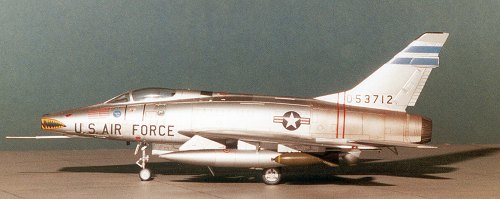 Once the kit was completed, it was time for a paint
scheme. I wanted to do a Vietnam era Hun, but did not want to do a camouflaged
version. I had a 20 year old Modeldecal sheet with just
the right aircraft on it. A Vietnam vet in bare metal. This gave
me a change to do a nice paint scheme using several different shades of
Metallizer. As with all Metallizer kits, I undercoated the aircraft
with gloss white. I used Post-its to mask as they are very lo-tack
and will not pull up the Metallizer like other tapes will. When all
the painting was done, it was time to add the decals. The ancient
Modeldecals went on with little problem. I used Solvaset on them with
no problems and I think it helped the decals quite a bit as they are
a bit thick.
Once the kit was completed, it was time for a paint
scheme. I wanted to do a Vietnam era Hun, but did not want to do a camouflaged
version. I had a 20 year old Modeldecal sheet with just
the right aircraft on it. A Vietnam vet in bare metal. This gave
me a change to do a nice paint scheme using several different shades of
Metallizer. As with all Metallizer kits, I undercoated the aircraft
with gloss white. I used Post-its to mask as they are very lo-tack
and will not pull up the Metallizer like other tapes will. When all
the painting was done, it was time to add the decals. The ancient
Modeldecals went on with little problem. I used Solvaset on them with
no problems and I think it helped the decals quite a bit as they are
a bit thick.
After decaling, it was time to weather the aircraft, which I did using pastels. It's important to get the rear to give off a kind of burned look as all F-100s are well scorched in this area. After the pastels were used for gun stains and generall grunge, I added the finishing touches. These included a new stainless steel nose pitot made from small diameter tubing, and the addition of bombs on the outer pylon courtesy of a Hasegawa weapons set.
The finished model looks great and is highly recommended to Hun lovers everywhere.