Classic Airframes 1/48 F-5B 'NATO Allies Pt 2'
|
KIT # |
488 |
|
PRICE: |
$55.00 MSRP |
|
DECALS: |
Three options |
|
REVIEWER: |
Scott Van Aken |
|
NOTES: |
Includes lots of resin parts! |
|
HISTORY |
Please visit the preview for a look in the box and a short history on the type.
|
CONSTRUCTION |
Now I could easily take the cheap way out and tell you to read the F-5A build for this part, but that wouldn't be fair game. Besides, I don't build that many of the same kind of kit to have everything go the same way every time. That's too much like 'production line' building and trust me, that takes a lot of the fun out of the hobby to do that.
 I learned a number of things from the previous build that I told myself
I'd either fix or do a bit differently. One thing that didn't change is
that I first started building sub-assemblies, starting with gluing
together the wing tanks and the belly tank. I then sanded off the ejector
stubs from the intake pieces and glued those together. Yeah, I didn't
paint them first because these parts are so close together, that painting
them afterwards will do just as well. Besides, it makes for a much
tighter join. There was a considerable amount of flash on the forward
part of the outer intake that needs to be trimmed off prior to assembly.
I learned a number of things from the previous build that I told myself
I'd either fix or do a bit differently. One thing that didn't change is
that I first started building sub-assemblies, starting with gluing
together the wing tanks and the belly tank. I then sanded off the ejector
stubs from the intake pieces and glued those together. Yeah, I didn't
paint them first because these parts are so close together, that painting
them afterwards will do just as well. Besides, it makes for a much
tighter join. There was a considerable amount of flash on the forward
part of the outer intake that needs to be trimmed off prior to assembly.
Next up, I cut the wheel halves from the sprue and then sanded each one of them down to remove about a third of their thickness. As they are they are way too thick and even after sanding down could probably have stood to be a bit thinner. Gluing these flat surfaces is a bit messy as the glue oozes out the tread, but it makes for a good join that usually needs no filler after sanding down.
 While
that was drying, I attended to the wing inserts. The wings also have
ejector towers that need to be removed. In case you are wondering just
what these towers are, here is a shot of the wing with the small tower in
where the insert goes. These are left over from when the sprues are
pushed out of the mold. Sometimes the towers are very large and sometimes
the ejectors leave little circular indentations. On this kit, most parts
of any largish size have a tower or two or three to remove. It is a
typical phenomena of short run kits. After removing the tower, I had to
sand on
While
that was drying, I attended to the wing inserts. The wings also have
ejector towers that need to be removed. In case you are wondering just
what these towers are, here is a shot of the wing with the small tower in
where the insert goes. These are left over from when the sprues are
pushed out of the mold. Sometimes the towers are very large and sometimes
the ejectors leave little circular indentations. On this kit, most parts
of any largish size have a tower or two or three to remove. It is a
typical phenomena of short run kits. After removing the tower, I had to
sand on
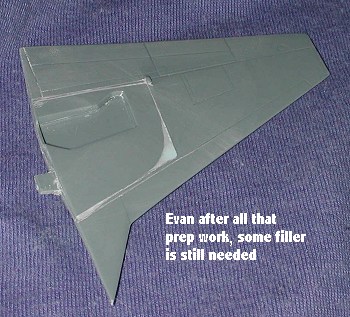 the insert and scrape away at the opening in the wing in order to
get things as flush as I could. Otherwise, the insert would be too fat
and stick up a bit. Even after all this, there were gaps that had to be
dealt with in the standard method.
the insert and scrape away at the opening in the wing in order to
get things as flush as I could. Otherwise, the insert would be too fat
and stick up a bit. Even after all this, there were gaps that had to be
dealt with in the standard method.
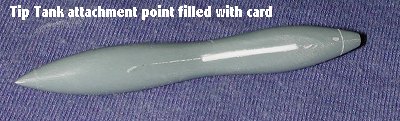 After the usual filler and
sanding that is inevitable with short run kits, I turned to the tip
tanks. Once the basic shape was sanded down, I filled the wing tip slots
with some plastic card. When it was dry, I sanded it down and applied the
usual filler to it as well. I did this as the kit tank attachments will
have these tanks level with the wing. In actuality, they should have a
pronounced downward angle. Filling the slots gives me the option to
either butt fit them or cut new slots at the correct angle. Not sure
which I'll choose at this time. After the plastic card had dried, the
usual gaps were filled and then the tips were sanded down in preparation
for the colored tip lights. I use
After the usual filler and
sanding that is inevitable with short run kits, I turned to the tip
tanks. Once the basic shape was sanded down, I filled the wing tip slots
with some plastic card. When it was dry, I sanded it down and applied the
usual filler to it as well. I did this as the kit tank attachments will
have these tanks level with the wing. In actuality, they should have a
pronounced downward angle. Filling the slots gives me the option to
either butt fit them or cut new slots at the correct angle. Not sure
which I'll choose at this time. After the plastic card had dried, the
usual gaps were filled and then the tips were sanded down in preparation
for the colored tip lights. I use
 small
bits of plastic from swizzle sticks to do this. The procedure is really
quite easy. After the tip is sanded, the chunk of colored stick is glued
in place. I give it a goodly time to dry and then start sanding away. It
is a tad time consuming so you can use a motor tool if you have one. I
like to use ultra-coarse sand paper to get things close as it cuts back
on the 'oops' factor! Once the final shape is attained, it is a simple
manner to use finer and finer grades of sandpaper to bring the lights to
a polish. Then, they can be masked in preparation for installation and
painting.
small
bits of plastic from swizzle sticks to do this. The procedure is really
quite easy. After the tip is sanded, the chunk of colored stick is glued
in place. I give it a goodly time to dry and then start sanding away. It
is a tad time consuming so you can use a motor tool if you have one. I
like to use ultra-coarse sand paper to get things close as it cuts back
on the 'oops' factor! Once the final shape is attained, it is a simple
manner to use finer and finer grades of sandpaper to bring the lights to
a polish. Then, they can be masked in preparation for installation and
painting.
 Meanwhile, I worked on the interior bits. The interior pieces and inside
fuselage in that area were painted in Dark Gull Grey, which is a pretty
good general cockpit color for modern jets. (You know you are old when
you think of an aircraft that is probably out of service as 'modern'). I
then installed the cockpit sections. The rear one went in first and fit
pretty well. I did have to be rather careful not to get it misaligned.
Though not so much of a problem with the rear, having things misaligned
was a bigger problem with the front cockpit. This is as much because of
no positive alignment in terms of fore or aft placement. I basically had
to align things by where the instrument panel fit. Then the parts were
tacked in place and when everything looked pretty good, the joins were
flooded with superglue to keep them in place.
Meanwhile, I worked on the interior bits. The interior pieces and inside
fuselage in that area were painted in Dark Gull Grey, which is a pretty
good general cockpit color for modern jets. (You know you are old when
you think of an aircraft that is probably out of service as 'modern'). I
then installed the cockpit sections. The rear one went in first and fit
pretty well. I did have to be rather careful not to get it misaligned.
Though not so much of a problem with the rear, having things misaligned
was a bigger problem with the front cockpit. This is as much because of
no positive alignment in terms of fore or aft placement. I basically had
to align things by where the instrument panel fit. Then the parts were
tacked in place and when everything looked pretty good, the joins were
flooded with superglue to keep them in place.
![]() I
then glued in the nose wheel well and put in some weight in the space
that was left, just to be sure it wouldn't tail sit. With the fuselage
halves together, I could glue in the already assembled and cleaned up
intakes. Then the resin wheel well/speed brake area was test fit. Quite a
bit of trimming was needed to get it to fit in there well, but at least
it wasn't a bit too narrow as I found when doing the A model. With that
in place, the rest of the fuselage was glued in place. It seems to me
that the molders put the tail plane attachment holes on the forward part
of the
I
then glued in the nose wheel well and put in some weight in the space
that was left, just to be sure it wouldn't tail sit. With the fuselage
halves together, I could glue in the already assembled and cleaned up
intakes. Then the resin wheel well/speed brake area was test fit. Quite a
bit of trimming was needed to get it to fit in there well, but at least
it wasn't a bit too narrow as I found when doing the A model. With that
in place, the rest of the fuselage was glued in place. It seems to me
that the molders put the tail plane attachment holes on the forward part
of the
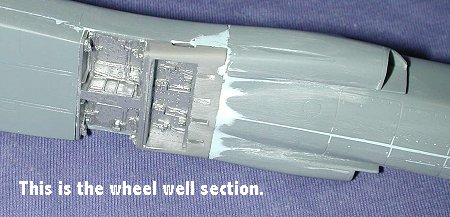 rear
insert instead of the rear section as there are two holes that will need
filled (along with a lot of other parts of the fuselage). In fact, I did
several filler applications and in the end discovered that I still missed
a few spots! Probably the most work was done on the area around the wheel
well/speed brake. Looks terrible, but all that disappears under paint!
rear
insert instead of the rear section as there are two holes that will need
filled (along with a lot of other parts of the fuselage). In fact, I did
several filler applications and in the end discovered that I still missed
a few spots! Probably the most work was done on the area around the wheel
well/speed brake. Looks terrible, but all that disappears under paint!
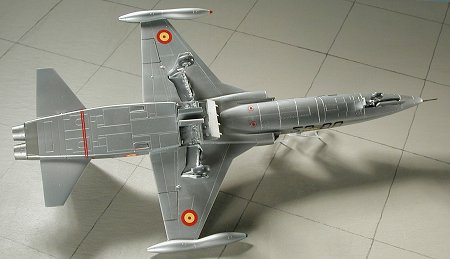
 With
the fuselage pretty well done, the wings were glued in place. I did have
to trim the tabs on them to get them to fit properly, but this time, they
fit much better than on the A. A touch of filler was needed on the joins.
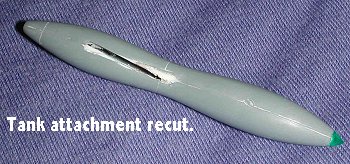
While that was drying, I cut the grooves in the wing tanks at the proper
angle to fit on the wing tips. It doesn't take much and I wasn't very
scientific about it, just using a cutting disc on my motor tool to make
the work quick and easy. With the wings dry, these were then glued on and
a bit of filler used to smooth things out.
With
the fuselage pretty well done, the wings were glued in place. I did have
to trim the tabs on them to get them to fit properly, but this time, they
fit much better than on the A. A touch of filler was needed on the joins.
While that was drying, I cut the grooves in the wing tanks at the proper
angle to fit on the wing tips. It doesn't take much and I wasn't very
scientific about it, just using a cutting disc on my motor tool to make
the work quick and easy. With the wings dry, these were then glued on and
a bit of filler used to smooth things out.
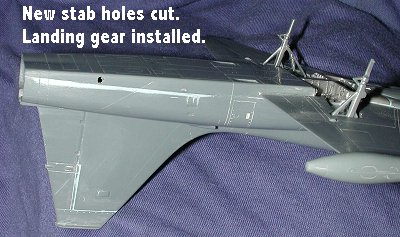 Then
I glued on the landing gear legs so that when it came time to paint, I
could put it on its gear to dry. On the main gear, the forward sections
had to be trimmed to fit as they are too long on the bottom. I had little
trouble with the small resin part on the nose wheel. I did have to drill
out the nose gear and install a pin to fit into the hole in the nose
well. I also drilled out the stabilizer attachment holes, first
using drill bits and then using round files. I had to shape the pins on
the stabs as well for they were really huge. Once I got the holes large
enough I test fit the stabs and did some fine adjustments to get a tight
fit.
Then
I glued on the landing gear legs so that when it came time to paint, I
could put it on its gear to dry. On the main gear, the forward sections
had to be trimmed to fit as they are too long on the bottom. I had little
trouble with the small resin part on the nose wheel. I did have to drill
out the nose gear and install a pin to fit into the hole in the nose
well. I also drilled out the stabilizer attachment holes, first
using drill bits and then using round files. I had to shape the pins on
the stabs as well for they were really huge. Once I got the holes large
enough I test fit the stabs and did some fine adjustments to get a tight
fit.
 Back
at the cockpit, I had to install the rear anti-glare shield and put in
the center section and forward canopy actuators. This didn't fit as well
as I'd hoped for it seems I got the forward cockpit a bit crooked. It
required a bit of trimming to get everything in place. I then glued on
the windscreen. There is a gun sight, but it is way too tall and even
trimming it won't get it to fit. I have t
Back
at the cockpit, I had to install the rear anti-glare shield and put in
the center section and forward canopy actuators. This didn't fit as well
as I'd hoped for it seems I got the forward cockpit a bit crooked. It
required a bit of trimming to get everything in place. I then glued on
the windscreen. There is a gun sight, but it is way too tall and even
trimming it won't get it to fit. I have t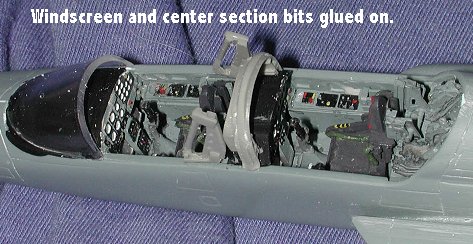 o tell you that you pretty well have to build this
kit with the canopies open. I did try to fit them all in the closed
position and not only do you have to cut away quite a bit of resin
to get them even close to fitting, you also have to leave out the center
section. I'm not sure if anyone has thought to do a vacform canopy for
this and the single seat kit, but that is what will be needed to do a
closed canopy model. Either that or some cutting on the clear bits to
trim them down to size. Anyway, with the new parts on, the next step was
to replace the kit pitot tube. It isn't bad, but it really is softly
detailed and so I used telescoping stainless steel tubing to replace it.
It may be a tad too far forward, but it looks a whole lot better. I
didn't install it just yet, but wanted to make sure it fit before
painting started. I did a lot of rather awkward-looking masking of the
cockpits and masked the canopy parts, then headed for the paint shop.
o tell you that you pretty well have to build this
kit with the canopies open. I did try to fit them all in the closed
position and not only do you have to cut away quite a bit of resin
to get them even close to fitting, you also have to leave out the center
section. I'm not sure if anyone has thought to do a vacform canopy for
this and the single seat kit, but that is what will be needed to do a
closed canopy model. Either that or some cutting on the clear bits to
trim them down to size. Anyway, with the new parts on, the next step was
to replace the kit pitot tube. It isn't bad, but it really is softly
detailed and so I used telescoping stainless steel tubing to replace it.
It may be a tad too far forward, but it looks a whole lot better. I
didn't install it just yet, but wanted to make sure it fit before
painting started. I did a lot of rather awkward-looking masking of the
cockpits and masked the canopy parts, then headed for the paint shop.
|
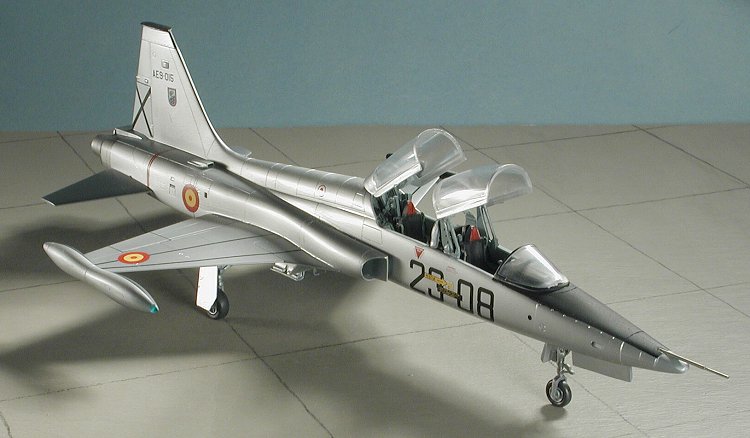
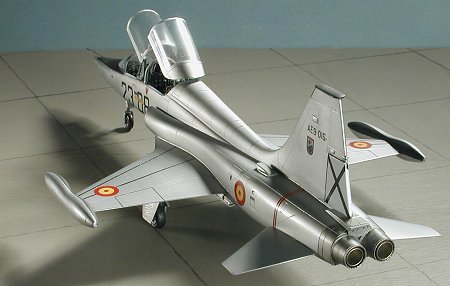
COLORS & MARKINGS |
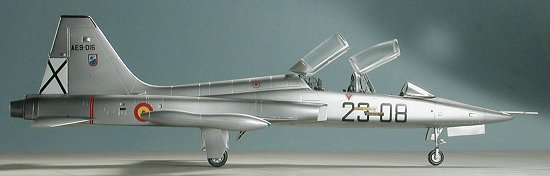
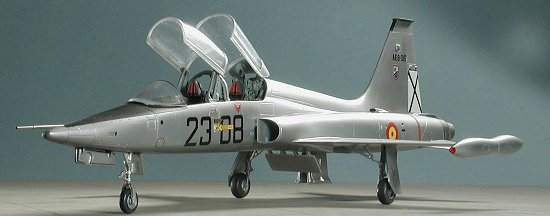 I decided to do this one in a silver scheme and for
this kit, that meant the Spanish AF version. Most F-5Bs were delivered in
this scheme, even the Canadair versions, as they were mainly used for
trainers. Later, many were given some sort of camouflage. They were in
silver lacquer and not bare metal so they could look very ratty. I
decided to take the easy way out and just use Alclad II Aluminum which I
would later give a coat of matte clear to dull it out and then add some
gloss to bring back the sheen, but not the metallic glint. It has worked
before so should do so as well this time.
I decided to do this one in a silver scheme and for
this kit, that meant the Spanish AF version. Most F-5Bs were delivered in
this scheme, even the Canadair versions, as they were mainly used for
trainers. Later, many were given some sort of camouflage. They were in
silver lacquer and not bare metal so they could look very ratty. I
decided to take the easy way out and just use Alclad II Aluminum which I
would later give a coat of matte clear to dull it out and then add some
gloss to bring back the sheen, but not the metallic glint. It has worked
before so should do so as well this time.
After the entire airframe was painted with Alclad II, I masked off the nose and tip tanks to paint the black anti-glare panels. The instructions fails to point out the black tank areas, but they are there on all the slides I have of silver F-5Bs. I also masked off the upper leading edge of the fin and the entire flat part of the fin tip for these were also often painted black. I then glued on the exhaust section on the back (after a LOT of trimming) and painted that area in Dark Aluminum with a touch of jet exhaust in it to make it a bit darker.
 Back at the bench, I applied the decals. These fit
very well though I did have a bit of trouble with the turbine warning
stripes. These are a bit fiddly and didn't want to fit the compound
curves of the rear fuselage too well. These and the other stripes are
overly long so you will have to trim them. No worries with the rest and
regular old Microsol/set was all that was needed.
Back at the bench, I applied the decals. These fit
very well though I did have a bit of trouble with the turbine warning
stripes. These are a bit fiddly and didn't want to fit the compound
curves of the rear fuselage too well. These and the other stripes are
overly long so you will have to trim them. No worries with the rest and
regular old Microsol/set was all that was needed.
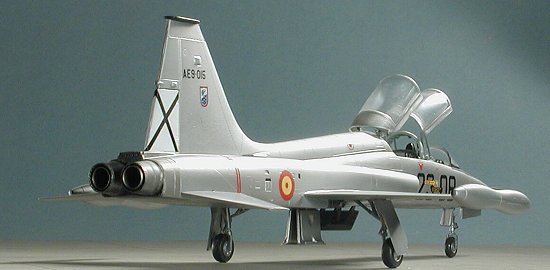
With the decals in place, I then attached the nose probe, wheels, speed brake and gear doors. Then the entire airframe was given a coat of matte clear followed by a dusting of gloss clear.
The final things I did was to remove the masking from the windscreen and then glue the canopies into place. I was actually surprised that they fit as I'd found a photo of the rear canopy mechanism on an F-5F and was able to get the little bits to fit without too much trouble. I then quickly took it to the photo lab to get pictures of it before I broke something!
|
CONCLUSIONS |
Considering that I'd run into most of the problems before with the F-5A, I knew what was coming and so was able to correct some things and do a bit of prep that wasn't done before. It still isn't a toss together kit and does need work to get it looking right, but the end result is well worth it. Besides, it is just a cool looking airplane. It isn't often that I do more than one of a certain kind of kit, but if a CF-5D is offered, I'll be seriously considering doing one of those as well!
July 2004
#1324 in a series
Copyright ModelingMadness.com. All rights reserved. No reproduction without express permission.
If you would like your product reviewed fairly and fairly quickly, please contact the editor or see other details in the Note to Contributors.