
Valom 1/72 Northrop BT-1
| KIT #: | 72016 |
| PRICE: | $ |
| DECALS: | Two options |
| REVIEWER: | Scott Van Aken |
| NOTES: | Short run multimedia kit |
| HISTORY |
The Northrop BT was a two seat, single engine, monoplane, dive bomber built by the Northrop Corporation for the US Navy. At the time Northrop was a subsidiary of the Douglas Aircraft Company. The design of the initial version began in 1935. A 700 hp Pratt and Whitney XR-1535-66 Twin Wasp Jr. double row, radial air-cooled engine powered the aircraft. The aircraft ha d slotted flaps and a landing gear that partially retracted.
The next iteration of the BT, designated the XBT-1 was equipped with a 750 hp R-1535 engine. This aircraft was followed in 1936 by the BT-1 that was powered by an 825 hp Pratt and Whitney R-1535-94 engine. 54 aircraft were built, more than enough to equip two squadrons, one aboard Yorktown and the other aboard Enterprise. Other ships used the Helldiver biplane or the later Vindicator. One of the BT-1 aircraft was modified with a fixed tricycle landing gear and was the first such aircraft to land on an aircraft carrier.
The next version, the XBT-2, was a BT-1 aircraft modified in 1939 by Douglas Aircraft Company to incorporate a fully retracting landing gear, wing slots, a re-designed canopy, and was powered by an 800 hp Wright XR-1820-32 radial air-cooled engine. The XBT-2 became the prototype for the Douglas SBD-1.
| THE KIT |
Valom has been making interesting multimedia short run kits for a few years now and each one seems to be an improvement over the one previous. This is to be expected for as one gains experience, one learns what works and what doesn't. When the BT-1 was announced late last year, I was very much looking forward to it. It is an aircraft that has been overlooked by many kit makers,  though I'm sure that there have been vacuformed and resin versions, I've not seen them.
It is not a lovely plane, but it is very important in the history of Naval Aviation, being the progenitor of the famous SBD Dauntless, both designed by John Northrop, who was a brilliant designer, but who was not good at keeping aircraft companies together, having his first one bought out by Douglas and losing control of the second in a hostile takeover.
Anyway, this kit has nicely engraved panel lines that some may think are too large, but I don't and a coat of paint will lessen this impression. The fabric control surfaces are represented by some raised lines and no real fabric detail. However, most of us don't think that is a concern. There is some framework detail on the inside of the cockpit. Large pieces will have small ejector towers that one will want to remove and I saw one sink area on a bulkhead piece. Small pieces have medium size sprue gates so care will be needed to remove them.
Resin is used for a majority of the interior bits like the floor, seats, instrument panel and various other bits such as the engine banks, exhaust and bomb body. These parts are very nicely cast and have small or thin resin attachment points so that one can use a hobby knife to remove them from the pour stubs.
 There are two photo-etch frets. one is for the dive brakes and is very nicely done. The other is for various smaller pieces like bomb fins, seat belts, instrument panels, and other small bits. You have a choice of an injected or vacuformed canopy. Both are well done and quite clear. I like this option as those who want to show off the inside can use the vac canopy while others can use the injected one.
Instructions are on a glossy paper and are well done. A breakdown of parts, and several nicely drawn construction steps are included. The ID tags are considerably smaller than earlier kits and much appreciated. Colors are given in Humbrol, Agma, Model Master, Gunze and FS 595 references. The painting and decal guide is in full color. Markings are given for the two units that operated the aircraft. One is the box art squadron, VB-5 aboard the Yorktown in 1937/38. It has a red tail section with a blue nose, wing, and fuselage band. The blue did not print well and looks purple, but it is blue. The other with VB-6 aboard the Enterprise has a blue tail section and wing bands. The decals are very well done and I noted no registration problems. Even the prop tip markings are provided. I should note that the 'B' for theVB-6 aircraft should probably be in black as it is not over a fuselage band.
| CONSTRUCTION |
Valom kits have always been ones that you need to do some careful studying of the instructions before starting. Parts placement can be vague, but there are clues and additional drawings that will often help in this regard. Sometimes the parts have areas marked off to help out.
 I started this one with the interior. The resin floor had the seat, center bulkhead, control stick and a number of other bits (like the rudder pedals and etched pieces) added. I also put on the pilot's harness to the seat prior to painting. I found that, once again, the harness seems to be too short, but I did what I could. Then the interior and inner fuselage were painted aluminum along with several other pieces, like the inside of the wheel wells and the wheel hubs themselves.
I next taped the fuselage halves to see if I could fit the interior from the underside. This seemed to be possible so the fuselage halves were glued together after installing the rear gun mini-bulkhead and the forward oil cooler backing plate. This latter was way too wide so had to be trimmed down to fit. Doing it this way made installing the interior much easier. Same for putting in the instrument panels.
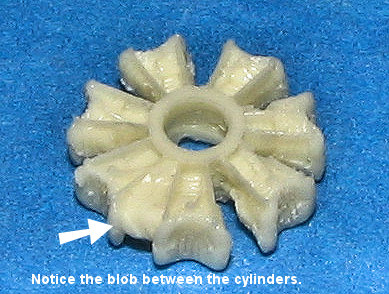 Meanwhile, the engine halves and cowling were assembled and the seam on the cowling cleaned up. These were also painted aluminum. The engine moldings are not terribly good in one respect. That is that there was a large lump of resin fusing two cylinder banks together that took careful work with a motor tool and files to clean up. Test fitting the engine/cowling to the forward fuselage showed that it just didn't fit, thanks to the small indentations for the exhaust that are molded on the forward fuselage. I left it go until after the airframe was completed.
I filled and filed the fuselage halves and then attached the tail planes. Next, the lower wing center section was glued in place after removing some rather large flash on the rear fuselage opening. The upper wing halves were also attached at this time to be sure that things were level.
 I installed the instrument panel and then glued in the interior. It was a tight fit, but this method seemed to work out rather well compared to other kits I've done. The rear radio panel was then glued in place along with its etched face radio. The seat and loop antenna were left off until I was ready to install the canopy.
 The next item was to install the wings. These fit fairly well though there was the usual need for filler at the attachment points. Nothing major, though. I did find that fitting the screen into the forward oil cooler opening was a bit of a challenge. It seems that this area is a tad shorter than on the real plane (or maybe it is broader and just seems shorter), but with some work, you can get an acceptable fit. The tail planes were easy as was the tail wheel. Again, some filler was needed
The main gear wells were assembled and glued into place. You do need to take care that they line up with the little wedges that are molded on the wing. They fit flush with the back of these wedges. You'll need filler to smooth things in place.
Once that was done, I decided to start painting.
| COLORS & MARKINGS |
Pre-war US planes are very colorful and also require a lot of masking, so painting will not be a simple task. This is made a bit more difficult by not having any of the stripes supplied as decals. I chose the USS Enterprise version as I did not want to have to mask the fuselage band. Lazy? Perhaps. But I figured most would do the box art plane and I wanted to do the other option. Step one for me was to mask off the cockpit area and spray everything with Alclad II Primer and then a coat or two of Aluminum. Actually, this worked out great as it pointed out some areas where I needed more filler.
 That was done and more Aluminum sprayed on. Then I sprayed Floquil Reefer White on the upper wing and around the leading edge. Though the instructions don't show it, Wayne Telvin of Yellow Wings Decals was kind enough to send me a scan from the original painting instructions. They clearly show that the yellow wrapped around the wing leading edge. It also showed where the wing stripes were to be applied. Once all the yellow was painted on (and I did the upper dive brakes as well, that area was masked for the blue wing stripe and the black wing walkway. I also masked the tailplane area so that I could paint that blue as well. It is supposed to be True Blue. Wayne told me that Testors French Blue is the closest match. Not having any of that, I used Xtracolor FS 15414 blue that seemed to be a relatively close match. This took several days to dry. Some times, I just mix the paint wrong and it stays tacky for quite a lot longer than I'd like.
Once the blue and black were dry, I masked it all off and went back to the bench to add more stuff.
This time, I installed the gunner's seat and the DF antenna. I did not put in the gun nor did I attach the bomb cradle. Two reasons. One is that I broke the bomb cradle into three pieces while removing it from the sprue. Second, 99.9% of the aircraft's life was spent without these items attached. Only when going out on gunnery or bombing exercises with live weapons would these items be installed. Most of the plane's flight time was spent without these items so I just left them off. Besides, the resin gun is a bit too big and the mounting hole for it too small.
 I chose to use the injected canopy, though in all fairness, the vac one would probably have been a better fit as it was thinner. The injected canopy did not fit all that well at the very front and was a tad too large at the rear. It was masked and then glued in place. The gun housing and side carb intake were also glued on as I'd forgotten them earlier. I also glued on the tail hook. This needs its mounting point sanded down a bit to make it flat.
With everything masked, more Aluminum was sprayed on. The dive brakes got a coat of white then red on the inside and the surface color on the outside. These will be displayed in the rarely seen open position. Normally, just the lower brakes will be down if any are open at all as they act as flaps. I did not paint the lower fuselage area above the central brake in red as I don't think that was done in that manner.
I then started to take off the tape after things had dried a day. For some odd reason, the Aluminum started to pull up when I took off the tape next to the black wing walkway on one side. I was able to stop in time to prevent major damage and had no similar problem on the other parts of the airframe. Very odd.
I then glued on the main landing gear and their supports. The attachment point is a mere hollow in the lower wing and this needs care in constructing. I had both gear break loose later on. The wheels also needed drilled out to fit the axles.
At this time, I put on the decals. The Valom decals are quite thin and did not react at all to Solvaset, which means that they did not snuggle down into the detail on the wings. The yellow on the upper insignia shows through a bit, but it isn't bad. As I mentioned in the preview, there should be a black 'B' for the Enterprise plane. Look though I did, I was unable to find an exact replacement. I thought of using some from the Yellow Wings Vindicator sheets, but since they never sent me any 1/72 sheets, that wasn't possible. Besides, the font was different. So I had no real choice but to use to the incorrect, white, 'B'. I also had a small decal slip and couldn't get it unstuck to put in its proper place. The kit provides decals for the prop blade tips, but mine were very brittle and broke into pieces while trying to get them in position. I ended up hand painting the stripes.
| FINAL CONSTRUCTION |
 Lots of bits on this one. Forward gear doors were glued in place before moving to the dive brakes. There is a piece that fits into the back of the wing before putting on the brakes themselves. This piece was narrower than the opening. Perhaps I needed to squeeze the wing together and glue it back there before attaching the wing to the fuselage. The dive brakes were glued in an open position just to add some character to things. Normally, if any of the brakes were open on the ground, it would have been just the lower ones. Besides, the fit of the brakes isn't perfect when closed so open is a better choice.
Other small bits included the radio mast and a pitot tube, which I made from tubing. The landing light area has to be enlarged as it is too small for the lens to fit. Once I had it about as good as I was going to get it, I attached the lens using clear paint.
The engine wasn't going to fit with the circular firewall provided as the little exhaust placement 'nubs' on the fuselage halves interfere . What I did, was to take a round file and file out openings in the firewall that matched the small exhaust cut-outs. It took some time and a lot of dry fitting, but got it where it was a good fit. Then I glued on the firewall. This won't fit cleanly into the fuselage opening, but if it goes all the way in, it will be difficult to find an attachment point for the cowling. I put a beveled edge on the firewall piece with a sanding stick and glued it in place. Took a bit of fudging and shifting, but eventually got it in place. The cowling was glued on and then the small resin exhaust piper, which were pre-painted with Burnt Iron. Then a small hole was drilled in the upper forward fuselage and the sight was cemented in place.
The final step was to remove the masking and then do some paint touch-up. Naturally, the touch-up paint wasn't exactly the right shade........ I then gave the model a coat of clear gloss. These planes really were well maintained to near-showroom condition so no staining or other crud was added.
| CONCLUSIONS |
I enjoyed building this kit. Yes, it did offer a few challenges along the way and that is something that I like, for it makes me feel I'm accomplishing something in the build. None of them were difficult to overcome and the end result is a very nice model of a little-known, yet important part of US naval aviation history. If you are a fan of the yellow wing era and feel you can handle a kit like this, then it is one that I'd recommend to you.
| REFERENCES |
Wikipedia and Google My thanks to Valom for providing the review kit. Visit their website to see what other interesting models they offer.
December 2006
#1445 in a series
Copyright ModelingMadness.com. All rights reserved.
If you would like your product reviewed fairly and fairly quickly, please contact the editor or see other details in the