Azur/FRROM 1/72 PZL.11f 'In Rumania'
| KIT #: | FR0023 |
| PRICE: | $ |
| DECALS: | Five options |
| REVIEWER: | Scott Van Aken |
| NOTES: | Short run with photo etch and resin parts. |
| HISTORY |
The
PZL P.11 was a Polish
fighter aircraft, designed in the early 1930s by PZL in Warsaw. It was briefly
considered to be the most advanced fighter aircraft design in the world. The PZL
P.11 served as Poland's
 primary fighter defence in the Polish campaign of 1939,
but by that point was outdated due to rapid advances in aircraft design in
comparison to more advanced contemporary fighters, including the Hawker
Hurricane and Messerschmitt Bf 109.
primary fighter defence in the Polish campaign of 1939,
but by that point was outdated due to rapid advances in aircraft design in
comparison to more advanced contemporary fighters, including the Hawker
Hurricane and Messerschmitt Bf 109.
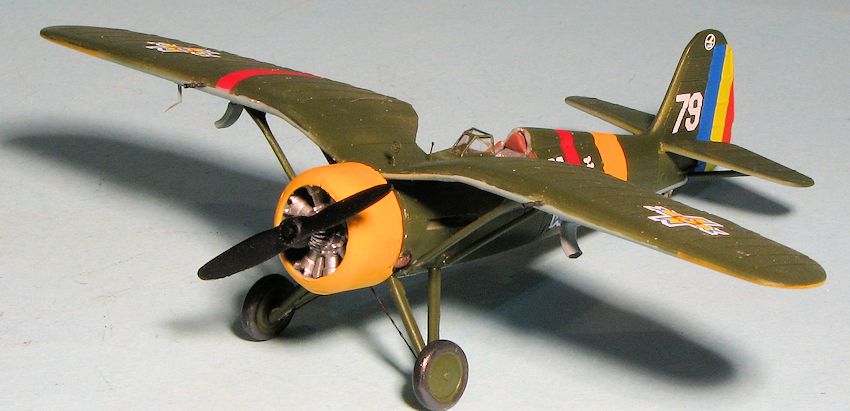
The P.11 and its slightly faster brother, the P.24, were good sellers in the overseas market. PZL fighters were operated by Greece, Turkey, Bulgaria and Romania with the latter obtaining a production license under the designation P.11f. Eighty aircraft, powered by 443.7 kW (595 hp) I.A.R. 9K Mistral engines, built as licence production by I.A.R. in Romania. Despite their obsolescence at the start of Romania's entrance into WWII, they were useful aircraft and had some successes against the Soviets.
| THE KIT |
 There are additional bits on the sprues that you do not need as they are not
germane to the P.11f. I found it to be a nice option that resin skis are
provided as a couple of these aircraft were operated on skis during their
lifespan. A few things I noticed. One is that there are ejector towers on
all the large pieces. This means the inside of the fuselage and the inside
of the upper and lower wing halves so you will need to remove those. I was
also impressed at how well the corrugated surfaces were done. Thankfully,
these corrugations do not extend over the wing leading edges. I also noticed
that there are no pushrods on the engine, nor do the instructions show these
needing to be added. It will add a lot to the engine if these are added; at
least to the front row, but it is your choice. This would have been a nice
p.e. or resin addition.
There are additional bits on the sprues that you do not need as they are not
germane to the P.11f. I found it to be a nice option that resin skis are
provided as a couple of these aircraft were operated on skis during their
lifespan. A few things I noticed. One is that there are ejector towers on
all the large pieces. This means the inside of the fuselage and the inside
of the upper and lower wing halves so you will need to remove those. I was
also impressed at how well the corrugated surfaces were done. Thankfully,
these corrugations do not extend over the wing leading edges. I also noticed
that there are no pushrods on the engine, nor do the instructions show these
needing to be added. It will add a lot to the engine if these are added; at
least to the front row, but it is your choice. This would have been a nice
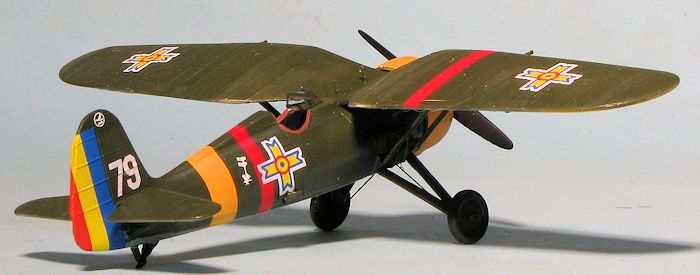
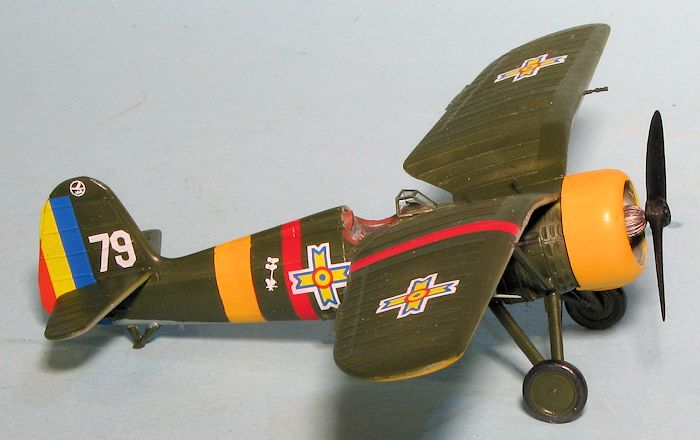
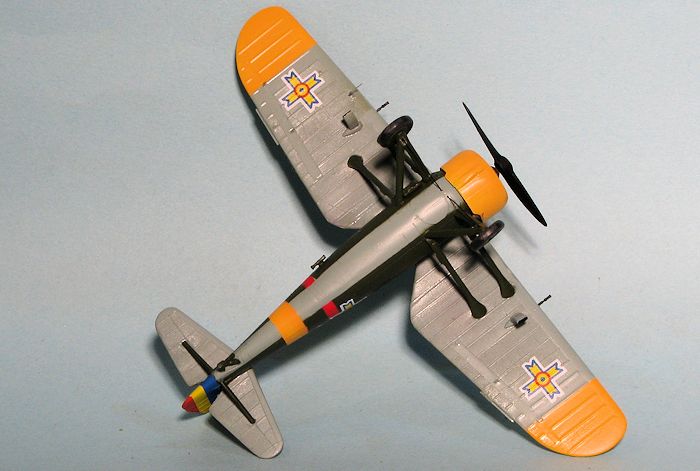
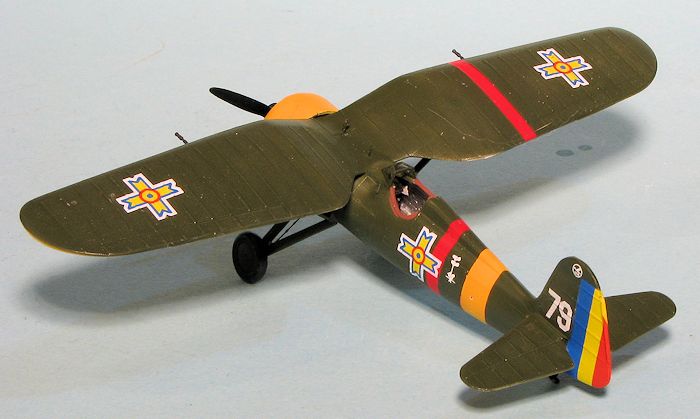
p.e. or resin addition. Markings are provided for five aircraft. All are in an olive green/khaki upper with light blue undersides. Cowlings, lower wing tips and fuselage bands are in yellow. Two of the options also have red fuselage bands behind the cockpit. These planes also have a red stripe atop one wing. A further two have rudder stripes. All are from the late 1941 time period. Something that is always interesting is that there are several different sizes and designs for the insignia used on these aircraft so one will need to pay attention to what goes on which option when one makes their choice. The decal sheet is superbly printed by Aviprint and will be quite thin.
| CONSTRUCTION |
 First thing I did was to assemble the main interior
bits. There are two interiors provided so be sure to use the proper one as the
other has a head rest that is far too wide. Not that it would really matter in
the end. I also glued in the seat, which was a bit of a mistake and shouldn't be
added until after the belts are installed. There are two side rails on the seat
that need to be made of stretched sprue. I used bronze wire for this. The upper
belts need to drape behind the seat a bit which is why you need to install the
seat after the belts are attached. I also glued in the rudder pedal and attached
the small photo etch foot braces. The control stick is simply a straight piece
of plastic and rather thick. Replacing wouldn't be a bad idea, though I did not.
First thing I did was to assemble the main interior
bits. There are two interiors provided so be sure to use the proper one as the
other has a head rest that is far too wide. Not that it would really matter in
the end. I also glued in the seat, which was a bit of a mistake and shouldn't be
added until after the belts are installed. There are two side rails on the seat
that need to be made of stretched sprue. I used bronze wire for this. The upper
belts need to drape behind the seat a bit which is why you need to install the
seat after the belts are attached. I also glued in the rudder pedal and attached
the small photo etch foot braces. The control stick is simply a straight piece
of plastic and rather thick. Replacing wouldn't be a bad idea, though I did not.
While all this was going on, I glued the wing sections together and also attached the oil cooler and its tiny p.e. straps to the right fuselage half. Returning to the cockpit, the instructions have you thin it down. You have to thing it down a LOT and do much test fitting. When I thought I had it right, I glued it into one fuselage half. I also glued in the instrument panel.
Apparently I did not thin it down enough and had to do a lot
of sanding, to the point of starting to remove detail from the floor and bumping
up against the seat. In reality, one needs to shave it almost down to the floor
detail. The back bulkhead also needs quite a bit of trimming. In the end I got
it close, 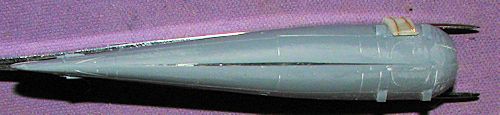 but there were still
some major gaps that required super glue to fill. The largest was on the
underside.
but there were still
some major gaps that required super glue to fill. The largest was on the
underside.
With that taken care of, the horizontal stabs were installed. This is to help align the main wing. The openings for the stabs are smaller than the tabs on the stabilizer pieces so you'll need to trim one of the two. I chose the stabs. They are also keyed, but since the slots in the fuselage are the same size, it really makes no difference which is installed where. With that done, the wing was glued in place. I had to do a bit of adjustment as the fuselage did not dry square so had to resort to trimming a bit. When dry, the landing gear were installed. The attachment holes were drilled out to provide a more positive fit. The legs need to be 33.5 mm apart. I think mine are 34mm so please, no e-mails on this. The tail skid was also attached. There are two of these on the sprues so be sure to use the correct version.
Before attaching the wing struts, I attached the trim tabs as well as the shell ejector chutes. Looking at what color things would be, I decided that now would be a good time to do some painting so I stuffed the cockpit opening with tissue.
| COLORS & MARKINGS |
 First step was to paint white areas around the rear fuselage and the upper
left wing. The lower wing tips also got some white paint as did the engine
cowling halves. I then painted the upper wing stripe and the forward fuselage
stripe with red. The wing tip undersides, the engine cowling and aft fuselage
stripe were painted RLM 04 yellow. Aside from the cowling halves, the rest were
masked off.
First step was to paint white areas around the rear fuselage and the upper
left wing. The lower wing tips also got some white paint as did the engine
cowling halves. I then painted the upper wing stripe and the forward fuselage
stripe with red. The wing tip undersides, the engine cowling and aft fuselage
stripe were painted RLM 04 yellow. Aside from the cowling halves, the rest were
masked off.
I then painted the underside with RLM 65. This included a thin strip of the lower fuselage and the underside of the wings and tailplanes. As the struts were to be the upper color, these were not installed as I hoped it would make things a bit easier to assemble. I then masked the lower wings and tail planes along with the lower fuselage using some thin tape for the fuselage. The instructions recommended FS 34079 for the upper surface. This is a dark green used in Vietnam era camo schemes.
| FINAL CONSTRUCTION |
With the main painting done, I then installed the wing struts. These were all
a little bit long, but fortunately, a bit too long is easy to fix. They were
slowly installed one at a time. With those on, the tail struts were glued in
place. Meanwhile, the main wheels were painted and when all the struts were dry,
 they were glued on. I then attached the p.e. gun sight bits. I have to confess
that I found the various photo etch control surface hinges and stuff to be an
impossible task, which is a bit odd as I seemed to have no issues with these
tiny pieces when I did the Bulgarian P.24 a few years back. The sad truth is
that I lost many of the bits trying to apply them so simply left them off once
one of them disappeared. I used .008 wire for the wires between the struts and
attached the windscreen with matte clear paint. The prop was then put in place.
Last items were the gun barrels, but I had lost them when removing them from the
sprue. Though not exactly the same, because the kit guns did not have flash
suppressors, I used a pair of Quickboost guns for the Lancaster as they were the
proper size. The windscreen was glued in place with clear flat paint and after a
bit of paint touchup, that was it.
they were glued on. I then attached the p.e. gun sight bits. I have to confess
that I found the various photo etch control surface hinges and stuff to be an
impossible task, which is a bit odd as I seemed to have no issues with these
tiny pieces when I did the Bulgarian P.24 a few years back. The sad truth is
that I lost many of the bits trying to apply them so simply left them off once
one of them disappeared. I used .008 wire for the wires between the struts and
attached the windscreen with matte clear paint. The prop was then put in place.
Last items were the gun barrels, but I had lost them when removing them from the
sprue. Though not exactly the same, because the kit guns did not have flash
suppressors, I used a pair of Quickboost guns for the Lancaster as they were the
proper size. The windscreen was glued in place with clear flat paint and after a
bit of paint touchup, that was it.
| CONCLUSIONS |
I have to confess that this one took longer than I'd anticipated. I also had not counted on all the issues I had with the photo etch, but it was my fault. Perhaps the hands are not as steady as I would like as the years go on. Anyway, that is my excuse and I'm sticking to it! The end result is still a very nice model and one that I'm glad I built.
| REFERENCES |
http://en.wikipedia.org/wiki/PZL_P.11
February 2014
Copyright ModelingMadness.com. All rights reserved. No reproduction without express permission from the editor.
Thanks to Azur/FRROM for the preview kit. If your local shop does not carry it, ask them to get it in for you.
If you would like your product reviewed fairly and fairly quickly, please contact the editor or see other details in the Note to Contributors.