Heller 1/72 Bf-109B/C
Kit Number: 121
Price: $3.00
Decals: Two versions: Luftwaffe and Spanish Civil War
Reviewer: Scott Van Aken
Date of Review: 10 August 1997
Early Bf-109s were built in relatively few numbers compared t the later versions, but it was these aircraft that helped to give the 109 and the Luftwaffe a cloak of invincibility during the late 1930's. Flown by many of Germany's early aces, the Bf-109B/C saw considerable service during the Spanish Civil War with the Condor Legion of German Mercenaries on the side of General Franco. By the time WWII had started, most of these early versions had been supplanted by the more capable Daimler Benz powered versions and the Jumo engined 109s were relegated to training commands.
Heller's kit is still the only quality kit of the early 109 in 1/72 scale. Molded in grey plastic with finely raised lines, good representations of fabric covered control surfaces and devoid of flash or visible injector pin marks, this Heller kit marks the highest quality available during the mid-1980's. Much has been said of how Hasegawa was the kit leader during this time, however I firmly believe that Heller kits of this time were of equal or better quality, despite having raised panel lines.
Construction is quite straightforward for a single engined fighter. The cockpit consists of an accurate seat, instrument panel, and control stick. There is no sidewall detailing as is typical of kits of the period. These items were painted RLM 02 grey, detailed, and glued into the fuselage. The backing plate of the propeller was inserted, the radiator glued in and the fuselage glued together. Some final sanding of the fuselage and rescribing lost panel lines completed the fuselage. The canopy was then attached using 5 minute epoxy. As with all Heller 109s, the canopy is a three piece affair allowing you to display the aircraft with the canopy open. Why is it that some Japanese kit makers of 1/48 kits do not allow this option? The canopy was then masked for painting.
The wings are next and provided no problems in assembly. Attachment to the fuselage was hassle free requiring only a minimum of filler at the front for a good fit. I got by the usual problems of a step at the top of the wing by gluing the top wings to the fuselage first and then attaching the lower wings. A rather unorthodox approach, but if I had not done this, I would have had a visible step. This approach is usually done when dry fitting shows a possible problem and there are no other extenuating circumstances. Horizontal stabilizers fit well as did the struts. The extremely fine aileron balances were then glued to the underside of the ailerons, the radio mast, and upper nose scoop were then attached.
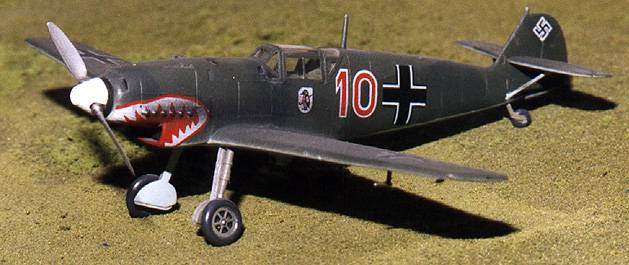
The scoop and machine guns were then drilled out and the aircraft was pretty well ready for painting. I used Gunze Acrylics for all major colors. The prop was painted with aluminum metallizer and the prop spinner with Testors white. the scheme basically all early 109s in German service was RLM 70/71 upper and RLM 65 lower surfaces. Since Heller decals are very flat, I chose to use a sharkmouth scheme from a Microscale sheet on early 109s. After the airframe was dry and glosscoated, the decals were applied. Once dry the aircraft was lightly sprayed with dullcote. Later the propeller, underwing pitot tube and landing gear were attached. The gear wells are not boxed in. In the 12 years since I have built this kit, it has held up very well and no parts have been lost. What has happened is that the Testors clear coats have caused color shifts in the paint. Both the white spinner and undersurface blue have yellowed considerably. This aspect of these products has caused me to stop using them. You cannot see them in the photo thanks to the wonders of computer enhancement.
This kit was a delight to build and only my current concentration in larger scales has prevented me from building more of them. Highly recommended
Copyright ModelingMadness.com. All rights reserved.