Anigrand 1/72 YA-9A
|
KIT # |
AA-2021 |
|
PRICE: |
$58.00 MSRP |
|
DECALS: |
one option |
|
REVIEWER: |
Scott Van Aken |
|
NOTES: |
Short run resin kit with vac canopy |
|
BACKGROUND |
Please visit the preview for a look at what comes in the box and a brief history of the YA-9A.
|
CONSTRUCTION |
 Step one with resin kits to clean them up. Doesn't matter
how well they are molded, they will all have some mold seam lines and
some flash to deal with and this kit is no exception. Rather than do a
mass clean-up as I usually do, I decided to concentrate on doing the big
bits and then clean the small ones as I needed them. First I tackled the
fuselage halves. There was some flash in the cockpit area that needs to
be removed prior to use and that was quickly done with a hobby knife.
Thankfully, the resin isn't super hard so that makes it a lot easier to
handle. I then removed and cleaned up the cockpit bits; seat, tub,
control stick and instrument panel. These were all glued together and I
installed the tub in a fuselage half while putting in the instrument
panel as it has to mate up with the combing inside. It was during this
that I found that the front and
Step one with resin kits to clean them up. Doesn't matter
how well they are molded, they will all have some mold seam lines and
some flash to deal with and this kit is no exception. Rather than do a
mass clean-up as I usually do, I decided to concentrate on doing the big
bits and then clean the small ones as I needed them. First I tackled the
fuselage halves. There was some flash in the cockpit area that needs to
be removed prior to use and that was quickly done with a hobby knife.
Thankfully, the resin isn't super hard so that makes it a lot easier to
handle. I then removed and cleaned up the cockpit bits; seat, tub,
control stick and instrument panel. These were all glued together and I
installed the tub in a fuselage half while putting in the instrument
panel as it has to mate up with the combing inside. It was during this
that I found that the front and
 back walls of the cockpit were not
exactly the same on both sides so some additional sanding and scraping
will be needed to match them up. The other large bits to do were the
wings, tail planes and the engine pods. These last items were pretty
rough on the edges and took extra time. I also had to clean out the panel
lines as there was some build-up in them that required removal. I used a
very thin saw blade to do this.
back walls of the cockpit were not
exactly the same on both sides so some additional sanding and scraping
will be needed to match them up. The other large bits to do were the
wings, tail planes and the engine pods. These last items were pretty
rough on the edges and took extra time. I also had to clean out the panel
lines as there was some build-up in them that required removal. I used a
very thin saw blade to do this.
![]() Back at the fuselage, I filled up the nose with weights
in hopes that it would be sufficient to keep it from tail-sitting. Then I
taped all the large bits in place to see if it was enough. It was
boarder-line so I put more weight under the cockpit and that seems to be
enough to take care of things. (Barely, as it turned out. Add more
weight!) With the interior bits dry and the weights
in place, the cockpit area and parts was then painted Dark Gull Grey.
When dry, the belts were painted white, the consoles and instrument panel
black and it was then installed in the
Back at the fuselage, I filled up the nose with weights
in hopes that it would be sufficient to keep it from tail-sitting. Then I
taped all the large bits in place to see if it was enough. It was
boarder-line so I put more weight under the cockpit and that seems to be
enough to take care of things. (Barely, as it turned out. Add more
weight!) With the interior bits dry and the weights
in place, the cockpit area and parts was then painted Dark Gull Grey.
When dry, the belts were painted white, the consoles and instrument panel
black and it was then installed in the
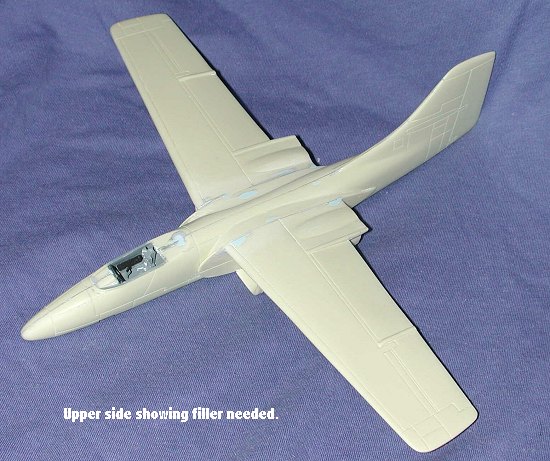
![]() fuselage. With it nice and dry,
the two fuselage halves were mated together. As I feared, the panel lines
did not end up matching across the halves. Though not off by much, it is
noticeable. Also noticeable to me was the size of the seam and the fact
that the fin did not mate into its other half quite as well as I would
have liked. Nothing irreparable, just something that will take more
filler and sanding. As usual, I did the first filling with superglue
which was sanded as soon as the accelerator was applied and washed off.
Also as usual, several other applications of filler were needed to ensure
things were properly smoothed down.
fuselage. With it nice and dry,
the two fuselage halves were mated together. As I feared, the panel lines
did not end up matching across the halves. Though not off by much, it is
noticeable. Also noticeable to me was the size of the seam and the fact
that the fin did not mate into its other half quite as well as I would
have liked. Nothing irreparable, just something that will take more
filler and sanding. As usual, I did the first filling with superglue
which was sanded as soon as the accelerator was applied and washed off.
Also as usual, several other applications of filler were needed to ensure
things were properly smoothed down.
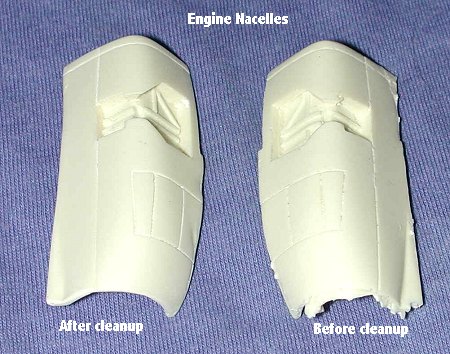
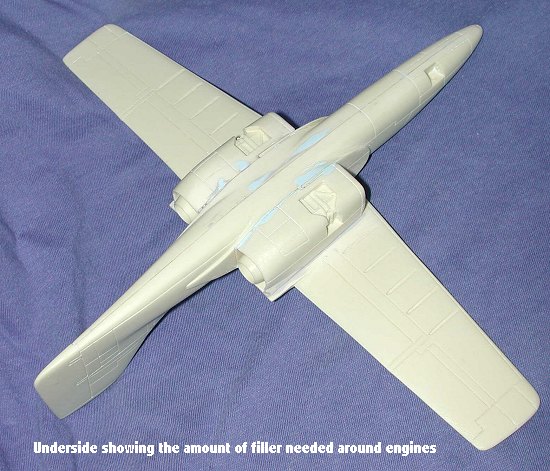
 While that was going on, I decided to do the wings and
engine pods. The wings were cleaned up as were the bits for the engines.
I had to do a lot of trimming to get the exhaust pods to fit as the
attachment points on the inside of the pods were not complete and
partially filled with resin. After the usual rounds of filing and
fitting, the exhaust pods were glued in place. The compressor intake
pieces also needed some work, though not as much as the exhaust. Thinking
back, it might have been better to just trim all the attachment points
off the exhaust, install some plastic card where the exhaust go, and glue
in the exhaust at the end of the build.
While that was going on, I decided to do the wings and
engine pods. The wings were cleaned up as were the bits for the engines.
I had to do a lot of trimming to get the exhaust pods to fit as the
attachment points on the inside of the pods were not complete and
partially filled with resin. After the usual rounds of filing and
fitting, the exhaust pods were glued in place. The compressor intake
pieces also needed some work, though not as much as the exhaust. Thinking
back, it might have been better to just trim all the attachment points
off the exhaust, install some plastic card where the exhaust go, and glue
in the exhaust at the end of the build.
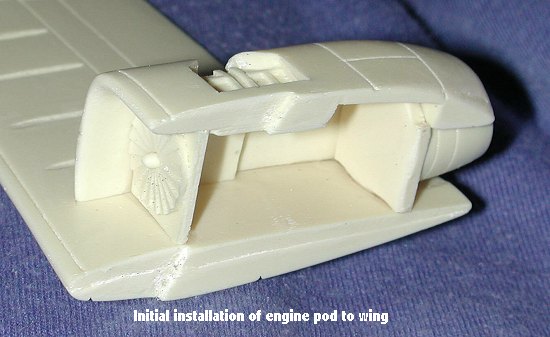
Once the pods were done, it was time to glue them to the
wings and fuselage. I did both those gluing steps at the same time to be
sure that all fit well. The superglue I used has a bit of 'fudge' time
built in so I could move things around. On one side, it
 went rather
smoothly, but on the other I ran into problems so had to use superglue
remover to take the wing and engine pod assembly apart, clean off the old
glue and reattach. There are guidance lines on the wing to help with
placing the pods, but they should just be used for an approximate
location as neither of my pods lined up with these marks. I should also
mention that before attaching the wings and pods, there are two
went rather
smoothly, but on the other I ran into problems so had to use superglue
remover to take the wing and engine pod assembly apart, clean off the old
glue and reattach. There are guidance lines on the wing to help with
placing the pods, but they should just be used for an approximate
location as neither of my pods lined up with these marks. I should also
mention that before attaching the wings and pods, there are two
 large
splitter plates that need to go on first. I aligned them with the guide
grooves on the fuselage side and that seemed to work well. Once all
was in place and dry, I began the normal round of fillers and sanding,
several applications being needed to get things in place.
large
splitter plates that need to go on first. I aligned them with the guide
grooves on the fuselage side and that seemed to work well. Once all
was in place and dry, I began the normal round of fillers and sanding,
several applications being needed to get things in place.
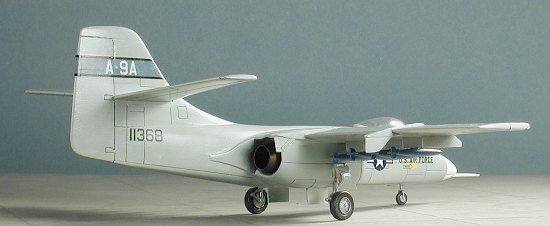
It was after all was glued in that I noticed that the fin wasn't straight. In fact, it is rather badly warped. Too late at this stage to do anything about it, but I can state with certainty that with it straightened out, there will be even more of a gap in the fin area than that which was already there. Again, nothing that filler and sanding won't fix, but you really need to be sure that all the parts are perfectly straight before assembling. I didn't and will pay the price.
The next bits to attach were the tail planes. Thanks to
the warped fin, the angles of attachment to each fin side is different as
I went and aligned them with the wings. The photographs won't show much
of a problem as I deliberately did not take any head-on images that will
emphasize the glitch! A touch of filler was needed and then I went to the
canopy. This was trimmed with som e difficulty due to the faint frame
lines and glued in place. It is actually larger than the cockpit area,
but looks OK when on. Much rather have it a bit bigger than too small.
Once in place, I let it dry, noticed that it had fogged on the inside
(RATS!), and then applied filler to the front of it to smooth it in a
bit. Then I masked it as best I could and proceeded to add some more
bits. I drilled a hole in the nose and fit in the instrument probe. Then
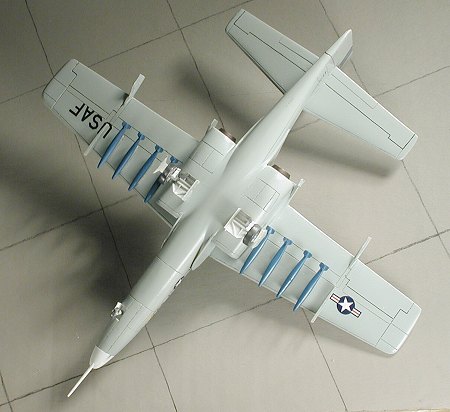
there were the myriad bomb racks. These each needed cleaning and I
left on the little stubs on the bottom. This was mainly for attaching
ordnance. It would be easy to drill holes in the ordnance and then simply
plug them into the stubs. Fit of the racks was good and I left off the
outboard ones as it appears that decals need to go on first. I also added
on the outboard flap tracks. Fit here was fair and filler was needed. The
inboard ones I left off as the instructions showed these to be the same
as the outboard ones and clearly they are not. They were also quite vague
as to exactly where they fit. I needed more information. Rather than hold
things up scrounging for a reference, I headed for the paint shop.
e difficulty due to the faint frame
lines and glued in place. It is actually larger than the cockpit area,
but looks OK when on. Much rather have it a bit bigger than too small.
Once in place, I let it dry, noticed that it had fogged on the inside
(RATS!), and then applied filler to the front of it to smooth it in a
bit. Then I masked it as best I could and proceeded to add some more
bits. I drilled a hole in the nose and fit in the instrument probe. Then
there were the myriad bomb racks. These each needed cleaning and I
left on the little stubs on the bottom. This was mainly for attaching
ordnance. It would be easy to drill holes in the ordnance and then simply
plug them into the stubs. Fit of the racks was good and I left off the
outboard ones as it appears that decals need to go on first. I also added
on the outboard flap tracks. Fit here was fair and filler was needed. The
inboard ones I left off as the instructions showed these to be the same
as the outboard ones and clearly they are not. They were also quite vague
as to exactly where they fit. I needed more information. Rather than hold
things up scrounging for a reference, I headed for the paint shop.
|
CAMOUFLAGE & MARKINGS |
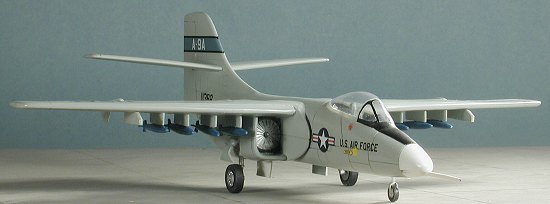
This is really the easy part. Overall gloss ADC Grey, FS
16473 using Testors Model Master enamels. And I mean everything got this
color. I had some problem with fish eyes due to oils on the resin. I
thought I got all that off, but didn't, it seems. It
 could also be due to
applying the paint too thickly at first. I find it best to mist on the
initial coat so that the rest of the paint has paint to stick to. I also
painted the outside of the gear doors. Gear struts and wheels were done in
aluminum. It looks from the preserved one that the nose wheel is black, but
I'm not really sure and I don't think it really matters. They could have
been white for all I know. Once all the overall color had dried, I masked
off the very tip of the nose and painted it white. The museum bird has the
nose in ADC grey and that is not the proper color. It should be white. The
anti-glare panel was then masked and painted matte black. Using the tail
decal as a guide, I masked off the fin area and used some medium blue for
the tail band.
could also be due to
applying the paint too thickly at first. I find it best to mist on the
initial coat so that the rest of the paint has paint to stick to. I also
painted the outside of the gear doors. Gear struts and wheels were done in
aluminum. It looks from the preserved one that the nose wheel is black, but
I'm not really sure and I don't think it really matters. They could have
been white for all I know. Once all the overall color had dried, I masked
off the very tip of the nose and painted it white. The museum bird has the
nose in ADC grey and that is not the proper color. It should be white. The
anti-glare panel was then masked and painted matte black. Using the tail
decal as a guide, I masked off the fin area and used some medium blue for
the tail band.
With all that stuff done, I then attached the additional flap guides and painted them and some surrounding areas that looked a bit thin. Next, I masked around the wheel wells and painted the wells and insides of the gear doors with Floquil reefer white. With that done, I returned to the workbench to get this beast on its wheels.
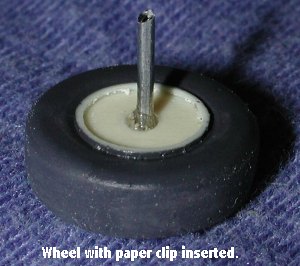 The gear themselves required the usual mass of clean-up.
The areas where the wheels were to fit were short shot on my kit so I
drilled out the lower gear. Then I drilled out the back of each wheel and
inserted a piece of paper clip. When dry, it was trimmed to the proper
length and then glued into the gear. The nose gear was drilled out on the
top and a section of paper clip also inserted. Then the attachment hole was
deepened and the nose gear glued it. The plane barely sat on the nose gear
so I guess I needed more weight!
The gear themselves required the usual mass of clean-up.
The areas where the wheels were to fit were short shot on my kit so I
drilled out the lower gear. Then I drilled out the back of each wheel and
inserted a piece of paper clip. When dry, it was trimmed to the proper
length and then glued into the gear. The nose gear was drilled out on the
top and a section of paper clip also inserted. Then the attachment hole was
deepened and the nose gear glued it. The plane barely sat on the nose gear
so I guess I needed more weight!
It was then time for the decals. These are well printed,
glossy and pretty thick. None of my setting solutions had any effect on
them whatsoever. They also didn't want to handle any wrapping around. The
tail bands were too long so needed to be trimmed. The rest went on OK,
mostly thanks to the fuselage being devoid of any really tricky curvatures
t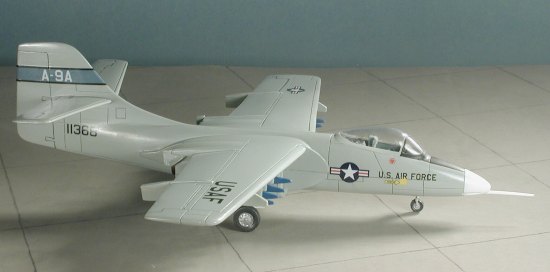 hey'd have to handle.
I decided to use the kit bombs since they were provided. The moldings are poor to say the least. Some of the bomb fins are no longer cruciform the molds slipped so much. All the bombs are oval in cross section after removing the huge mold seams. They were painted blue to resemble practice weapons. Then the holes in the top, which were mostly filled in, were drilled out so they'd fit on the stubs on the bottom of the racks. After they were glued in place, the outer racks were glued in place, and the nose gear door attached. The main gear doors were cut and glued in. Then the outer bomb racks, which I'd left off until now, were glued in place.
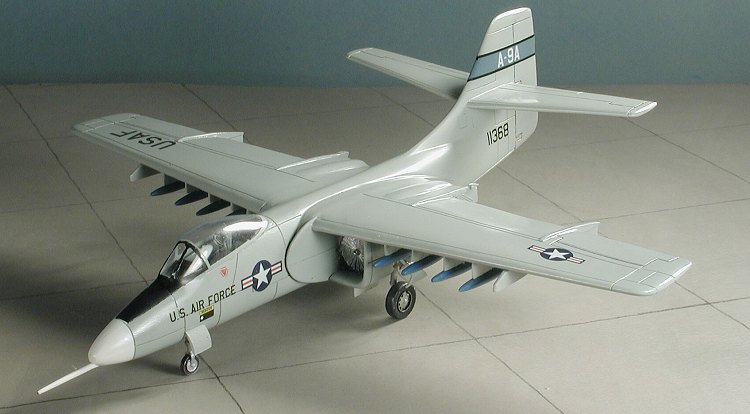
 I
then took the model back to the painting area to have a coat of gloss clear
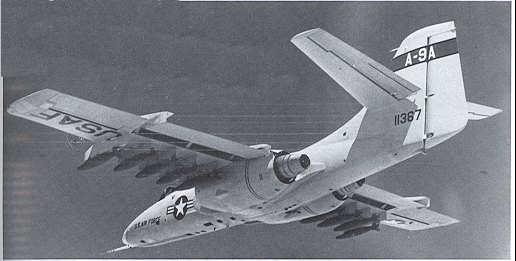
added to it. About this time, I found an article on the YA-9A and so
heisted this photo from it. As you can see, I've put the serial number a
bit too
far forward though it is correct IAW the kit instructions. The insignia may
be a tad too small and there are other differences. For one, I misplaced
the inner flap track housings and the engine exhaust area is much longer
than what is supplied in the kit. While a tad disappointing, it is not a
huge problem as few people will know anything at all about the aircraft.
Anyway, I pulled the masking of the fogged canopy and proceeded to
photograph it before something broke. Unfortunately, the butt join main
gear was unable to handle the sliding around on the photo table and one
broke loose. Just a tad more superglue put the errant part in its place. I
should have used paper clips bits for a more positive fit!
I
then took the model back to the painting area to have a coat of gloss clear
added to it. About this time, I found an article on the YA-9A and so
heisted this photo from it. As you can see, I've put the serial number a
bit too
far forward though it is correct IAW the kit instructions. The insignia may
be a tad too small and there are other differences. For one, I misplaced
the inner flap track housings and the engine exhaust area is much longer
than what is supplied in the kit. While a tad disappointing, it is not a
huge problem as few people will know anything at all about the aircraft.
Anyway, I pulled the masking of the fogged canopy and proceeded to
photograph it before something broke. Unfortunately, the butt join main
gear was unable to handle the sliding around on the photo table and one
broke loose. Just a tad more superglue put the errant part in its place. I
should have used paper clips bits for a more positive fit!
|
CONCLUSIONS |

 Well,
I now have another modern-ish prototype to add to my growing collection
of the weird and wonderful. Was this kit an easy build. No, but I didn't
expect it to be. Short run kits, regardless of if they are injected
plastic, resin, or vacuformed require more work than your average kit.
The box says for experienced modelers only and this one certainly was an
experience. I can recommend this kit because those who buy it will know
exactly what they are getting and revel in the joy of actually doing some
modeling in order to get the desired result.
Well,
I now have another modern-ish prototype to add to my growing collection
of the weird and wonderful. Was this kit an easy build. No, but I didn't
expect it to be. Short run kits, regardless of if they are injected
plastic, resin, or vacuformed require more work than your average kit.
The box says for experienced modelers only and this one certainly was an
experience. I can recommend this kit because those who buy it will know
exactly what they are getting and revel in the joy of actually doing some
modeling in order to get the desired result.
July 2004
# 1322 in a series.
Copyright ModelingMadness.com. All rights reserved.
Many thanks to DMC Models for the review kit.
If you would like your product reviewed fairly and fairly quickly, please contact the editor or see other details in the Note to Contributors.