Hobby Boss 1/48 F-18A Hornet
| KIT #: | 80320 |
| PRICE: | $86.99 SRP |
| DECALS: | Three options |
| REVIEWER: | Scott Van Aken |
| NOTES: | New tool kit at the time (2007) |
| HISTORY |
The McDonnell Douglas F/A-18 is a multirole fighter designed for aircraft carrier duty and is the first tactical aircraft initially designed to carry out both air-to-air and air-to-ground missions. The U.S. Marines ordered it as an F-18 fighter and the Navy as an A-18 attack aircraft. It can switch roles easily and can also be adapted for photoreconnaissance and electronic countermeasure missions.
The resilient F/A-18 Hornet was the first aircraft to have carbon fiber wings and the first tactical jet fighter to use digital fly-by-wire flight controls. Variants included a two-seater, an improved fighter, a reconnaissance aircraft and a night-attack fighter.
 Since the first Hornet entered service in 1980, McDonnell Douglas built over 1,200. Overseas, Hornets served with the Australian, Canadian, Spanish, Kuwaiti, Swiss, Finnish and Malaysian air forces. In November 1986, the 40th anniversary of the Navy's Blue Angels, the demonstration squadron replaced its A-4 Skyhawks with F/A-18 Hornets. They saw use as a show aircraft the following season.
Hornets entered active duty in January 1983. In 1986, Hornets on the USS Coral Sea flew their first combat missions. During the 1991 Persian Gulf War, while performing an air-to-ground mission, Hornets destroyed two Iraqi MiG-21s in air-to-air combat. During 2001, Hornets provided around-the-clock battlefield coverage in the Afghanistan theater of operations.
Thought most F/A-18A Hornets have been withdrawn from service, those modified to F/A-18A+ and the remaining F-18C models are still viable weapons systems and continue to operate with fleet units.
| THE KIT |
 The kit does follow with most modern models in that the detailing is engraved, and this includes the engraved rivet detail. This is one of the current fads in modeling aircraft and you either like it, hate it or figure it is no big deal. In my quest for molding faults, I found only ejector pin marks inside all the gear doors. No sink areas, no flash and the rest of the molding is very good indeed.
The kit is molded like nearly every other F-18 kit I've seen in that the fuselage is split horizontally with the upper wing molded with the upper fuselage. There are separate flaps, ailerons, and slats as well as a separate nose. The only reason I can think that this latter feature is included is so that later versions with longer noses or camera bays can be done. This is certainly the case with offering a two seat variant later as even the upper cockpit area and seats are in a separate bag from the rest of the kit.
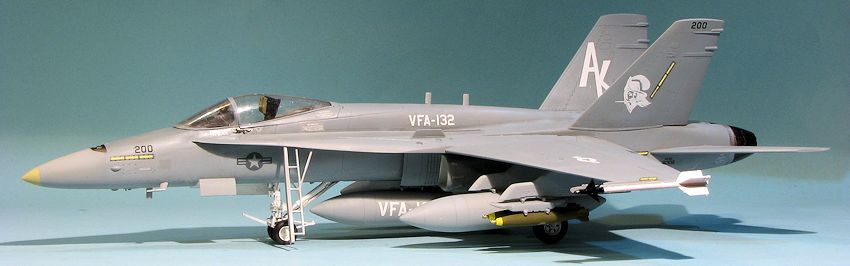
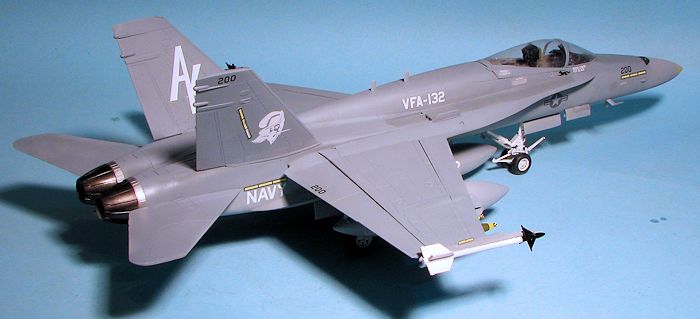
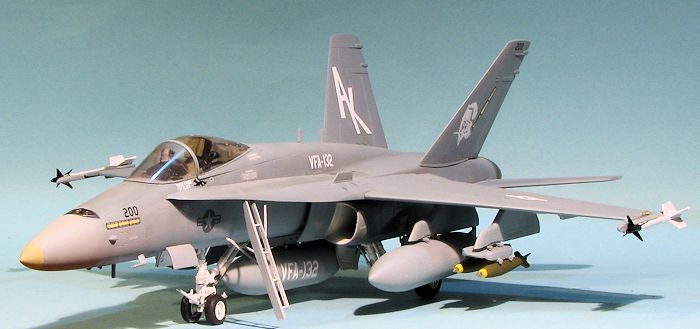
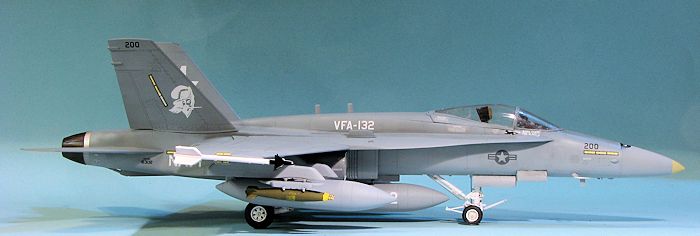
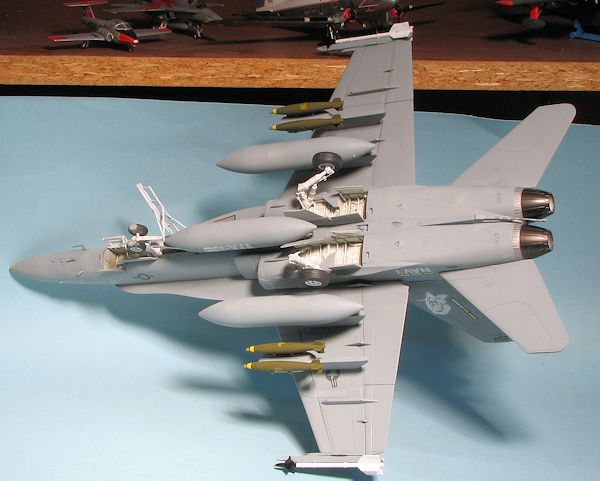
Landing gear is suitably complex and should please most if not all builders in this regard. One also finds suitably deep intakes and exhaust. Two designs of burner nozzle are given with one looking decidedly plain but not used on this kit. A boarding ladder is also supplied and though not shown, I would like to think that one could pose it up if needed. An area where this kit shines over the Hasegawa version is that it offers a large weapons load of Sidewinders, Harm, Harpoon, Mk-82 slicks and GBU-10s. JDAMS are also included, but these are not compatible with the era portrayed by the various decal options.
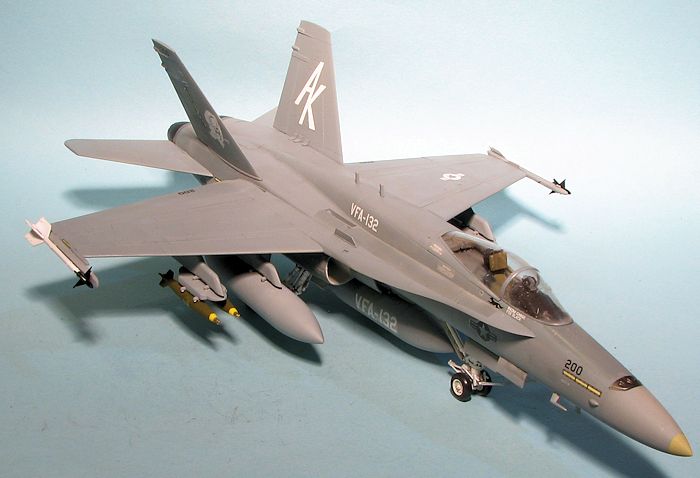
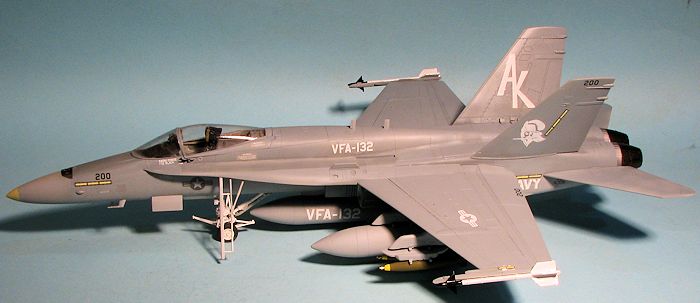
 Instructions are very well done and provide clear guidance on parts placement and colors. Speaking of which, those are offered in Gunze references. An FS 595 guide would be helpful as well, though most who build kits of this complexity will probably know what shades go where. Decals are provided for one of three aircraft. The box art plane is a later F-18A (163132) from VMFA-451 and is done in the later two greys TPS scheme. Other options are early F-18As. 161353 from VX-4 is in the three grey scheme applied early in production, while 161939 of VFA-25 is in an experimental scheme of overall FS 36320 aka Dark Compass Ghost Grey. The kit decals are well printed and an additional sheet offers weapons markings. Frankly, the yellow doesn't look opaque enough to my eyes so this may be an area of concern. My experience with Hobby Boss decals has generally been quite good, though I'm sure that many of the aftermarket sheets available for the F-18A will fit this kit without any real problems
| CONSTRUCTION |
I started building this kit back in late 2007 after having received it as a review kit from a place that is no longer in business. Over the years it has been started and stopped as I either ran into difficulty or lost interest in the projects. As modelers, many of us run into this situation when it comes to kits as what we start in great enthusiasm can easily get sidetracked and forgotten. I know I have a considerable number of incomplete projects just waiting for the day that they will get finished.
 But back to this kit. I decided to follow the instructions on building it; at least to some extent. I generally look for subassemblies and then build those up, giving me something to work on while other parts are assembled. In this case, it was the upper fuselage with its built in wing and various inserts, the flap, the bang seat, intakes, pylons and nose. Generally, the fit is fair, but some items, such as the flaps did not fit all that well. On the flaps, the insert was too shallow, the nose has a small insert that was also a bit too shallow and I found theat the LEREX insert did not fit very well. Though later in the build, the intake and side fuselage inserts were a major pain to get installed. These later bits required a lot of sanding and filling, taking much of the fun out of the build as was one reason for such a long delay.
Moving back to the cockpit, it went together fairly well and I spent a bit of time painting little bits in this area. The bang seat was not installed until very late in the build. The nose gear well is three pieces and this slides into the lower fuselage half. Atop it fits the cockpit. This then is trapped by the joining of the upper and lower fuselage. I should add that all the interior bits were first painted dark gull grey except for the instrument panel, side consoles and the ejection seat, which were painted black. The assembled nose, minus the bits that could get broken off due to handling was then glued on and the usual sanding work was done. Note that this comes with the side mounted search light used on the CF-18 so that has to be filled in. I also left off the gun port as that would be painted and installed later. Much filler was needed on the underside of the LEREX as the fit there is rather poor.
Also not a great fit are the slats and especially the cover that goes atop the wing once you install the flaps and ailerons. The flaps and ailerons are not designed to be deployed, but in the neutral position. This is not the norm for an F-18 on the ground as the usual appearance is with these lowered. There is also a piece that fits on the upper fuselage as Hobby Boss has designed this kit to also be a two seat F-18B/D. I installed the speed brake lowered as it is rarely deployed on the ground. I also built up each of the exhaust sections, but left those off until final assembly.
 The gun sight is a very fussy construct and was attached to the anti-glare shield. I then masked the windscreen and attached it. The canopy section is separate from its frame. That was glued on and then masked. It was tacked onto the cockpit opening. The fins are separate items and have three little braces on the inside. I managed to break one of them . I also installed the little fences on the fuselage. You need to open the holes for these before cementing the upper and lower fuselage.
Eventually, I had a relatively complete airframe. I left off all the antennas and the stabilators until after painting. I should mention at this time that Hobby Boss wants you to install all the various antennas that make an F-18C, so you need to leave those off. There are also antennas molded on the right forward nose gear door that should be sanded away. I am pretty sure I did not get all the C mods removed, but I think I got most of them. Fortunately, the fins are the proper ones as they are the largest visual clue.
| COLORS & MARKINGS |
 While waiting for the paint to dry, I assembled the landing gear. Each one of these comprises quite a few parts and I found that the instructions were not all that helpful when it came to the various small struts on the main gear. After painting the struts, they were glued in place and the airframe was given a couple of gloss coats using Future.
 | FINAL CONSTRUCTION |
There actually was quite a bit left to do once the decals were on. This included building up the fuel tanks and assembling the various pylons. Each pylon has separate anti-sway braces and all this stuff needed the usual cleanup. I chose a pretty standard load out that included iron bombs, fuel tanks, and the usual Sidewinder and Sparrow missiles. The kit includes the sensors for guided munitions, but does not show them being used in the build. Those who want to use the LGBs or the Harpoons could do so by adding these items.
 I then glued on all the gear doors with their various retraction struts. These are pretty complex and the Hobby Boss instructions are not totally clear on where they all fit so you'll have to rely on Google for some images of the real plane. With those bits in place, I then gave the airframe a nice semi-matte clear coat so I could see how badly the decals had silvered.
Actually, the silvering situation was not as horrible as it could have been, but still not perfect, either. With that done, I started attaching the gear doors and the wheels. It was during this process that I had a disaster that almost had be giving up on the whole thing. While resting atop my scanner, one of the main landing gear legs collapsed and the whole thing went crashing to the floor. This resulted in all the gear legs breaking off along with one of the vertical fins and several doors. It was an agonizing thing to watch, but I'd gone this far so literally picked up the pieces and started doing repair/gluing the bits back on. One of the axle shafts had broken away so that was pinned back into place along with the wheel. It all meant that what was once a nice, level, and symmetrical landing gear, was now anything but.
 I figured that I'd go ahead and put on the last bits, not caring much about doing any detail painting, just wanting to get it done so I could move on. This may sound like the kit stopped being fun, and that would be pretty accurate, at least at this point. But I did want to finish it so I then attached the radio antennas and nose sensors along with the upper gun section. The fuel tanks were glued in place, followed by the outer racks with the bombs. I then glued on the Sidewinders and decided not to attach the Sparrows. The exhaust were glued on as was the boarding ladder. The last thing was to remove the masking from the clear bits, install the seat, glue on the tail hook and the canopy.
| CONCLUSIONS |
| REFERENCES |
Probably Wikipedia though it has been so long....
December 2014.
If you would like your product reviewed fairly and fairly quickly, please contact the editor or see other details in the