Hasegawa 1/48 F-18F Super Hornet
| KIT #: | 07238 (Pt 38) |
| PRICE: | $64.98 MSRP, Less from Hobby Link Japan |
| DECALS: | Two options |
| REVIEWER: | Scott Van Aken |
| NOTES: |
| BACKGROUND |
Allow me to direct you tothe preview to have a look in the box and to read a short history on the type.
I have to confess to you that I generally find modern aircraft to be uninteresting. Perhaps it is because of what I grew up  with, but anything much after the F-14 Tomcat usually doesn't pique my interest. Don't get me wrong, I do build modern stuff, but it just that I don't have a consuming interest in them.
Analyzing this phenomena a bit farther, I do believe that it all comes down to the fact that much of what makes into a modern aircraft model consists of stuff hanging from the underside. If you look at any well equipped kit of something new, you'll find that a lot of the sprues are dedicated to pylons, bombs, rockets, missiles, ECM equipment, targeting pods and the like. These sorts of things not only are not aesthetically pleasing, but are just more things on which I can screw up a build! Many times I've done a respectable job on the airframe, only to botch things grandly when it comes to aligning the things under wings.
However, the kind folks at Hobby Link Japan sent me this kit to build so I figured I'd have a go at it. I've not built the Hasegawa 1/48 Tomcat or F-18A/C kits, though have done a few of their Phantoms. These later kits have a reputation for being difficult builds, so I thought I'd put their latest one to the task and see if this one is a snap or not.
| CONSTRUCTION |
As I peered into the box, I noted a very respectable number of things that could be done as subassemblies. Pylons, fins, control surfaces, drop tanks, and missiles all consist of 2 or more parts that need to be built. With this in mind, I started with some of these while also beginning with step one of the constructions, which is the cockpit. I glued in the control stick and stub as well as the rear controls. Then the Instrument panels were glued in place. I then sprayed the cockpit as well as the surrounding fuselage bits with FS 36231, Dark Gull Grey. I'm a fan of decals over raised bits, so I used the decals that came on the sheet. They covered well, though you will have to cut the ones for the main instrument panels to get them to fit 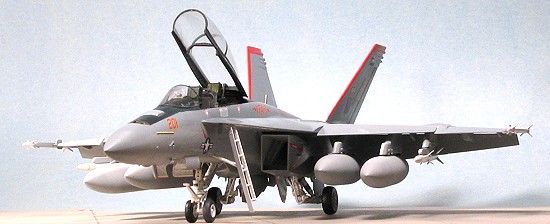 properly (I didn't and this is how I know you have to cut them). I also recommend applying the decals to the rear side consoles before attaching the two controls. I ended up cutting that area off the console decals as there is no way they'd fit with the controls already cemented in place.
The seats had the main part glued together and then painted matte black. I then set that aside for near the end as I always install seats as one of the last bits.
Meanwhile, I glued together the drop tanks and most of the large pylons. Fit on these is good but I still needed to sand and use filler on them to get them smooth. I also glued the fins together and installed the separate rudders. You'll need to sand the inside faces of the fins as some of the ejector marks stand proud. This would prevent proper assembly of the fins.
With the interior in good order, I glued it to the lower nose section that includes the wheel well. Then the forward fuselage halves were glued on. This basically means that three long parts are brought together. The fit cannot be called perfect as while there are tabs to help, things are not locked in place. Thought I tried very hard to make this a filler-free zone, it just didn't happen.
While all that was setting, I assembled the intakes. These will have a seam running down them that will be very difficult to completely fill. What I did was to apply filler to about the front 40%. This was more easily sanded using sanding sticks. The intakes were painted white and the compressor faces glued on the back of them. Then I assembled one of the intakes. 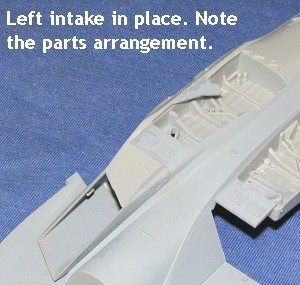 Again, getting it tight and requiring no sanding is not something I could do. This assembly, when dry, was glued onto the lower rear fuselage part. It locks in place somewhat and again, I had difficulty getting all the parts to align well and when dry had several steps; the largest one in the back near the tail plane holes. Major sanding took those down and also destroyed the detail in those areas.
Once the exterior bits are glued on and solid, the intake trunking part was glued in place. Now I do have to say that I prepainted all of the intake areas to be sure that I'd not have some very difficult masking to do later, for the trunking is white and the entry areas are in FS 36375, the underside color. I did the same thing to the other side of the lower aft fuselage and had the exact same fit problems.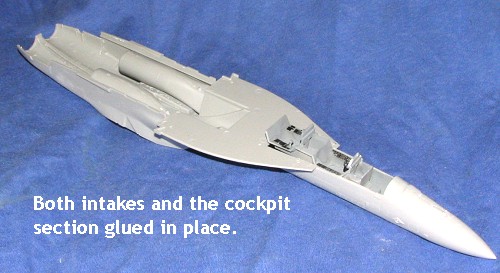
With that in place, the next step in the instructions was to glue on the nose section. Once again, the attachment seam was not perfect and I had to do some major sanding to level things out, even though I clamped it in place while drying. I also found that the lerex did not want to stay flat when glued. Not sure t he problem, but you may want to tack it in place with super glue and then flood on the liquid cement.
Next bit to glue on were the wings to the upper rear fuselage section. You also need to drill out the holes for the pylons before gluing the halves together. Though there are a lot of seams on the wings, these will be covered up, for the most part, by the separate flaps and slats. No need to make them perfect, but I did sand them down until the forward sections were smooth. Fit of these was fairly good, though one side did have a small step at the root.
 After that had dried, the upper surface was glued to the lower half. As expected, the fit was OK, but not perfect. On one side the seam in the underside of the lerex was quite small, while on the other there was a major gap. It i
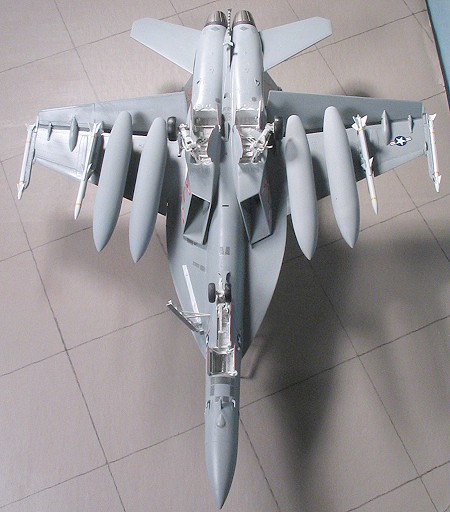 sn't like the lower piece can be moved much to fill that gap as it had been glued to the nose section in the previous step. I'm almost thinking that one needs to glue the nose and the upper section at the same time to try to eliminate some of these gaps.
From there construction went fairly smoothly but slowly as I came to realize this wasn't going to be a quick build. I glued all the missiles together and these take a bit of time as each of the 8 fins is separate. I also glued together the wing tip and pylon missile rails. When done, these were glued in place.
 Then it was time for the slats and flaps. I have to tell you that this wasn't a ton of fun. The larger inner flaps have an insert that is too small for the opening. While one went on without a lot of fuss, the other required multiple applications of filler to take care of the depression. The leading edge slats are two piece constructs as well. When done, these were glued into place. There is an upper flap fairing that gets glued on and the instructions are very vague about how this fits. Thankfully, the booklet that comes with this kit shows them almost laying atop the flaps. I saw a very nicely built F-18F at the 2005 Butch O'Hare show that had these incorrectly glued flush with the upper wing surface.
Then, as I am wont to do, I let the kit marinate a while. When I returned to work on it, I glued the landing gear together. These are quite complex, but look great when you are finished with them. At this time, I decided to do some painting. I painted all the bits that would be white using Floquil's Reefer White. Then I filled the wheel wells with tissue and moved ahead.
| COLORS & MARKINGS |
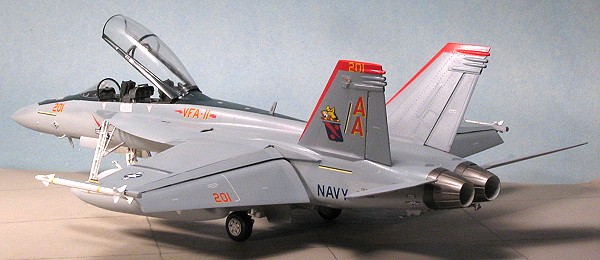
The two colors on this airplane are very close to each other in hue. The underside FS 36375 was painted first, using Testors ModelMaster enamels. Then, much of it was masked and the upper surface was painted with FS 36320, also using Testors Model Master enamels. There was overspray, but I wanted to get the basic colors down first. The drop tanks were also painted at this time as were the pylons.
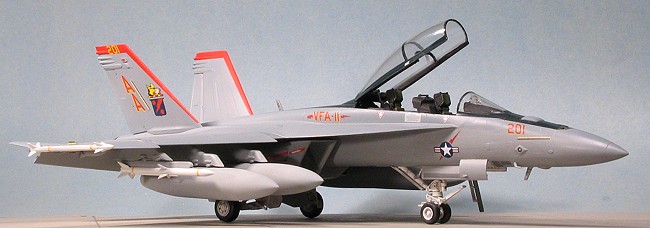 Then I masked off sections of the aft fuselage and painted the fin tips and leading edges with Floquil Reefer White. When it was fully cured, I used Gunze Red Acrylic and painted over the white areas. This was later masked off and the fins repainted in the camo grey.
I then took the kit back to the workbench. During this I did more work on the interior in terms of painting, and installed the clear sight. Then the windscreen was masked and glued in place. The main canopy has a seam running down it and this was sanded and polished. While not super clear, it will have to do until the near end when I dip it in Future. Masking over Future-coated canopies can cause the Future to pull up so best to wait until the end. The canopy was masked and attached using white glue. Then the upper surface was appropriately masked, and FS 15052 dark blue was sprayed on the upper surface, including the canopy frame.
Once all that was dry, the blue area was masked and I did more touch-up painting. This wouldn't be the last of the touch-ups, but did handle most of it. The nose gun area and aft exhaust section of the fuselage were painted with Alclad II Steel.
Now it was time to get the beast on its landing gear. There are a lot of various actuators and other 'stuff' in the gear wells. The nose gear fits very firmly into its locating holes. However, the main gear is rather sloppy and so one has to get all the various bits in place, apply the usual amount of cement, and then hope that it dries the way you want it.
 Next parts to install were the various antennas and sensors. The inner weapons pylons were also glued in at this time. I had to open the mounting holes in the wings considerably to get the pylons properly in place. I left off the outer missile pylons until last so that I'd have room to apply the insignia decals. It was at this stage that I painted the antennas and applied an overall coating of clear gloss in preparation for decals.
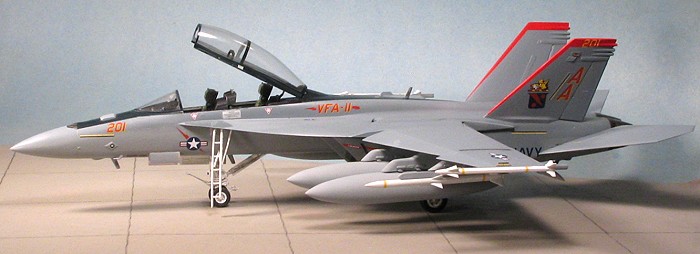
I had decided to do my F-18F in the markings of the CO's plane of VFA-11 as shown inSuperscale 48-1046. The sheet is quite complete and I had no trouble applying any of the markings. Now, I am going to suggest that you use as many of the kit decals on yours as you can. The reason is that the Superscale ones for things like vents and intake warnings do not precisely fit this kit. The aft vent ones are not quite the same shape and the intake warning stripes seem too short. (Late Note: I've been told that the intake warning stripes are supposed to be too short and not reach the intake lips. Choice is yours) The kit decals work quite well though I did have some trouble with silvering, even using a strong setting solution. I think much of the fault was that I did not use hot water on them. That may well be the cure. Once dry, the kit was given a spray of clear semi-gloss to seal in the decals.
| FINAL CONSTRUCTION |
There is a lot to the final bits on this kit. This is mostly because I left off a lot of stuff while applying decals. First thing I attacked were the landing gear doors. I have to say that this was a rather frustrating portion of the build. All the gear doors themselves are well done and I outlin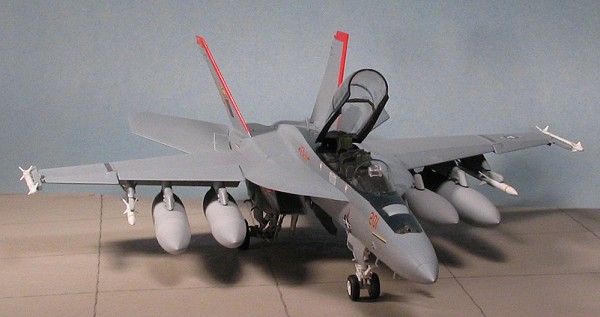 ed the edges with a red Sharpie. They all have some sort of attachment mechanism which works well. What doesn't work well are all the actuating arms. None of them fit as they should have. They generally caused some sort of door mis-alignment as on the nose gear doors, or they didn't fit into the designated slots on the door (main gear). The main gear inner door actuators actually fit well down into the gear wells, something the instructions don't make very clear at all.
Once the doors were in place, I started on the built in stair. I did mine with it deployed as fitting the closed door seemed to be impossible without removing the detail inside the shallow well first. Fit of this was fair and took a bit of fiddling around to get all to properly align. Once the glue dried it was quite sturdy.
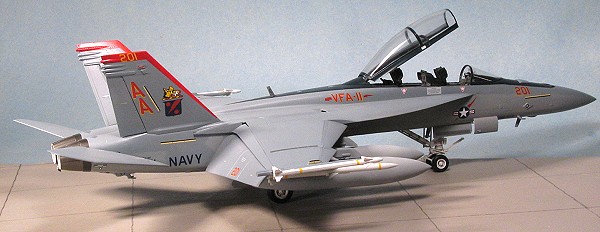
Then I started on the weapons and drop tanks. I left off the centerline tank/pylon as I like my pylons to have things attached to them if possible. Though a slow go, I managed to get everything glued on without too much trauma. I then glued on the tail hook assembly and shoved the stabilators in place.
Moving to the front, the seats were glued in and I glued the insert into the canopy. When dry, the canopy was glued in place. I like the way that there is positive contact at the back of the canopy section without involving the actual clear bits. One could also leave it un-glued if they wished, but I glued mine in place. The afterburner cans were the last main bit attached.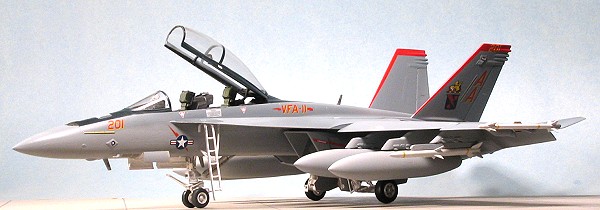
I then looked over the remaining sprues to see what I missed. Yep, I did miss a few things. One was the rocket nozzles for the AIM-120s. These were glued on and showed how badly I had mis-aligned the aft fins! I also found that I missed the fuselage bomb braces. These were the devil to install with the tanks and gear doors and all in the way, but I did finally get them in.
The last things done were to do some detail painting on areas I'd missed. I used my drafting pen to handle some small intakes. A wash was applied to the gear and wells. I'm sure these areas are usually quite clean, but gear washes are expected so they were done. The small clear lenses on the fin were attached using clear paint and that was basically it.
| CONCLUSIONS |
 I know that there are folks who can put these sorts of kits together with minimal if any fuss. They are probably used to them and so have little difficulty. I always find the 1/48 Hasegawa modern jets to be a challenge. The bits are all there, but they just don't seem to fall together in my hands. That being said, the end result is quite impressive and I'm always glad that I've gone through the trials to get the kits built. About the only thing I'd want to add to this kit are seat harnesses. While I know that many will opt for aftermarket seats with belts attached, it would be nice to at least have them as decals. Overall, this is a kit that I can recommend to those who have reached a level where they can deal with all the small parts and the occasional fit issues.
December 2005
#1391 in a series
Copyright ModelingMadness.com. All rights reserved. No reproduction in part or in whole without express permission.
Many thanks to Hobby Link Japan for the review kit.
If you would like your product reviewed fairly and fairly quickly, please contact the editor or see other details in the