AMtech 1/72 EC-135B/E/N ARIA
| KIT # | 72002 |
| PRICE: | $? |
| DECALS: | Four aircraft |
| REVIEWER: | |
| NOTES: | Test shot |
| HISTORY |
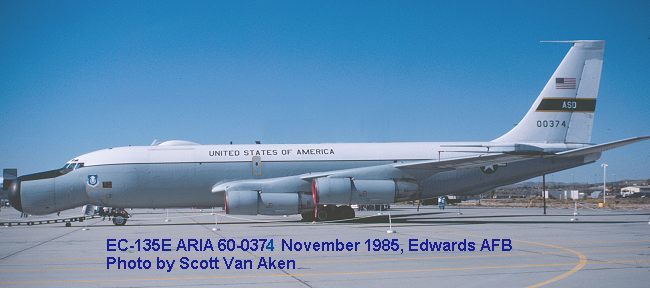
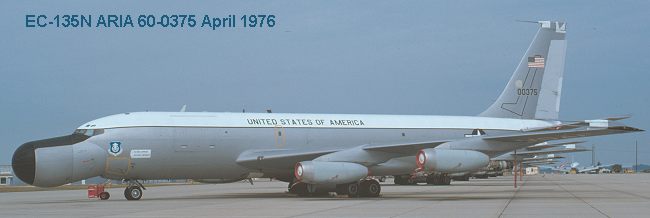
Eight C-135As were modified by Douglas to perform the ARIA (Apollo Range Instrumentation Aircraft) function in 1967 and redesignated EC-135Ns. The modification was most noticeable in the 'Snoopy' nose that housed a 7 foot radar dish in a nose that added 10 feet to the length of the aircraft. These planes were operated by the 6549th Test Squadron at Patrick AFB in Florida to provide tracking and communications during Apollo flights.
Upon completion of that program, they were redesignated as Advanced Range Instrumentation Aircraft, a moniker that happed to keep the same abbreviation, which undoubtedly saved millions in paper changes! Of the eight original aircraft (60-0372, 60-0374, 60-0375, 61-0326, 61-0327, 61-0328, 61-0329, and 61-0330), four of them were re-engined with TF-33s to replace the J-57s and were redesignated EC-135Es. Those four were 60-0374, 61-0326, 61-0329 and 61-0330. Of the remaining aircraft, 61-0328 crashed as an EC-135N in 1981 and 60-0372 and 60-375 have since been modified to C-135E configuration by removal of the nose and equipment. 61-0327 was kept as an EC-135N even after the equipment was removed and as of 1998 flew as an airborne command post. Four of these aircraft were further modified to take the large A-LOTS (Airborne Lightweight Optical Tracking Sytem) pod that was mounted on the left side just under the cargo door.
Of the initial four that were modified as EC-135Es, 61-0329 is a BDR trainer at Tinker AFB and the other three were assigned to 452nd Flight Test Squadron as of 1998.
The C-135B T/RIA program (Telemetry/Range Instrumented Aircraft) involved four aircraft; 61-0331, 61-2664, 62-4126 and 64-4128. These were modified in 1967 and later called EC-135Bs. They were quite similar to the above EC versions, but could not carry the special A-LOTS pod. 61-0331 was later to have its ARIA nose removed and was lost in June of 1971, while 2664 was converted to an RC-135S and later crashed. Two other aircraft, 62-4128 and 62-4133, were used in the ARIA role as EC-135Bs during 1979/80. Since then 4133 has been modified to TC-135S and 4128 to RC-135X. These TF-33 powered aircraft were virtually indistinguishable from the EC-135N. A very similar looking aircraft are the EC-18B/D aircraft. However, those were converted from 707 airframes and not from the C-135. Most of the C-18s have been modified again to E-8 JSTARS aircraft.
| THE KIT |
 If you have seen any of the AMT KC/EC/RC-135 kits, then you have basically seen this one. The only difference I could find was the fuselage. There was no step or any other glitch between the fuselage and the nose insert. The wings, fin and tailplanes were warped, but not badly and it is nearly impossible to have such long, thin pieces stay straight. A bit of hot water was all that was needed to correct the problem. The kit also comes with both J-57 and TF-33 engines so that you can build either a C-135B, EC-135E, EC-135N, version. In addition you get all the bits for the EC and RC versions plus the ALOTS pod that was used. This also includes the wing tip radio antennas. What I did not see was a suitable antenna dome for the upper fuselage that all the ARIA aircraft eventually carried. However, if you are doing an aircraft early in its life, this upper antenna was not carried. (See the image below and compare it to the one at the head of the article.)
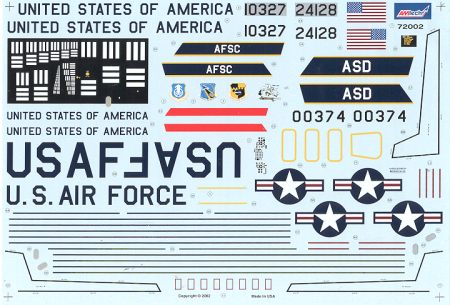
Now this was a test shot so the instructions that came with it were for the RC-135 aircraft and not the EC-135N. However, a super set of decals were provided. You can do four aircraft with this sheet; One EC-135N with the A-LOTS pod and one regular EC-135N. One C-135B and one EC-135E. The C-135B had the large photo calibration section on the right side of the forward fuselage. The decals themselves are very well printed by Microscale and seemed in perfect registration. The sheet provides all the walkways and other markings. You'll have to paint eh nose radome and the anti-glare panel.
| CONSTRUCTION |
Never to be one that is totally unprepared, I first looked in my old Military Model Preview magazine to see if the AMT KC-135 kit had been done. Sure enough, back in 1992 in issue #3 there was a review. I used it as a guide throughout construction to help with any rough spots. Step one, for me, was the old subassembly trick. This meant the outer wings, tailplanes, wheels and interior were all glued up. I didn't spend a lot of time on the interior as I figured little could be seen even in 1/72. The interior itself was painted a medium grey with red seat covers and black instrument panels. You get two main instrument panels, one for the decal and one that has raised detail. I used the latter and drybrushed it. Gluing the wings and tailplanes was tricky as they were warped a bit. I flexed them under some hot water and they seemed to straighten out. A work of warning when removing the wings and fuselage from the sprue. Use a razor saw. I tried my usual Xuron nippers and only managed to gouge sections out of the plastic. The attachment points are too thick for cutters so I highly advise you to saw them off. I also decided to build this kit with the crew entry door and the cargo door closed. They don't fit too well. Both are actually a bit too small for the opening. I had to putty up around them after they were reinforced somewhat in the back. Taking a clue from MMP, I glued the interior to one side of the fuselage and then taped the two halves together. During this time I also dry fitted the lower wing center section that holds the gear to make sure things were properly aligned. The interior section has the main gear wells and wing spar as part of it and there is not really any positive locators for the interior. I just lined things up with the crew entry door and went from there. The fuselage is very 'flexy' and to my mind, has insufficient guide pins so I'll have to glue it in sections and be very careful when the time comes. Meanwhile, I sanded and puttied the leading edges of the wings and tailplanes where I gouged the plastic when removing them from the sprues. Back at the fuselage, the nose gear was glued into the well and when dry, the well was glued to the left fuselage half. It is a bit of a snug fit. I aligned it as best I could and taped the nose section together to make sure all fit well and set it aside to do its drying thing. Interest was then lost in the project after putting on what seemed to be endless layers of filler.
| PAINT & DECALS |
| CONSTRUCTION CONTINUES |
| CONCLUSIONS |
| REFERENCES |
The Boeing C-135 Series, by Don Logan, Schiffer, 1998
If you would like your product reviewed fairly and fairly quickly by asite that has well over 150,000 visitors a month, please contactme or see other details in the