
RVHP 1/72 C-12D Huron
| KIT #: | 72162 |
| PRICE: | $50.00 from Coopers Models |
| DECALS: | One option |
| REVIEWER: | Scott Van Aken |
| NOTES: | Resin kit |
| HISTORY |
The King Air 200 is a continuation of the King Air line, with new features including the distinctive Ttail, more powerful engines, greater wing area and span, increased cabin pressurisation, greater fuel capacity and higher operating weights compared to the King Air 100.
Beech began design work on the Super King Air 200 in October 1970, resulting in the type's first flight on October 27 1972. Certificated in mid December 1973, the King Air 200 went on to be the most successful aircraft in its class, eclipsing such rivals as the Cessna Conquest and Piper Cheyenne. Today the King Air 200 is the only one of the three in production.
 The improved B200 entered production in May 1980, this version features more efficient PT6A42 engines, increased zero fuel max weight and increased cabin pressurisation. Sub variants include the B200C with a 1.32m x 1.32m (4ft 4in x 4ft 4in) cargo door, the B200T with removable tip tanks, and the B200CT with tip tanks and cargo door. The Special Edition B200SE was certificated in October 1995 and features an EFIS avionics suite as standard.
Various special mission King Air 200s and B200s have been built, including for navaid calibration, maritime patrol and resource exploration. In addition several hundred Super King Airs have been built for the US military under the designation C12. C12s perform a range of missions from electronic surveillance to VIP transport.
The 1500th commercial King Air 200 was built in 1995. In 1996 Raytheon dropped the `Super' prefix for all 200, 300 and 350 model King Airs.
 All branches of the US military have used the King Air with the Army calling it 'Huron'. None of the other services refer to it as anything other than either C-12 or King Air. For years the USAF used the C-12F for short range hauling or for hacks with many units having a C-12 just for that purpose. Many USAF C-12s were used at overseas diplomatic stations for use by the American Ambassador. Most non VIP C-12s are gone from the USAF inventory though some are still used at training commands. The Navy has also used the King Air as the UC-12 for similar missions. Undoubtedly the widest range of uses has been with the US Army where not only are there the usual hack jobs, but dedicated battlefield signal intelligence has been performed with highly modified C-12s.
In addition to the US, the King Air has been used by a large number of foreign air forces.
| THE KIT |
This is the first RVHP kit I've seen and I have to say that I'm impressed. The molding is superb with finely done engraved detail and a minimum of molding glitches. In fact, a quick survey of the parts showed none that were apparent. You get a complete cockpit with seats, instrument panel and center console along with very finely done control wheels. There are clear resin window inserts and some spares are provided in case one goes astray. The interior also has a number of bulkheads to install. There is no cabin aside from the floor so how one outfits this is up to one's desire and skills.
 A very nice touch are separate clear wing tip formation light lenses. The two vac cockpit transparencies are among the finest I've seen in terms of clarity. The kit also has a small lip around the cockpit opening to make it easy to attach the transparency. What a great way to do things.
One is also provided with five propeller blades per side, though I imagine this is as much to handle other King Air variants as anything, but it is nice to have the spares. The landing gear are metal so no worries about resin deformation. They seem well molded but have a ton of flash to clean up. Many of the smaller parts are finely molded and appear to be rather delicate so care will be needed for construction. One will also have to wary of proper sanding of the back of the engine nacelles to keep them flat.
One set of markings is provided and that is for C-12D 83-0495 as assigned to the 89th AW at Andrews AFB for VIP transport. It is in a two shades of blue and white scheme with gold striping, a most fetching scheme. The decals are well done and you get two sheets to simplify costs. The modeler will have to paint the blue trim and the black de-icing panels. These VIP planes do not have fuselage insignia. Instructions consist of a history and exploded view on one side with the painting guide and decal placement on the other. FS 595 paint references for the blues are given, but no paint matchups.
| CONSTRUCTION |
 First thing I did was to remove the major bits from their resin pour stubs. This was generally pretty easy as I was able to remove the most pieces I wanted to use right away just with a sharp hobby knife. Only the seats and engines took a razor saw. I then did some test fits of the pieces to see how well the engines/nacelles would fit on the wing. Here was where I ran into a bit of a problem.
  You see, the engine piece is larger than the attachment point on the wing/nacelle. There are two options. One is to attach things as they are and sand the dickens out of the engine to get it to match its surrounds. The other is to have the wing/nacelle parts match the engine and fill in the corresponding gaps. Well, I chose the second option, using some plastic card to fill in the larger gaps and then epoxy filler to help smooth out the rough spots. It took a w
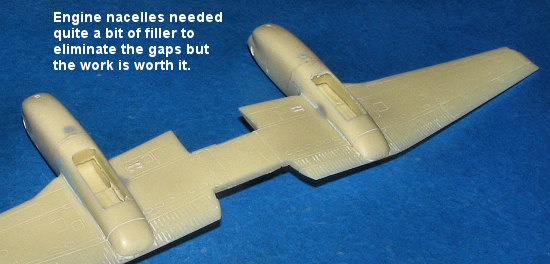 hile, but eventually I had a nice, smooth wing with engines to attach to the fuselage (once I had it done).
I then went to work on the interior. This consists of a cockpit with a couple of bulkheads. All the detail is in the cockpit with two seats, control wheels, center console and an instrument panel. There is no decal for the panel though some raised detail is there. A decal would be much preferred by this modeler. Anyway, I painted the two seats in what I hoped was an appropriate semi-civil scheme. Then the center console was glued in (its place is marked on the floor). Then the forward and aft bulkheads were attached. These were then test fit in place to be sure of a good fit. So far, no problemo.
 I then glued on the instrument panel. I had to drill out the wheel locating holes as there were none on the instrument panel. The wheels were glued in place, followed by the seats. I then glued in the nose wheel well to one half, taping the
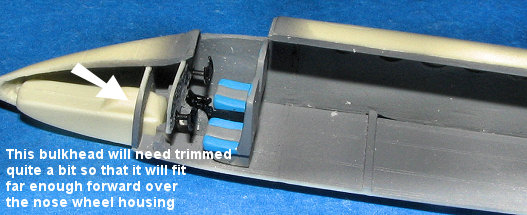 fuselage halves together and adjusting the well for a good fit. When dry, I installed the interior. Wouldn't fit. The opening in the forward bulkhead is too small. I had to cut on it considerably to get the interior to fit into its proper location. The instrument panel should fit just under the anti-glare panel for a good fit.
Once that fit was determined, I installed the cabin windows. These are clear resin and most were not real tight fits. It may be better to just glue in some plastic rod, cut them near flush with the fuselage and then carefully sand them down. It is the only way I can see to get flush windows on the cabin. But I try to use what is provided in the kit so used the kit bits. They aren't bad, just are not flush fits. These were then masked. While I hoped none of them would pop out, I glued in lead sinkers over the nose well to be sure this one would sit on its nose gear. Then I carefully glued the fuselage halves together, starting at the nose and working in sections. One has to tweak things a bit as one goes along to keep the panel lines matching.
Not surprisingly, the two halves are not perfect matches, and I chose to have the best fit on the top. The meant a rather large step on the fuselage before the wing. I did try to get the two to match up, but to no avail. The only cure would be a lot of filler, but before that, I figured I should get the wing installed.
This added to the work. One reason was that on my kit, the wing root area on the fuselage was rather jagged as if bits had broken off. When adding the wing, there was not only a step but a rather sizeable hole, the worst of the two being on the right side. When 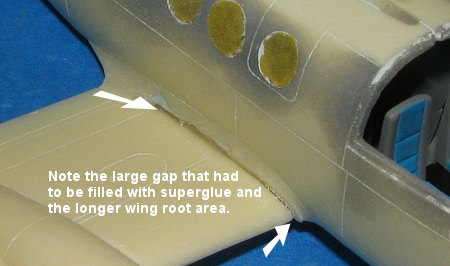 gluing the wing, I made sure the the lower rear underside was matched up as best as I could. That is because it is somewhat corrugated there and fixing it would be impossible. I tacked that area on first then wiggled the rest of the wing in place to have it fit on the forward lower part next. Not easy due to the step in the fuselage in that area. It also turns out the the fuselage root area is longer than the wing. Again, nothing that sanding and filler can't fix or at least cover up. Whe
![]() n it came to filler, I used multiple applications of super glue to fill the actual gaps (and there were some on the underside as well). The rest were taken care of with standard filler. When using this stuff for large areas, it is wise not to paint any of it until it has at least a week to properly cure. Sure enough, after I thought I had it done, a week later it had shrunk a bit and needed another application.
n it came to filler, I used multiple applications of super glue to fill the actual gaps (and there were some on the underside as well). The rest were taken care of with standard filler. When using this stuff for large areas, it is wise not to paint any of it until it has at least a week to properly cure. Sure enough, after I thought I had it done, a week later it had shrunk a bit and needed another application.
The next step was to add the fin and tail planes. The fin was dutifully cleaned up and attached. It also took several applications of filler at the base as the upper fuselage there doesn't totally match the underside of the fin. Tail planes were then glued in place 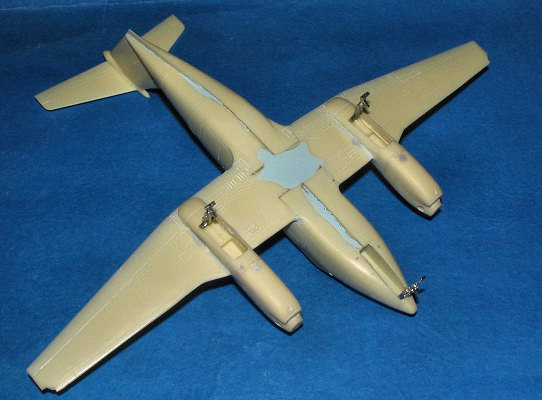 with no trauma. When it came to the lower fuselage strake, I broke mine into several pieces. This is as much due to its thinness as anything else. There was a large air hole in one section and while filling and sanding it, I flexed the piece and it snapped, leaving me with a shard in my hand and the rest of it who knows where. I made a new one from plastic card that, while not as thin, is a lot more robust. It was glued in place.
 Now I had a pretty much complete airframe. Time to deal with the vac canopy. I trimmed the dickens out of it and by the time it was down to where it would fit, it seemed to be just a tad oversize. I mean that when in place, I had to trim right up to the bottom of the bulged side windows. Means you can see the lip of the resin that keeps it in place quite easily. I also found the right side to be thicker than the left, so while the left fit into the lip perfectly, the right sticks out a bit. Trimming back on the lip is no good as I'd have to do that all the way up the back and the front would still stick out as there is no fudge room there.
So, what I did was to fit it in place where it fit best, on the left side. Then, after the white glue had dried, I added a touch of superglue at the top center where fogging wouldn't be a problem. The clear bits were masked using Tamiya tape and while not the best defined, I think I got most of the frame lines OK. Then some standard filler was applied to the front and smoothed out. Not exactly the most elegant solution as there is still quite an overhang on the right, but it does help. At this time, I decided to start applying some paint.
| COLORS & MARKINGS |
 Most of the airframe will be white, and that includes the wheel wells and gear components. I sprayed much of the upper airframe and wings with Floquil Reefer White. This is an excellent enamel and acts like a primer to show any glitches. Quite a few pinholes showed up on the horizontal stabs and on certain areas of the wing. A couple more applications helped to fill some of these. I then painted the cockpit section with a darkish grey as that is what will be seen through the windows.
Then more white was applied and this was then sealed with some Future. The two blues are not com mon colors and it was only by chance that I had a tinlet of both 15109 and 15414 in the Xtra-color range. I'd bought these nearly 20 years ago to do an F-5E and they were still good to go. Masking these things took an age as you have to cover up wherever you don't want to fine overspray. I have to say that even using one of the decal stripes as a guide, it did not turn out well. I'd HIGHLY RECOMMEND that RVHP provide a set of templates for the engine cowlings and the nose antiglare panel, though I'm willing to bet that they will not. I had to have spent at least a week doing little more than painting the two blues and the black portion, then going back to fix bits I missed. I found it odd that the lower inside cowling would be black, but not the upper inside
  portion. This may just be for the VIP bird as most C-12s I have seen have the full inside of the engine cowlings in black. (see the photo).
Putting on the decals was quite a trick as well. RVHP give you two sheets that actually includes a full second set of fuselage stripes and tail flags. The decals are very thin and quite fragile. I had particular trouble with the gold stripes breaking into pieces while trying to move them. Not a problem for the fuselage stripes as I had a second set to use, but the cowling ones were a problem as there were no back-ups. Fortunately, there are not that many markings on the plane. A second set of serial numbers (for some other plane not shown on the instructions) and a set of insignia that were not shown as used were the other unused bits.
| FINAL CONSTRUCTION |
With the thing painted and the decals in place. I took the kit back to the workbench. First thing I did was to touchup all the blue and black bits that I missed, and there were quite a few. I then Glued on the wheels. I had to drill out the main gear wheels a bit to get them to fit. The retraction struts were glued in at this time as well.
Meanwhile, I'd painted the spinners aluminum and the prop blades black with red/white tips. RVHP gives you ten blades, obviously for other kits. This VIP bird only uses three bladed props, which were common on several versions of the C-12. It seems that there is some correlation between three bladed props and the smaller wheels, though that is not universal as the C-12F in the photo above uses four bladed props. I've also seen images of three bladed prop C-12s with the larger wheels. Anyway, the kit props were glued into the spinners in a feathered position. Just about every C-12 I've seen at rest has the blades like this to keep the wind from wind-milling the props. These were set aside until the end along with the wing tip lenses.
The gear doors were next and RVHP must have missed something. The main gear doors are way too short. Had I not been under a bit of a time constraint, I'd have made new ones out of plastic card, but I used what I had. The engine exhaust were painted burnt iron and glued in. I recommend to you that you test fit these parts before you paint the nacelles. I did not as I wanted to paint the exhaust on the resin pour stub. They don't fit all the way in, leaving a small gap where the exhaust reinforcement plates are on the inside. I then attached the various antennas. You have to look at the box art for this as the instructions say nothing about them. The VOR antennas for the fin are too small and should be replaced by card. The shape is fine, they are just too short. No fin tip anti-collision light is provided.
I then gave the model a coat of Future clear varnish. I'd use only acrylic clear coats on this as even the very mild Microscale setting solutions caused some running of the colors on the gold fuselage stripes. Using a lacquer like Glosskote or Metallizer sealer would cause grave damage to these markings. I then brush painted the areas that would be matte black with Vallejo clear matte and used the paint from a chrome paint pen to do the engine intakes and area around the windscreen. The masking was taken from the windows, then the props were glued on. I had to trim one prop shaft as they are too long. The other I'd cut off removing the hub. The wing tip lenses were not an easy fit. They are difficult to handle and one of them went zinging off into the distance. I had no real option on this so I took the clear sprue, shaped it as close as I could, glued it on and sanded it down until it was pretty close. Not perfect, but I'll just add that to the usual goofs I make on a kit.
And that was it.
| CONCLUSIONS |
I have to say that this was a bit more work than I'd originally thought from looking at the kit. That seems to happen to me a lot when it comes to resin kits. It is probably part and parcel for most of these, and I pretty well expect to put additional work into them to figure out ways around those obstacles.
It seems that RVHP have provided us with a pretty good kit and an excellent basis for a nice model. I really like the metal landing gear as it prevents the inevitable gear sa g that a lot of resin kits get after time. It also makes it easier to bend the gear a bit to get all the wheels to touch. I notice that I forgot to do this on mine before I took photos, but you can be sure I will attend to it.
I'm not sure why the glitches such as the too short gear doors and antennas and I could have missed something but I don't think so this time. For the complex scheme on the engine nacelles, there should be templates that we can copy and use to get a good paint line (yeah, I could have used those on the drawings by enlarging them, but shouldn't have to). I was also somewhat discouraged with the seemingly bit too large canopy. From past experiences, this appears to be a regular problem with a number of short run companies. Now while it is just guessing, I'm thinking that perhaps they make a master that fits the kit, then when they make the finished product, they have forgotten to take into account the thickness of the plastic, which will result in it being a bit too large. On a bubble canopy one can get away with it. With a precision fit such as on this kit, one cannot.
However, there is really nothing that cannot be overcome as you have seen in this build. None of it is particularly difficult for someone with a little experience and the end result is a very nice model of an important aircraft. While I'm not into doing another right off the bat, if RVHP releases a MAC C-12F as in the photo shown earlier, I'd be interested.
My thanks to Dave Cooper of Coopers Models for allowing me the opportunity to build this kit. Get yours direct at the link.
Thanks to all of you who wrote in to help me straighten out the wheel situation as well.
December 2006
#1444 in a series
If you would like your product reviewed fairly and fairly quickly, please contact the editor or see other details in the