Italeri 1/72 MiG-29 Fulcrum A
| KIT #: | 184 |
| PRICE: | probably about $20 or so nowadays |
| DECALS: | Two options |
| REVIEWER: | Scott Van Aken |
| NOTES: |
| HISTORY |
The history of the MiG-29, like that of the larger Sukhoi Su-27 'Flanker', started in 1969 when the Soviet Union learned of the U.S. Air Force’s 'FX' program, which resulted in the F-15 Eagle. The Soviet leadership soon realized that the new American fighter would represent a serious technological advantage over all existing Soviet fighters. The MiG-21 'Fishbed' was agile by the standards of its day, but had deficiencies in range, armament, and growth potential. The MiG-23 'Flogger', developed to match the F-4 Phantom II, was fast and had more space for fuel and equipment, but lacked in maneuverability and dogfighting ability. What was needed was a better-balanced fighter with both good agility and sophisticated systems. In response, the Soviet General Staff 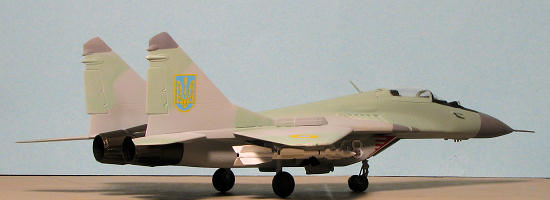 issued a requirement for a Perspektivnyi Frontovoi Istrebitel (PFI, roughly "Advanced Frontline Fighter", directly "Perspective Forward Fighter"). Specifications were extremely ambitious, calling for long range, good short-field performance (including the ability to use austere runways), excellent agility, Mach 2+ speed, and heavy armament. The aerodynamic design for the new aircraft was largely carried out by TsAGI, the Russian aerodynamics institute, in collaboration with the Sukhoi design bureau.
However, in 1971 the Soviets determined that the PFI aircraft would be too expensive to procure in the quantities needed, and divided the requirement into the TPFI (Tyazholyi Perspektivnyi Frontovoi Istrebitel, "Heavy Advanced Tactical Fighter") and the LPFI (Legkiy Perspektivnyi Frontovoi Istrebitel, "Lightweight Advanced Tactical Fighter") programs, the latter paralleling the contemporary USAF decision that led to the "Lightweight Fighter" program and the F-16 Fighting Falcon and YF-17 Cobra. The heavy fighter remained with Sukhoi, resulting in the Su-27 'Flanker', while the lightweight fighter went to Mikoyan. Detailed design work on the resultant Product 9, designated MiG-29A, began in 1974, with the first flight taking place on October 6, 1977. The pre-production aircraft was first spotted by United States reconnaissance satellites in November of that year; it was dubbed Ram-L because it was observed at the Zhukovsky flight test center near the town of Ramenskoye. Early Western speculations suggested that the Ram-L was very similar in appearance to the YF-17 Cobra and powered by afterburning Tumansky R-25 turbojets.
Despite program delays caused by the loss of two prototypes in engine-related accidents, the MiG-29B production version entered service in August 1983 at the Kubinka air base. State acceptance trials where completed in 1984, and deliveries began the same year to the Soviet Frontal Aviation. The workload split between TPFI and PFI became more apparent as the MiG-29 filtered into front-line service with the VVS in the mid-1980s. While the heavy, long range Su-27 was tasked with the more exotic and dangerous role of deep air-to-air sweeps of NATO high-value assets, the smaller MiG-29 directly replaced the MiG-23 in the frontal 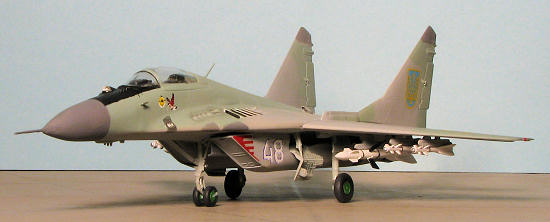 aviation role. The Fulcrum was positioned relatively close to the front lines, tasked with providing local air superiority to advancing Soviet motorized army units. Rugged landing gear and protective intake grates meant the MiG-29 could operate from the damaged or under-prepared airstrips Soviet war planners expected to encounter during a rapid armored advance. The Fulcrum was also tasked with escort duties for local strike and interdiction air packages, protecting vulnerable ground attack aircraft from NATO fighters such as the F-15 and F-16. Frontal aviation MiG-29s would ensure Soviet ground forces could operate under a safe air umbrella, moving forward with the troops as they advanced.
In the West, the new fighter was given the NATO reporting name "Fulcrum-A" because the pre-production MiG-29A, which should have logically received this designation, remained unknown in the West at that time. The MiG-29B was widely exported in downgraded versions known as MiG-29B 9-12A and MiG-29B 9-12B (for Warsaw Pact and non-Warsaw Pact nations, respectively), with less capable avionics and no capability for delivering nuclear weapons. Total production was about 840 aircraft. The MiG-29 was first publicly seen in the West during a visit to Finland in July 1986. Two were displayed at the Farnborough Air Show in Britain in September 1988. Western observers were impressed by its apparent capability and exceptional agility, but found fault with the excessive smoke generated by its Klimov powerplants.
MiG-29 export customers have included Algeria, Bangladesh, Bulgaria, Cuba, Czechoslovakia, Eritrea, East Germany, Hungary, India, Iran, Iraq, Malaysia, Myanmar, North Korea, Peru, Poland, Romania, Serbia, Slovakia, Syria, and Yemen. The ex-Soviet republics of Belarus, Kazakhstan, Moldova, Turkmenistan, Ukraine, and Uzbekistan were left with large numbers of aircraft after the disintegration of the Soviet Union; some remain in service, others were mothballed or — like the 34 aircraft originally held by Moldova — have been sold abroad.
| THE KIT |
This kit comes on three sprues, one of them holding a two-piece canopy. The other have nicely engraved detailing, though not quite as crisp as what one finds on the Fujimi or Hasegawa MiG-29 kit. I also suspect that this kit is more accurate than those two, for the Japanese companies were in a rush to get theirs on the shelves and were unable to make accurate measurements of the real aircraft. The date on the box side is 1994.
 The kit's cockpit consists of a tub with raised console detail, an instrument panel, also with raised detail, a control stick and a seat. The fuselage is split horizontally and I found flash in the opened upper wing intakes. The kit is designed to be built with the forward intake doors closed as there is no intake trunking. The fins are a single piece and I found some slight sink areas near the base on one of them. The chaff/flare dispensers that one routinely sees on the base of the fins are separate parts, indicating that Italeri has a two seat variant.
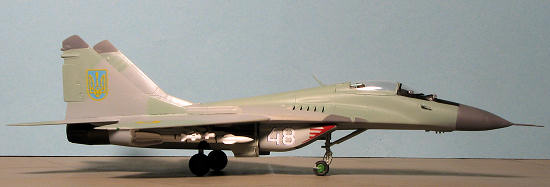
Landing gear are quite convincing and the kit comes with a full complement of under wing pylons. There are also six missiles to fill those pylons. Two long range and four short range types (I'm not very conversant on Russian missiles). No drop tank is supplied. No indication is given if any nose weight is required, though it may well not need it.
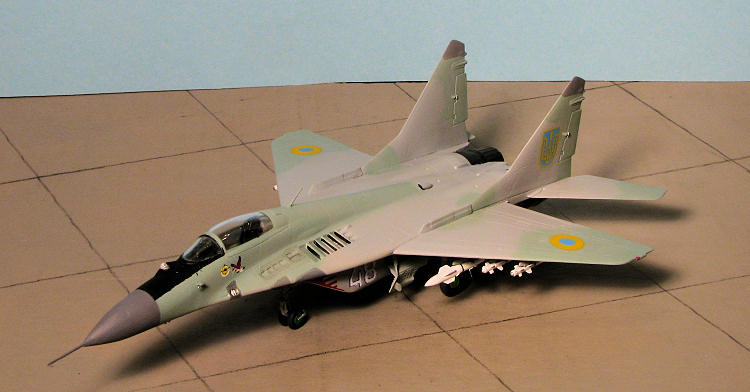
Instructions are very well done and provide full painting information in generic, Model Master and FS 595 references. A small but well done decal sheet gives markings for two aircraft. Both of these carry different camo schemes. The Russian aircraft is pale green over light gull grey, while the Yugoslav aircraft is light ghost grey over light gull grey. I'm sure the colors are approximate. The Yugoslav painting and decal guide is in full color on the back of the box.
| CONSTRUCTION |
 I was building this kit concurrently with the ICM MiG-29 Fulcrum C. As much to see how much they may be alike, especially since the Italeri kit seems to have been a major influence on the ICM kit; right down to many parts being interchangeable!
First step was to clean up a bit of flash. Apparently the kit has been in production for a while. I built up the cockpit tub, finding the instrument panel to be a bit of a difficult installation. Eventually, when I glued in the tub, I found that the panel was more easily attached to the anti-glare panel and then attached to the tub. Thanks to being able to get to the back of the panel before gluing on the lower fuselage, this was pretty easy. The bang seat is rather generic but adequate and was left out until near the end of construction.
 I then cemented the intakes and the intake guards. This fit fairly well, though filler was needed on the join. Meanwhile, I added a bit of nose weight and cemented the upper and lower fuselage halves. I needed to clamp the rear pieces as well as the nose to get a good join. There is a major 'jog' in the seam near the nose that didn't want to properly line up and while it wasn't as bad as on the ICM kit, it eventually took a few rounds of sanding and filler and sanding to
  get things smooth. One major benefit of the Italeri kit vs the ICM is that there are lower wing stubs molded onto the lower fuselage along with the horizontal stabs.
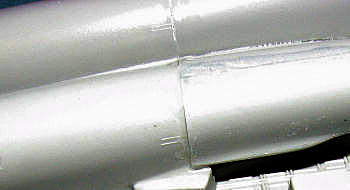
With the intakes done, those were then mated to the fuselage. Like every Tomcat I've built, this is one of the worst fit areas on the kit. Not horrible, but not great. More filler and sanding on these. Be sure to get the intakes wide enough near the nose gear well or you won't get the gear doors to fit properly. I made that error on the ICM kit. With the fuselage seam taken care of as well as the engine areas, I attached the wing. I recommend sanding down the tops of the stubs or you'll end up like me with steps that you'll have to sand later. This is the second poor fit area. Before attaching the wings, be sure the holes are drilled out enough for the weapons pylons by test fitting a couple.
So the wings go through the sand, fill, sand routine as well until you are happy with the results or just tired of sanding. Starting to look like an aircraft now. The fins fit fairly well, lacking any positive lock for the right angle. Since Italeri does a two seat kit of this as well, the flare/chaff dispensers that fit on the front of the fin are separate, and a poor fit. More filler to blend things in there and 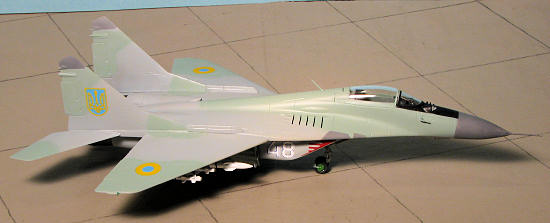 on the fins as well. Meanwhile the exhaust pieces were glued together. Take care not to sand off the alignment tabs. I also cleaned up the landing gear in preparation for painting. These are more robust than the ones on the ICM kit and perhaps less detailed as well. Next, I cut off the canopy and windscreen. A sneeze during windscreen removal caused me to take a chunk out of the side of it. No replacement, I fear so I just left it as it is. These were then masked and attached to the airframe after installing the seat. The fit is only fair with the rear of the canopy being too large to fit into the rear fuselage. By this, I mean it is too wide at the rear and too tall so it sits up above the fuselage and I'd have to widen the fuselage to get it to match the canopy cut-out width. As the fuselage is molded upper and lower, widening and raising this area would be a challenge. Strangely, it fits fine on the sills and is not too wide there.
| COLORS & MARKINGS |
First step was to paint the wheel wells, gear struts, and inner gear doors in ADC Grey/Aircraft Grey, using Testors Model Master Enamels, as I did for the other two main camouflage colors. One was FS 36375 and the other was Flanker Green-Grey. I first painted the airframe and outer gear doors with the FS 36375. Then I realized I'd not painted the upper exhaust sections on the rear of the body so gave those a coat of Alclad II Jet Exhaust before masking them off. I also painted the nose cone with FS 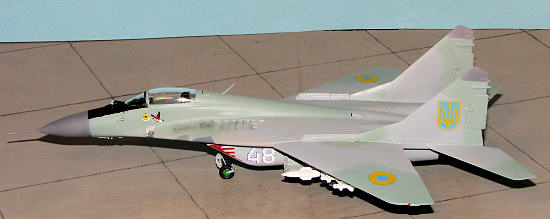 36118, Gunship Grey from an old Aeromaster Acrylics bottle that I had handy. This was then masked off. I repainted the 36375 where needed and once that had dried, used my Skybow AB-100 detail air brush to spray on the Flanker Green Grey in the pattern shown in the decal sheet I was going to use. It is pretty much the standard pattern.
When that had dried, I masked around the antennas on the fin tips and on the forward fuselage. These were also painted FS 36118. The wheel hubs were painted with Humbrol #3 green, which is probably too green, but looks fine to me. Then a coat of clear gloss to prepare for decals.
But before decals, I added on some more parts. The landing gear were glued in place and the well areas were brush painted with Aircraft Grey to take care of areas that had overspray. Unlike the Fulcrum C, the main gear do not rake so far forward. Not sure which is more correct, but am guessing the ICM kit has this more like the prototype. I also took this time to attach the gear doors. Fit was quite good on these items with the exception of the large main gear doors. In that case it was a 'fit where it was glued' sort of thing. The small landing lights were glued in place at this time.
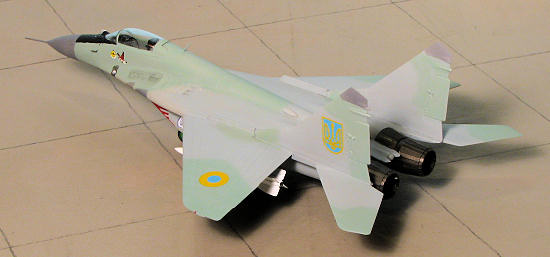
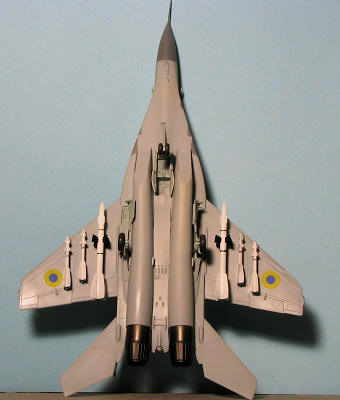
 Finally, it was on to the decals. After the less than sterling experience with the AD decals used on the Fulcrum C, I decided to stay simple with this one as well and used only the unique markings from Authentic Decals 72-11: MiG-29 part 1. I wanted to do one of the Ukraine AF schemes and chose the one with the red design on the intake; White 48. As expected, anything that didn't have white backing it was near transparent. The roundels, for instance, when taken off the backing were the same color front and back. I also came to realize they were not the right colors, being too dark. Fortunately, I have a set ofBlue Rider BR 808: Ukraine Air Force 1992-94insignia and those are the right color. If you look at the photo, the Blue Rider insignia are on the top. You can see how the yellow of the AD markings nearly disappears against the background paint. I left the too dark ones on the underside as few actually look under models. The fin insignia are a bit too tall, but again, the right colors. I also found that the white on the Authentic Decals was off register. Authentic Decals really needs to get with the program in terms of backing ALL their markings with white and ensuring that they are in register.
| FINAL CONSTRUCTION |
 Once the markings were on, the usual coat of clear semi matte was applied. Then the wheels were glued in place as well as the exhaust, various nose sensors, and the missiles. I used the R-27s from the ICM kit as I'd already built them up and hadn't used them, using the drop tanks instead. The last item to add was the IR seeker clear bit. Fit here was poor even after some trimming of the mounting area (tried to trim the seeker itself but it is really hard to hold). It was mounted with clear cement. Usual touch up painting, masking removed from the clear bits and I was done.
| CONCLUSIONS |
I'm like most modelers and generally pleased with the results I get, regardless of the work involved. While not a toss together kit, it is very much like much of what I have built in the past. A bit of modeling skill required but a nice model when done. I found while building this in conjunction with the ICM kit that it really didn't take much longer to do two similar kits instead of just one. They make a nice comparison when displayed together.
| REFERENCES |
http://en.wikipedia.org/wiki/Mikoyan_MiG-29
May 2009
Copyright ModelingMadness.com. All rights reserved. No reproduction in part or in whole without express permission from the editor.
If you would like your product reviewed fairly and fairly quickly, please
contact the editor or see other details in the