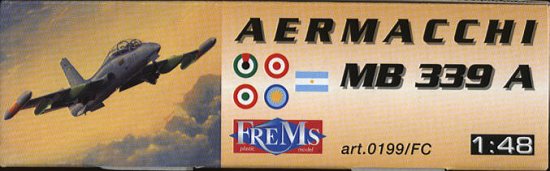
FreMs 1/48 MB-339A
| KIT # | 0199 |
| PRICE: | $34.98 |
| DECALS: | A bunch of options; see review |
| REVIEW : | |
| NOTES: |
|
| HISTORY |
The Aermacchi MB.339 is the latest in a long line of successfulMacchi aircraft, dating back to just after World War I. While mostly buildingfighters, including the very successful MC.202 Folgore and 205 Veltro, duringWorld War II, postwar, the Macchi company decided to start concentrating ontrainer aircraft. Their first, the G.59, was based on the airframe of theMC.202/5, though powered by a less rambunctious engine and sporting two seats.It was a mild success in the home market with a few overseas sales.
 With the coming of the jet age, the AMI decided that it needed agood, reliable jet trainer. From this was borne the MB.326, a Viper poweredaircraft with pleasant handling qualities and a very good serviceability record.This aircraft was the main jet trainer for the AMI for nearly 30 years. Whenremoved from training use, it served as a hack for many different units untilfinally retired in the mid 1990s. The 326 had good overseas sales, amongst thebigger buyers of the aircraft being Australia, Brazil and South Africa. Adedicated single seat attack version was also made and sold well.
The next generation of trainer from what was now Aermacchi isthe MB.339. This aircraft first entered service in the late 1970s/early 1980s.Frankly, much of this aircraft is quite similar to the 326. The only part thatis externally different is the cockpit section. It is more streamlined and isalso slightly stepped to give the instructor a better view during landing andtake-off. Internally is where things are different. It has updated avionics,different instruments and an uprated Viper engine. Recently, the Italian 339sshed their teardrop shaped wing tanks for ones that are more rounded. Salesabroad for the 339 were and are very good with many versions going to suchplaces like Argentina, New Zealand, Eritrea, United Arab Emirates and othercountries. As with the MB.326, a single seat, dedicated light attack version isalso made.
| THE KIT |
 I won't go into much about the kit itself. Andy Abshier did avery good review of it and if you wish to know more, here is
| CONSTRUCTION |
The first thing Idid was to start gluing cylinders. ???? Well, that is to say, I started gluingtogether wing tanks, gun pods and rocket pods. I was pretty sure I wasn't goingto do a current Italian one, so glued together the teardrop shaped wing tiptanks. The wings were also glued together at this time. Fit is very good, butnot perfect and I used some filler on all of the assemblies, specifically the gunpods. One of the benefits of the heavy detailing is that it isn't sanded away,which is good, as the plastic is a bit softer than the norm.
 Once the tanks and stuff weredone, I started on the interior bits. First the seats. The initial gluingtogether of the head rest assemblies is rather tricky as there is no positivecontact point, just a thin line. Once dry, the seam was sanded outand the rest of the seat constructed, except for a few bits, to ease painting.Next the interiors were done. There are separate front and rear tubs (you cansee a single-seater coming from FreMs with this layout). The instrument panelsare, oddly, a three piece affair; a center section and two side panels. Theinstructions have you believe that they are flat, which makes it odd that thereare three pieces. However, when you attempt to put the interior in, you willnotice that the instrument panel sticks out too far. Your choice is to trim itoff, or slightly curve the two outer panels. I chose the latter. No photo of thecockpit could be found, so I hope this is correct. As an aside, I found itinteresting that for some assemblies, identical parts were given different partnumbers while for others they were numbered the same. Not a problem, just aninteresting idiosyncrasy.
The painting instructions forthe interior are very complete. Basically the interior is grey with bits andpieces in other colors. I used Aeromaster and Model Master paints throughoutconstruction. I really like the way FreMs goes the extra mile to give FS 595references for all its colors rather than to refer you to a specific paint brandnumber. While this paint was drying, the intakes were glued onto the wings.These small bits are just a teeny bit oversized. This is good for me as it meantthey could be sanded down to fit rather than having to rely on filler for asmooth finish.
After the seats were gluedtogether, they were painted an overall dark grey. Then the seat cushions andhead rest were painted flat black as per the instructions. The top of theparachute pack was painted a dark green (actually Aeromaster RAF DarkGreen). The pull handle and bottom of the seat cushion were paintedyellow. Then I tried to get the bottom cushion to fit. It was too wide so a bitof sanding was needed to get a snug fit. The pull handle then had black stripespainted on it with a fine tipped pen.
 The exhaust pipe and aftengine were painted Burnt Iron and then glued together. At this time the speedbrake well was glued together and then glued into the fuselage. Same withthe nose gear bay and the now dry exhaust. A large weight was placed above thenose gear well and the interiors were glued in. Here is where I ran into myfirst construction problem. First off all, the aft cockpit needed a bit oftrimming to clear the back attachment of the front cockpit. Nice that theplastic is soft as it makes trimming easy.
Once that was trimmed away, Itried to glue the fuselage halves together. No go. Something was in the way.That something was the instrument panels. They are just too wide and don't fitthe contours of the cockpit at all well. I ended up removing the cockpits andinstrument panels, trimming on the panels, fitting them back in and thenregluing in the cockpits. Not exactly the neatest evolution. Not sure why theinstrument panels fit so poorly, but thinking back on it, it is quite possiblethat the instructions are mismarked and the front ones fit in the rear and viceversa. Something to think about. Anyway, I did get the fuselage halves gluedtogether, but I had to clamp them and still had some gaps on the bottom near thenose that needed filled. There were also some sink marks in the exhaust sectionthat I missed and those were also filled and sanded smooth, though it would havebeen much easier to have done it before gluing the fuselage halves together.
After taking care of thefuselage, the wings were glued on. No real fit problems here at all. The forwardsection of the speed brake was glued in place at this time as well. Then it wason to the back of the plane. The tailplanes were glued on as were theunderfuselage stabilizing fins. A bit of a gap on these was filled with Mr.Surfacer 500. Then the wheel wells and speed brake well were filled with tissue andit was off for the first round of painting.
| A BIT OF PAINT |
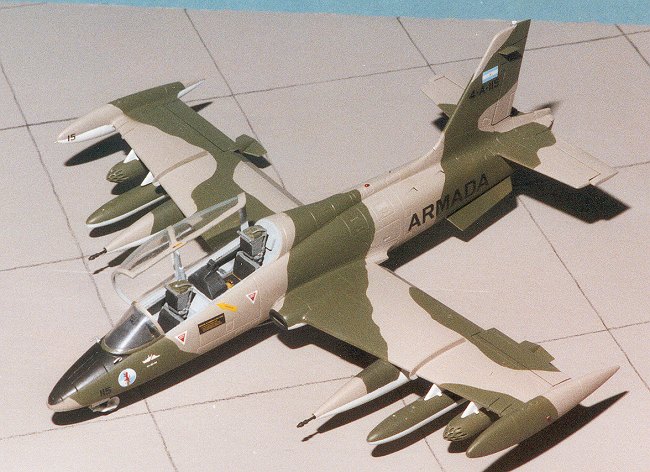
I chose to do the Argentine version mainly because I wanted touse the gun pods and because I already had an MB.326 in that scheme. This schemehas a white underside color. I used Colors by Boyd white primer for this becauseit is flat and because it covers very well. The entire underside of the aircraftwas painted in this color as were the undersides of the tip tanks, wing tanksand gun pods.
| CONSTRUCTION CONTINUES |

Then it was back to the workroom to add a few more bits beforegetting down to some serious painting. At this time, a scoop that I had missedwas glued to the bottom as were the ILS receiver antennas on the tail. Duringthis time the two HUDs were constructed. Each is four very small pieces. Theyalso do not look exactly like what is in the instructions, so I can only hopethey are correct. Since the bottom was painted, I took out the tissue from thevarious wells and touched up any overspray with a brush.
The next step was to get the canopy sections installed andmasked. While cutting them off their sprues, I noticed an odd odor about them.Couldn't quite place it until I realized that it was plexiglas! First time Ihave run across this for clear bits. Anyway, the blast screen was glued into thecanopy and the windscreen was glued in place using non-fogging superglue. Thenthe canopy was tacked in place with white glue and they were both masked withTamiya masking tape. The white underside was then masked off with Tamiya tapeand it was back to the paint shop
| WOT? MORE PAINTING? |
 This aircraft is painted in colors that are not available readily mixed inthe bottles. They are close to WWII RAF colors of brown and green, so I usedthose as starting places. I lightened the brown with white and added a touch tothe green as well. First color painted was the brown (now a tan). Once dry, thetan was masked and then painted green. The drop tanks are also green andwhite, while the rocket pods are overall green. The gun pods are white on thebottom and green and tan on the upper forward sections.
Despite my efforts at masking, there was the usual overspray that had to bedealt with. The anti-glare panel in front of the windscreen was painted black.These few sentences covering the painting of this kit actually took about 10days, what with the need to let paint dry before masking and all the touchupneeded. F-16s are MUCH easier to paint than these segmented camouflage schemeson modern jets!
| DECALS & MORE |
After taking care of the overspray, it was time to add on the glosscoat. I used Future acrylic clear and gave it several coats. When dry, thedecals were applied. These are without a doubt amongst the finest decals I haveever used. They are beautifully done, and have razor sharp registration. I usedthe Microscale system with them and they snuggled down quite well. I guess Ididn't gloss a few areas enough as I had some silvering. Perhaps a strongersetting solution would have helped. Though I really haven't mentioned it before,I decided to do the Argentine version as it was the only one of the schemes thatactually has seen any combat.
Once the decals had dried, it was overcoated with a semi-gloss to seal thedecals. I left the jet pretty well unweathered as not all aircraft look scroungy!Then it was time to start putting on an amazing amount of stuff. First were theflaps. These are designed to just slide in the back of the wings. The mounts arescored so you can bend the flaps into the lowered position. This makes theattachment point a bit weak and I managed to break off one of the flaps duringhandling later on. I suggest securely gluing them in whatever position youchoose.
 Next the gear doors were glued in place. Then the speed brake and piston wereinstalled. The wing pylons were just press fit into place as they hold quitewell. Same with the gun pods. These pods have brass gun barrels. They are a bitodd looking and I'm not sure how accurate they are, but there they are. Thesewere painted gunmetal after installation. I had todrill out the mounting hole in the pod a bit for the barrels to fit securely.They also are just press fit into place. For the other pylons, the fuel tanksand rocket pods also, you guessed it, press fit into place. Now this puppy wasloaded for bear!
Moving to the front of the aircraft, the clear bits were unmasked and thecanopy was prepared for the open position. There is a serrated thingie that fitson the right canopy sill for the canopy to glue onto. I'm guessing it issupposed to be the hinge. There is a strengthening bar with a shock on it thatone glued to the canopy just under the blast shield. Before attaching this, theengine intake lips were painted flat black using a brush and steady hand. Theexhaust area was also painted using Burnt Iron Metallizer.
Then the seats were glued into the cockpit and the canopy then glued to theoutside of the hinge with the opening piston base glued to the hole in thecenter divider. The final bits were the pitot/static sensors to the top of thefront fuselage and then the small clear bits like the landing light, tailbeacon, taxi light and the four teardrop shaped anti-collision lights. These arevery small and may be tough to glue into place. I painted the two larger onesand one small one red with the other small one being done in green before gluingin place.
| CONCLUSIONS |
Looking back on the experience, I can say without equivocationthat I really liked this kit. Some of my enthusiasm may be due to the subject asit certainly isn't a 'shake and bake' model. You do have to do some thinkingwhen constructing it and the instructions are not as crystal clear as I would haveliked on a fewminor things, however, when one considers that this isFreMs first kit, I can't be anything but very pleased with it. It builds into acool model, the parts fit well, and the decal sheet is absolutely superb. Ialmost wish that I had seven or so more kits so that I could do each of theschemes offered!
I can highly recommend this kit to modelers with some experienceand look forward with great anticipation to their upcoming F-104S Starfighter!Look for a preview and review here in Modeling Madness. (2011 note. Well, the 104 kit never was done as the company folded after producing the MB.339 series. Too bad)
| REFERENCES |
Scale Aircraft Modeller International, 1999
May 2000
Copyright ModelingMadness.com. All rights reserved. No reproduction in part or in whole without express permission from the editor.
If you would like your product reviewed fairly and fairly quickly, please contact the editor or see other details inthe Note toContributors.
Back to Reviews Page 2023