
Fujimi 1/72 BAe Hawk T.1
|
KIT # |
7A-3 |
|
PRICE: |
$ at swap meets for $5-10 |
|
DECALS: |
Two options |
|
REVIEWER: |
Scott Van Aken |
|
NOTES: |
Modeldecals used |
|
HISTORY |
 I'll keep the historical background brief. Needless to say, the Hawk has
been the most successful trainer that Britain has had since World War II.
In fact, it rivals the Hunter as to it's popularity overseas. Despite a
general post-war history of producing aircraft that did not do well on
the foreign market, the Hawk has been an aircraft that has done very
well.
I'll keep the historical background brief. Needless to say, the Hawk has
been the most successful trainer that Britain has had since World War II.
In fact, it rivals the Hunter as to it's popularity overseas. Despite a
general post-war history of producing aircraft that did not do well on
the foreign market, the Hawk has been an aircraft that has done very
well.
A very adaptable airframe that can perform both training and light strike missions with equal ease, the Hawk is suitable for those air arms who can handle some sophistication in terms of maintenance as well as those other more established countries that are looking for a capable and efficient trainer/strike aircraft. After at least 25 years in production, the Hawk is still coming off the lines.
|
THE KIT |
For a look at what comes in the box, please visit the preview.
|
CONSTRUCTION |
 On
this kit, I will hopefully miss all the problem areas I found on the
first and use this one to correct a glitch or two. One big problem with
this particular kit is that it must have been from a later run or
something as it was rife with sink areas. Most of them were on the wing
underside, but could be found on several fuselage locations as well. If
you look at the image comparing the lower wings of the two kits in
question, you'll see what I mean, Not shown are the sink areas on the
back side of the wheel wells. After filling those all in, I glued on the
upper wing halves.
On
this kit, I will hopefully miss all the problem areas I found on the
first and use this one to correct a glitch or two. One big problem with
this particular kit is that it must have been from a later run or
something as it was rife with sink areas. Most of them were on the wing
underside, but could be found on several fuselage locations as well. If
you look at the image comparing the lower wings of the two kits in
question, you'll see what I mean, Not shown are the sink areas on the
back side of the wheel wells. After filling those all in, I glued on the
upper wing halves.
One of the other problems I found after building the
first kit is that this kit isn't a full production version as the wing
fences needed to be farther inboard; about equal with the hinge between
the flaps and ailerons. Plastic card would have worked, but I have some
scrap brass from an old P.E. set (never throw away anything that could be
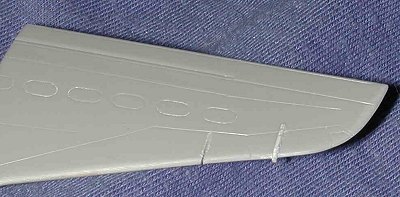 useful).
What I did was to take my thinnest finger saw and saw a groove in th
useful).
What I did was to take my thinnest finger saw and saw a groove in th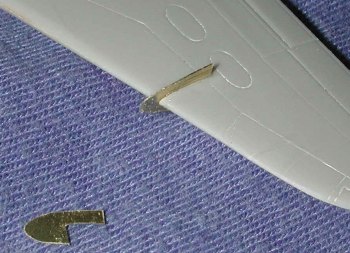 e
proper place, making it deeper on the top than on the underside. With
this done, I cut off the old fences and then sanded the stubs smooth to
the wing. Taking a pair of scissors, I rough cut one fence and then
trimmed it down to what looked about right. It was then smoothed down
with an old coarse sanding stick. The brass will trash a sanding stick in
a heart-beat so only use an old one or use files. Then, I applied a touch
of superglue to the new cut and inserted the new fences. Total time to do
all that was about a half hour, most of it cutting and shaping the new
fences. They look just great and are not that difficult to do.
e
proper place, making it deeper on the top than on the underside. With
this done, I cut off the old fences and then sanded the stubs smooth to
the wing. Taking a pair of scissors, I rough cut one fence and then
trimmed it down to what looked about right. It was then smoothed down
with an old coarse sanding stick. The brass will trash a sanding stick in
a heart-beat so only use an old one or use files. Then, I applied a touch
of superglue to the new cut and inserted the new fences. Total time to do
all that was about a half hour, most of it cutting and shaping the new
fences. They look just great and are not that difficult to do.
Turning back to the rest of the kit, I painted all
the interior and wheel well areas with Humbrol Light Aircraft Grey. I
used a tinlet that is so old that it actually has the color printed on a
small disc inside the recess of the lid. I also painted the gear struts
and inside of the wheel wells and gear doors with this color. The
instrument panels were painted black (yeah, I know they are supposed to
be light grey with black instruments) and then
 glued in place in the left
side. I also painted the instrument console tops black, despite the fact
that there isn't any detail and then glued in the control sticks. These
things look nothing like what I think Hawk control sticks should look
like, but they are all that comes with the kit. When all that dried, the
interior was glued into the left fuselage half. Fit is excellent. The
Hawk will sit on its tail like a bureaucrat so it really needs some nose
weight. I usually purchase a set of fishing weights of various sizes and
pick those that are cone shaped. They are quite useful in that shape,
especially when you have to
glued in place in the left
side. I also painted the instrument console tops black, despite the fact
that there isn't any detail and then glued in the control sticks. These
things look nothing like what I think Hawk control sticks should look
like, but they are all that comes with the kit. When all that dried, the
interior was glued into the left fuselage half. Fit is excellent. The
Hawk will sit on its tail like a bureaucrat so it really needs some nose
weight. I usually purchase a set of fishing weights of various sizes and
pick those that are cone shaped. They are quite useful in that shape,
especially when you have to
 put them into a radome. These were first
squished and then superglued under the cockpit floor. Once dry, the tail
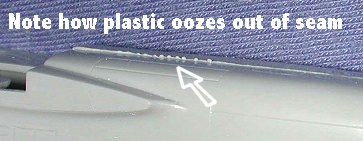
pipe was glued in place and then the fuselage halves glued together.
During the application of the cement, the fuselage was squeezed together.
What this does is to allow the plastic that is melted by the glue to ooze
to the surface and thereby, seal the join so that one doesn't have to use
as much filler on the seams. However, that is no help with the sink areas
near the alignment pins, so filler still had to be applied. Fitting on
the wing also required several applications of filler. Face it, this is a
bit of a filler monster!
put them into a radome. These were first
squished and then superglued under the cockpit floor. Once dry, the tail
pipe was glued in place and then the fuselage halves glued together.
During the application of the cement, the fuselage was squeezed together.
What this does is to allow the plastic that is melted by the glue to ooze
to the surface and thereby, seal the join so that one doesn't have to use
as much filler on the seams. However, that is no help with the sink areas
near the alignment pins, so filler still had to be applied. Fitting on
the wing also required several applications of filler. Face it, this is a
bit of a filler monster!
 After all the sanding that was needed, I rescribed as many of the panel lines as I could. I use a small-toothed
file that is the size and shape of a guitar pick. It is very handy for
doing jobs like this and is the right size for most engraved panel lines.
After all the sanding that was needed, I rescribed as many of the panel lines as I could. I use a small-toothed
file that is the size and shape of a guitar pick. It is very handy for
doing jobs like this and is the right size for most engraved panel lines.
With the airframe pretty well taken care of, it was time to add a few of the bits to it that make it just that more complete. First up was the lower ventral strakes. Because of the closeness of other things in that area, it is a good idea to get as tight a fit as you can. I used a square file to help out, as I knew I wasn't going to go the filler route on the joins. The next bits to attach are the small upper avionics bay cooling scoops. The next to go on were the tail planes. These are a bit of a sloppy join so you have to watch them to keep them from being in the wrong position while they dry. With those added, the only other major bit was the tail planes. These fit with no problem at all. I then turned my attention to the cockpit. The seats were given a nice painting, though I'm sure the colors are wrong and I wish I could have found a detail set to add some belts, but I didn't so they were glued in place. Then the canopy and windscreen were glued in. Fit of the canopy was not that great, a situation that was also discovered with the previous Hawk build. These were taped and it was time to do some painting.
|
COLORS & MARKINGS |
I decided to use Modeldecal sheet 116 from 1992, which has
markings for at least 10 Hawks on it. Picking the right one was a real
poser, but I finally decided on one of the grey aircraft with the black
tails. The instructions did not mention what colors the greys were so I
painted it Light Aircraft Grey on the undersides using Humbrol enamel and
Barley Grey uppers using  some Xtracolor enamels. The upper color wraps
under the wing leading edges. Before applying any of those colors, I
painted the tail Black using Floquil Engine Black Lacquer. Then I started
to cut out the decals when I noticed that I'd forgotten the nose probe.
That was glued in place, the area around it sanded and it painted with
the Xtracolor Barley Grey.
some Xtracolor enamels. The upper color wraps
under the wing leading edges. Before applying any of those colors, I
painted the tail Black using Floquil Engine Black Lacquer. Then I started
to cut out the decals when I noticed that I'd forgotten the nose probe.
That was glued in place, the area around it sanded and it painted with
the Xtracolor Barley Grey.
After that dried, I returned the model to the bench to add on the landing gear prior to applying the decals. The gear needs a lot of clean-up as the mold seam is particularly large on this boxing. In fact, the whole kit seemed to have a lot of large mold seams, probably due to the age of the mold or the need to properly adjust it to closer tolerances. Thanks to the gloss or semi-gloss nature of the paint, no clear coat was needed prior to using the decals. I chose the 79 Sq anniversary bird from the sheet and applied the decals. I didn't use the full suite of stencils on it, but did install enough to make it not seem quite so bare. Modeldecals are not quite up to modern standards in that they have more carrier film than needed and I also found the fin flashes to be a bit off register. I used Sovaset on them to ensure their cooperation! After they had dried, I returned to adding on more bits.
|
FINAL CONSTRUCTION |
 In this case,
the more bits were the wheels and landing gear doors. They were attached
with superglue. I also brush painted the center frame of the canopy with a
buff color as is so often seen on Hawks. When dry, the kit was then given a
matte clear coat. Perhaps it should have been a semi-matte, but it looks
fine as it is. The exhaust was painted with Burnt Iron, the formation
lights with clear green and red and the nose landing light glued in place.
This light really should be glued in early then sanded to shape as it seems
too big. I still have another Fujimi Hawk in the pile and I'll add that
note to the kit box! The masking removed, a bit of touch up painting, and I
was done.
In this case,
the more bits were the wheels and landing gear doors. They were attached
with superglue. I also brush painted the center frame of the canopy with a
buff color as is so often seen on Hawks. When dry, the kit was then given a
matte clear coat. Perhaps it should have been a semi-matte, but it looks
fine as it is. The exhaust was painted with Burnt Iron, the formation
lights with clear green and red and the nose landing light glued in place.
This light really should be glued in early then sanded to shape as it seems
too big. I still have another Fujimi Hawk in the pile and I'll add that
note to the kit box! The masking removed, a bit of touch up painting, and I
was done.
|
CONCLUSIONS |
 Despite the
quality of the mold on this one being worse than on the previous build,
this kit was not as difficult. I found the fix of the wing fences to be
very simple to do and it adds a lot to the end effect. I'm still not
pleased with the relatively poor fit of the canopy or the nose light and
these are areas that I believe the Italeri kit does a much better job.
However, the Fujimi kit is easy to find, cheap and is not really all that
fiddly. If you can find one, you know what its problems are by now and they
are easy to fix. Go for it!
Despite the
quality of the mold on this one being worse than on the previous build,
this kit was not as difficult. I found the fix of the wing fences to be
very simple to do and it adds a lot to the end effect. I'm still not
pleased with the relatively poor fit of the canopy or the nose light and
these are areas that I believe the Italeri kit does a much better job.
However, the Fujimi kit is easy to find, cheap and is not really all that
fiddly. If you can find one, you know what its problems are by now and they
are easy to fix. Go for it!
July 2004
# 1321 in a series
Copyright ModelingMadness.com. All rights reserved. No reproduction in part or in whole without express permission from the editor.
If you would like your product reviewed fairly and fairly quickly, please contact the editor or see other details in the Note to Contributors.