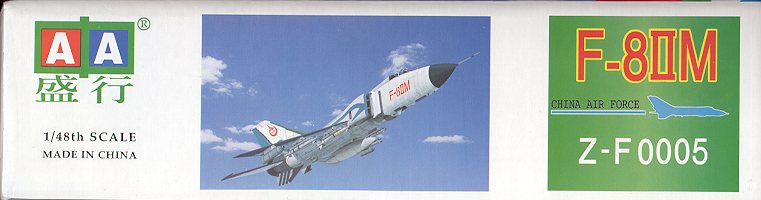
AA 1/48 Shenyang F-8IIM
|
KIT # |
Z-F0005 |
|
PRICE: |
$24.95 |
|
DECALS: |
One version: generic PLAAF |
|
REVIEW : |
|
|
NOTES: |
|
|
HISTORY |
The Shenyang F-8 and J-8 is basically a very scaled up MiG-21. It bears a striking resemblance to the MiG Ye-162A 'Flipper'. First flight of the J-8 was made in July 1968, but was plagued with problems and never put into production. An all weather version, the J-8I was equally unsuccessful, but did lead to the J-8II. This aircraft first flew in 1984 and is much improved. It also relies on previous Soviet technology, incorporating features from the MiG-19 and MiG-23 as well as the MiG-21. The J-8II only has 30% commonality with the previous J-8I, as so much needed to be changed. While there has been a small production batch of J-8II's, it is not known for sure if they are in widespread service with the PLAAF.
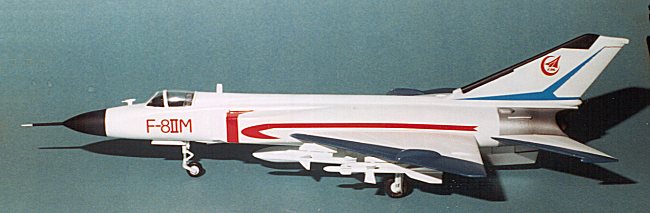
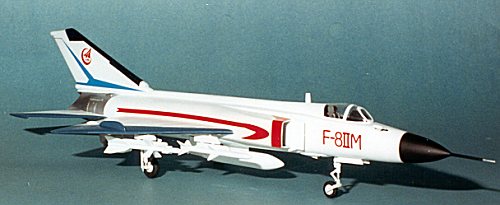
The F-8II is simply an export version of the J-8II. Much Western technology has been incorporated into the cockpit and avionics of the aircraft to make it more appealing to foreign buyers. Following the 1989 Tianamen Square incident, the project was put on hold as many of the Chinese engineers were removed from the project. The purchase of Su-27 Flankers from Russia may well have spelt the death knell for what is now basically an 'F-4 generation' aircraft.
|
THE KIT |
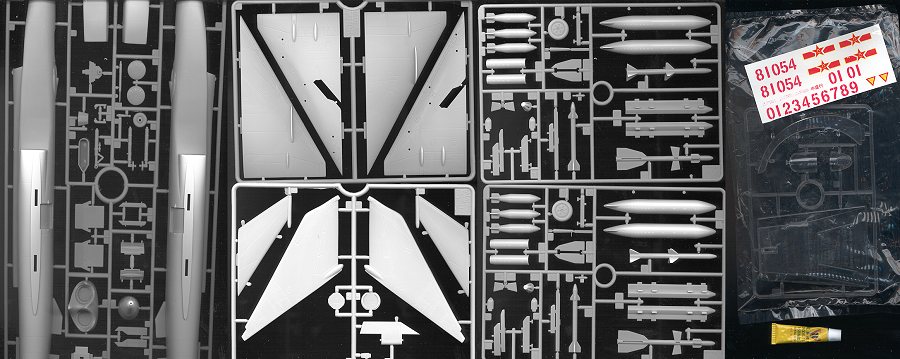
Typical of those kits built in the PRC, this one comes in a very sturdy cardboard box. There is a good painting of a prototype or demonstrator on the box top as well as the side panels. One photo of this aircraft is also included. Once you struggle with opening the box, you are confronted by a number of bagged sprues of grey plastic. One bag has the transparencies and the decal sheet in it. This kit even includes a stand, something I haven't seen in a long time in a kit. There is even a tube of glue included in the box, but it does not seem to be anywhere near enough to cement together all the parts that are included.
Another bag includes the fuselage section (which was too large to fit entirely on the bed of my scanner). Also on this sprue are the interior, a rather odd looking seat, landing gear struts, wheels and other bits. The back side of all the parts have rather large holes and in some cases pegs created by the ejector pins. This includes the wheels and struts, so some work will be needed here. This is true of all the parts, with the exception of the single piece horizontal stabilizers and the underfuselage stabilizing fin. The wings and tail parts are on the next two sprues, both of these sprues are in one bag.
The next two bags contain identical sprues. This one included a plethora of
underwing ordnance and various racks. There are rocket pods, regular bombs,
three varieties of missile and drop tanks. One should have no problem equipping
this aircraft for just about any scenario that one would wish.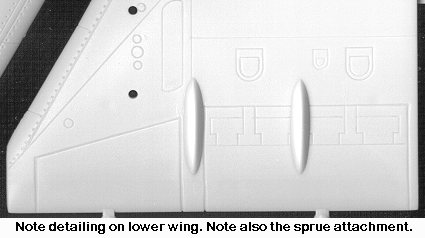
Detailing on the kit is very good indeed. All of it is engraved and to a very high standard. As you can see from the image, it has been masterfully done. Equally up to the standards of the day. One does need to be aware that some of the sprue attachment points are not perfect and some care will be needed when removing the parts. I have not tried to test fit any parts so fit is unknown. The locator pins and holes are very large and it is a credit to AA that there are not a huge number of sink marks on the kit, though I did find one or two very small ones.
Probably the biggest downfall of this kit is the instruction sheet. While it does give an 11 step pictorial construction sequence, there is absolutely no indication of colors for various parts. There is also no firm indication of where the various weapons loads should fit, a problem also with some of the smaller parts, nor is there any decal placement diagram. Since there is really very little information available on this aircraft, painting it will be a real challenge. There is some hope that an aftermarket decal sheet could become available, but I'm not holding my breath waiting for it.
|
CONSTRUCTION |
Step one, according to the instructions, is to cement the splitter plate to the intakes. So, after painting the interior of them white, cleaning up the plates and the intake lips, I did just that. Then, before the glue dried, the intakes were glued to the side of the fuselage. Fit is not good. In fact, it is horrible. There is not guide, and only flooding the joins with glue and pressing will you eliminate most of the gaps. Naturally, the splitter plate stands proud of the side of the fuselage so some additional work is needed after the intakes are nice and firmly mounted. It took several coats of filler and some killer sandpaper to smooth things out.
While working on that, the wings and tail halves were glued together. Fit is very good. Then my attention turned to the cockpit. There is a tub, that crummy seat, and an instrument panel. No control stick is shown in the instructions, but there is a hole in the floor for one. In fact, even the instrument panel is not called for in the instructions! So I painted the cockpit black as I have only seen one image of the cockpit and that is the predominant color. After doing that, I installed the cockpit tub, nose well, and underfuselage stabilizer into one fuselage half and then glued the two halves together. Fit wasn't bad, though not quite as good as the wings and stabilizer. Those huge alignment pins sure do the trick!
 At this time, the exhaust
piece was glued to the aft section. It is just a tad too large so was aligned at
the bottom (remember that stabilizing fin) and glued in place. The wings were
also glued on during this step and the whole assembly set aside to dry in
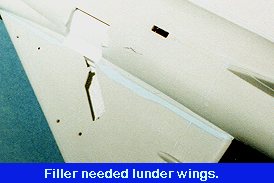
preparation for any filling and filing. And filling is the key word here.
Biggest offender is the wing/fuselage join. It seems that either there is
supposed to be step between the wings and the wing root, or the wings are too
narrow. Much filler was required. At this time I also glued on the fin. WHOA!!
At this time, the exhaust
piece was glued to the aft section. It is just a tad too large so was aligned at
the bottom (remember that stabilizing fin) and glued in place. The wings were
also glued on during this step and the whole assembly set aside to dry in
preparation for any filling and filing. And filling is the key word here.
Biggest offender is the wing/fuselage join. It seems that either there is
supposed to be step between the wings and the wing root, or the wings are too
narrow. Much filler was required. At this time I also glued on the fin. WHOA!!
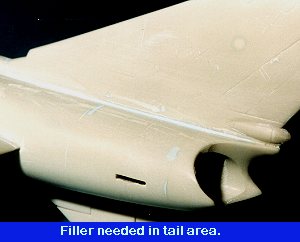 This puppy was not even close to being level. When finally dry, there was a
monster gap on the left side. It also appears to be slightly warped to that side
as well, but hopefully it won't be too noticable. Break out the filler and
sandpaper for this one. The more construction gets underway, the more it seems
like a Smer kit. While that doesn't mean bad, that does mean iffy fit.
This puppy was not even close to being level. When finally dry, there was a
monster gap on the left side. It also appears to be slightly warped to that side
as well, but hopefully it won't be too noticable. Break out the filler and
sandpaper for this one. The more construction gets underway, the more it seems
like a Smer kit. While that doesn't mean bad, that does mean iffy fit.
After getting those areas cleaned up, it was time to install the nose. A weight was superglued into it prior to fitting. I had chosen not to install the radar screen in it and to glue the nose in place. Fit was as expected and the area had filler applied to smooth things out. Meanwhile, I went to work on the underwing stores. All the missiles have a number of ejector pin marks on them that need either filled or filed off. There are two drop tanks, but only one rack. The tank I will use had the locator pins removed prior to gluing together. The MER for the bombs is pretty poor so I am not going to use it. It will probably mean that I have to fill some holes in the wing underside.
 Back in the cockpit, the
instrument panel was glued into the anti-glare shield and that assembly glued in
place. The instrument panel had to have a small section on the bottom removed to
properly fit. I have an aftermarket K-36 seat to replace the kit one. This seat
is too tall and had to have the bottom sanded down so it will fit. Once it was
sanded down, it was painted a medium grey and then detailed. While this was
being done, the canopy section was fit into place and the windscreen glued into
position.
Back in the cockpit, the
instrument panel was glued into the anti-glare shield and that assembly glued in
place. The instrument panel had to have a small section on the bottom removed to
properly fit. I have an aftermarket K-36 seat to replace the kit one. This seat
is too tall and had to have the bottom sanded down so it will fit. Once it was
sanded down, it was painted a medium grey and then detailed. While this was
being done, the canopy section was fit into place and the windscreen glued into
position.
Since painting seats isn't exactly a one day deal for me, I returned to add some stuff to the airframe. There are some intakes at the back of the fuselage. Now the instructions are basically worthless in where these go other than pointing in the general direction of the back of the plane. The few images I have are equally unhelpful. This meant a bit of creative engineering. I figured where they might be on a MiG-21 and then punted from there. They were also sanded down a bit when dry to make them look like they were supposed to go there.
Once the seat was painted, it was installed in the cockpit along with the thing that, I guess, is supposed to be the control stick. The interior was then drybrushed and the canopy glued in place. Once that was done, the actuating arm in the back of the canopy and the lump on the back of the fuselage spine were sanded smooth and filled. Also filled were the inner mounting holes under the wings. The only thing I could put there would be the bomb racks and they are just too toy-like to install.
Once filled, sanded and smoothed, the canopy was masked with Scotch tape and it was on to the paint shop.
|
PAINT |
 As much as I would have liked to have painted this aircraft in
any other color, those references I found only showed them in white. Now white
is a read pain to paint, mainly because it takes a zillion coats to cover and it
tends to bleach out all the details. After several sessions with the Testors
Modelmaster Gloss white, I had a painted aircraft. This single sentence covers
about 10 days, as gloss paint takes forever to really cure. It is dry to the
touch in just a few hours, but curing takes several days. The old adage about
paint is: 'If you can still smell it, it isn't cured' comes is one most modelers
should heed. It will save all sorts of paint problems, especially if you are
painting with more than one type or brand of paint.
As much as I would have liked to have painted this aircraft in
any other color, those references I found only showed them in white. Now white
is a read pain to paint, mainly because it takes a zillion coats to cover and it
tends to bleach out all the details. After several sessions with the Testors
Modelmaster Gloss white, I had a painted aircraft. This single sentence covers
about 10 days, as gloss paint takes forever to really cure. It is dry to the
touch in just a few hours, but curing takes several days. The old adage about
paint is: 'If you can still smell it, it isn't cured' comes is one most modelers
should heed. It will save all sorts of paint problems, especially if you are
painting with more than one type or brand of paint.
While all that was going on, I worked on the landing gear, weapons and pylons. These were cleaned up of their myriad seams and ejector pin marks, bits glued on them when necessary, and also painted......white.
Once the white painting was done, the nose, wing and fin were properly masked off and the antennas in them painted black. The wing ones are not the same as in the photo I was using. Apparently AA didn't get that part right as they are rather large, and AA did not include the proper scribing for them. The aft section was masked off and painted aluminum. Then Burnt Iron was sprayed in the exhaust section and misted over the aft portion of the Aluminum painted part.
|
CONSTRUCTION CONTINUES |
 With a pretty well done airframe, the landing gear was glued
into the wheel wells after the oleos were covered with Bare Metal Foil. The gear
doors for the main gear just snap onto the struts, a nice feature. At this time
the nose probe was snapped in place and the nose radome was touched up with some
black. At this time the centerline tank was glued onto its pylon. I had to trim
the mounting lugs as it is intended that you assemble the tank around the pylon,
something I didn't want to do. The nose gear doors were then glued in place and
basically, the kit itself was built. Only have to add the decals to it and then
attach the various wing pylons and missiles.
With a pretty well done airframe, the landing gear was glued
into the wheel wells after the oleos were covered with Bare Metal Foil. The gear
doors for the main gear just snap onto the struts, a nice feature. At this time
the nose probe was snapped in place and the nose radome was touched up with some
black. At this time the centerline tank was glued onto its pylon. I had to trim
the mounting lugs as it is intended that you assemble the tank around the pylon,
something I didn't want to do. The nose gear doors were then glued in place and
basically, the kit itself was built. Only have to add the decals to it and then
attach the various wing pylons and missiles.
|
DECALS |
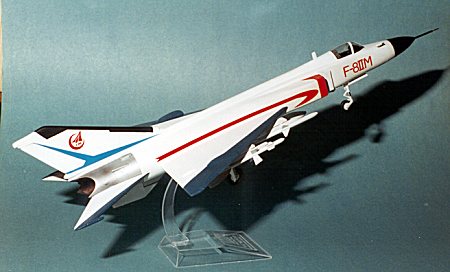
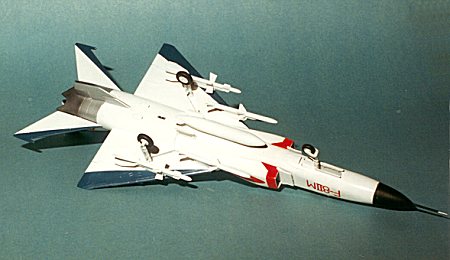
Since I had slowed down construction (mostly due to lagging interest because of the fit of parts), this gave someone a chance to produce some decent decals for this airplane. Tiger Wings finally came out with a sheet for four demonstrator aircraft and an number of operational F8IIs (sheet 8106 which is now long gone to other builders). Having decided to do a demonstrator, the plane went back to the paint shop to have some blue painted on the wings and stabilizers. I used Xtracolor RLM 25 blue as it seemed to match the photo on the box best. Unfortunately, I got it too thin and it ran along several panel lines requiring many days of back and forth repainting to repair the glitches. This was turning into a longer build than I had hoped!!
 Have you ever had one of those kits where no matter what you try, it doesn't
seem to want to behave? This is one of those kits. I finally got a bit fed
up and decided to just go ahead and finish it, glitches and all. Having decided
on the scheme, I cut out the decals and applied them. No insignia for the
demonstrators, but lots of red and blue. The decals are rather transparent, so
any attempt put them on a non-white background will cause heartaches.
Fortunately, all F-8IIs are overall white, so no problem there. The decals
themselves are very thin, close to Propagteam, but don't have the 'stick where
it lays' property, thank goodness! Using plenty of water, I was able to get them
where I wanted and only tore one of them. The intake decals are a relatively
decent fit, though they don't curve quite enough to go down perfectly flat. Not
wanting the red colors to melt, I only used the Microscale system on them,
though they seemed to want to snuggle down fine on their own.
Have you ever had one of those kits where no matter what you try, it doesn't
seem to want to behave? This is one of those kits. I finally got a bit fed
up and decided to just go ahead and finish it, glitches and all. Having decided
on the scheme, I cut out the decals and applied them. No insignia for the
demonstrators, but lots of red and blue. The decals are rather transparent, so
any attempt put them on a non-white background will cause heartaches.
Fortunately, all F-8IIs are overall white, so no problem there. The decals
themselves are very thin, close to Propagteam, but don't have the 'stick where
it lays' property, thank goodness! Using plenty of water, I was able to get them
where I wanted and only tore one of them. The intake decals are a relatively
decent fit, though they don't curve quite enough to go down perfectly flat. Not
wanting the red colors to melt, I only used the Microscale system on them,
though they seemed to want to snuggle down fine on their own.
Once that was done, all the bits I knocked off during construction as well as the missiles and rails were installed and a thin mist of clear was sprayed. Then the canopy tape was removed so I could see how much leaked under the tape. After cleaning up the few leaks, the kit was done. It was then mounted on its stand.
|
CONCLUSIONS |
 Once I realized exactly what this kit was and what it wasn't,
then the disappointment and surprises were kept to a minimum. What it isn't is a
state of the art Hasamiya Modeler kit full of fine detailing, comprehensive
instructions and decals. What it is, is one of the initial products from an
company with no experience in the world modeling market place. They are used to
selling to a captive market and what we see at toy-like features and lack of
detail is not seen as a drawback.
Once I realized exactly what this kit was and what it wasn't,
then the disappointment and surprises were kept to a minimum. What it isn't is a
state of the art Hasamiya Modeler kit full of fine detailing, comprehensive
instructions and decals. What it is, is one of the initial products from an
company with no experience in the world modeling market place. They are used to
selling to a captive market and what we see at toy-like features and lack of
detail is not seen as a drawback.
Frankly, I know of no really large modeling groups in China; no IPMS Beijing; no Chinese modeling forum. The modeling industry in China is basically in its infancy, and we should expect home-grown models to reflect that. Shanghai Dragon is an exception as that company was developed in Hong Kong, which isn't the same as the rest of China.
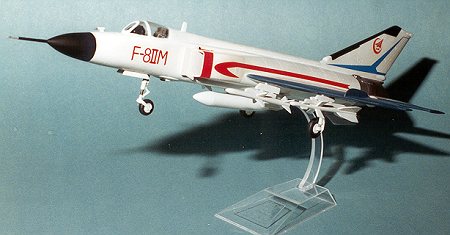
I, for one, am left with an overall positive impression. Sure it is crude, but it is of a kit that no one else makes. Sure the fit isn't the best, but it isn't anything that cannot be overcome. Am I making excuses for the kit? Probably. It isn't going to win contests, it wasn't a breeze to build, and I wish that it came with a decent set of decals, but I'm glad I built it. The few who have seen it think it is cool and I like having it in my display cabinet and that is what really counts.
|
REFERENCES |
Encyclopedia of World Military Aircraft, edited by John Lake, 1994, Airtime Publishing
March, 2000
Copyright Scott Van Aken
Review copy courtesy of me and my wallet!!
If you would like your product reviewed fairly and fairly quickly, please contact the editor or see other details in the Note to Contributors.
Back to Reviews Page 2017