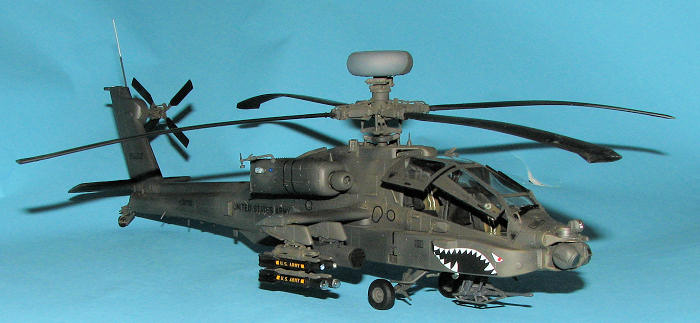
Hasegawa 1/48 AH-64D Apache
|
KIT # |
Pt 23 |
|
PRICE: |
$39.95 when new in 2001 |
|
DECALS: |
One aircraft |
|
REVIEW: |
|
|
NOTES: |
|
BACKGROUND |
To read a short history and see what is in the box, please read the preview
|
CONSTRUCTION |
Once opening the bag full of parts (and I mean full), I clipped
off the fuselage halves to test the fit, did a few exploratory laps around the
room to check its flying abilities and then started following the kit
instruction. On a kit this complex, I felt it best to follow the instructions as
much as possible. This means I started with the cockpit. The side consoles,
rudder pedals, control sticks and the aft seat attachment were glued together.
Then the interior bits were painted flat black. I didn't glue ALL the bits in
 place first as it would have complicated painting and decal placement. Once the
area was painted, I got the decals off the sheet and put them in place. A touch
of Sovaset was enough to get them to snuggle right down. They fit perfectly with
no hassles. I know that some people don't like these decals, but they really do
fit well and are a viable option to painting control boxes.
place first as it would have complicated painting and decal placement. Once the
area was painted, I got the decals off the sheet and put them in place. A touch
of Sovaset was enough to get them to snuggle right down. They fit perfectly with
no hassles. I know that some people don't like these decals, but they really do
fit well and are a viable option to painting control boxes.
With the interior at a semi-complete stage, it was installed into the fuselage halves. Fit of the interior is really quite good. The biggest headache was getting the aft glare shield to meet properly. A bit of clamp action was required to finally get it to fit. There still were a lot of bits and pieces to add, but I felt they could wait until later in the construction and stand a much better chance of not being broken off. There is a lower rotor assembly that must be glued together and then glued into a fuselage half. The instructions do a pretty good job on what goes where, but I found that some trimming of the parts was needed to get them to fit as advertised. This assembly along with a few other small finishing bits were glued into the rotor head area and the fuselage halves glued together. As a quick note, there are a number of holes in the fuselage halves that need to be opened up. Make sure to do this before gluing the halves together. I nearly forgot!
As was feared, the fit of the halves was not as perfect as I would have hoped. My choice was a relatively good fit on top or the bottom. Downside of a good upper fit is that many rivets on the bottom would be sacrificed to sandpaper. Having made my choice, I applied all the needed filler to the fuselage, and there really was more than I'd have liked to have used. As predicted, I lost a lot of rivet detail on the underside. I'm sure it can be replaced by strategically placed drops of superglue so may look into giving that a try.
 With the
fuselage together, it came time to see what was needed next. Pretty well
following the instructions, the stub wings were glued together as were the
landing gear assemblies. Thanks to Hasegawa's insistence in bagging all the
sprues in a single bag, there were a few parts rather badly broken that needed
to be repaired; some made a complete recovery and a few were less than perfect.
With the gear assemblies done and the wings done, it was time to do some test
fitting. I had hoped that I could install the wings and landing gear after the
rather large tub was glued to the fuselage. Can't be done.
With the
fuselage together, it came time to see what was needed next. Pretty well
following the instructions, the stub wings were glued together as were the
landing gear assemblies. Thanks to Hasegawa's insistence in bagging all the
sprues in a single bag, there were a few parts rather badly broken that needed
to be repaired; some made a complete recovery and a few were less than perfect.
With the gear assemblies done and the wings done, it was time to do some test
fitting. I had hoped that I could install the wings and landing gear after the
rather large tub was glued to the fuselage. Can't be done.
There is a small 'c' shaped piece that fits into a hold just under where the stub wing goes. The instructions are not clear on this piece and so you might be tempted to glue it too low down. Once this was glued on, I attached the wings. Fit is quite good and no hassles. The landing gear were also glued in place at this time. Fit here was quite good as well. Then it came time for the large tub to be glued in place. This consists of three parts: two sides and a bottom. First a small plastic hold down is inserted where the gun will go. Unfortunately, this area gives all sorts of trouble and try as I may, I couldn't get the bottom piece to fit down low enough. It caused alignment problems with the tub assembly that I'm just going to have to live with. Remember that small 'c' shaped piece. It also prevents the tub on that side from fitting. I had to cut it off and after everything had dried, it was pushed back in place. Apparently it is there to keep things from getting jammed between the lower part of the stub wing and the upper part of the tub.
 With that done, I
returned to the cockpit to add more pieces. The armor plating along side the
rear inside glass will require you to do a bunch of test fitting. Fortunately,
the glass is a tight fit. With all the bits now in the cockpit (other than the
seats), they were brush painted with flat black and then dry-brushed to bring
out detail.
With that done, I
returned to the cockpit to add more pieces. The armor plating along side the
rear inside glass will require you to do a bunch of test fitting. Fortunately,
the glass is a tight fit. With all the bits now in the cockpit (other than the
seats), they were brush painted with flat black and then dry-brushed to bring
out detail.
Back to the exterior, I started work on the engines and attached the tail wheel so that I could set the kit on its gear while working on it. The engine pods fit fairly well, though not perfect. Any attempt at using filler on the seams will cause much detail loss. The little inlet thingies (I guess they are deicers) each are three parts. Those were glued together and cleaned up in preparation for use. Then the exhaust were glued together, painted burnt iron and readied for installation. There are a myriad of small pieces that need to be glued in place and many of them were done now.
Enter into the
way-back machine. For whatever reason, this project lost my interest and
sat in its box for a few years. When I returned to it. It started by
assembling the main rotor assembly. The blade attachment is very positive
and makes a strong connection. The same cannot be said for some of the
detail parts. There are two bits that fit to the rotor shaft that, frankly,
are not well diagramed in the instructions. The larger attachment point is
vague to the max and I eventually attached the smaller of the
 two points
first and let the larger one just be glued where it sat. After
attaching the other small bits, I then test fit it to the housing atop the
fuselage. Much to my dismay, I discovered that I'd glued the lower section
at an angle several years ago, having the base of that part fit
under
the ledge on which it was to sit instead of atop it. Repairing this glitch
would mean breaking the fuselage halves apart, an option I didn't have.
I'll just have to bend the rotor shaft and glue the blades in a fixed
position to take care of this glitch.
two points
first and let the larger one just be glued where it sat. After
attaching the other small bits, I then test fit it to the housing atop the
fuselage. Much to my dismay, I discovered that I'd glued the lower section
at an angle several years ago, having the base of that part fit
under
the ledge on which it was to sit instead of atop it. Repairing this glitch
would mean breaking the fuselage halves apart, an option I didn't have.
I'll just have to bend the rotor shaft and glue the blades in a fixed
position to take care of this glitch.
Malaise once again set in for this kit and it spent yet a few more years sitting. I then decided to get off my butt and finish some long term projects, this being one of them. Sometime between this paragraph and the previous one, I'd painted about 80% of the airframe as it was, using a paint I'd mixed up. Blowing and brushing off the dust and cobwebs, I got back into seeing what had been done and where the build stood.
Most of what needed doing was a lot of small stuff, and I knew this would take a bit. first step was to get the engine pods sorted out and so those were glued in place, along with the little inlet 'thingies'. Next things to do were to mask the clear parts in preparation for painting. Once that was done, the canopy was glued in place. Fit was quite good with no real fit issues. I also assembled the nose seeker, glued on the outer wing pylons and got to work assembling the tail rotor.
 This part is
quite complex and is best glued all at one time to be sure all the parts fit
together properly. One of those cases where one wishes for multiple hands. This
was set aside for a bit. I'd already painted the blades so those were masked.
Same for the main rotor.
This part is
quite complex and is best glued all at one time to be sure all the parts fit
together properly. One of those cases where one wishes for multiple hands. This
was set aside for a bit. I'd already painted the blades so those were masked.
Same for the main rotor.
Then the time consuming part of removing, cleaning and attaching a myriad of handles, antennas, cable cutters and so on. This took many sessions as I worked on one section of the airframe and let it dry before moving on. This also allowed me to do some final clean up on some of the smaller parts, which were easier to sand once attached. The tailplanes were attached and I discovered I'd forgotten a piece on the tail wheel many years ago. This was then attached.
Meanwhile, I'd started assembling the Hellfire missiles. The bodies all needed cleaned up as, typical of Hasegawa missiles, the body had several ejector pin marks that had to be removed. I also attached the guard work around the chain gun, which had been built and painted years ago. Despite still having a number of items to attach, it seemed like a good time to paint. I attached the inner and outer handles on the doors then tacked them as close to closed as I could.
|
PAINT & DECALS |
My first painting session way back when consisted of some paint that I'd mixed
which was a bit darker than the normal Olive Drab. Well that paint had long ago
dried so I picked up a bottle of Testors Helo Drab to use on this one. I then
started painting all the new pieces that had been attached as w ell
as those areas that were still unpainted on the airframe. The Helo Drab is a bit
lighter than the original paint, but provided an interesting contrast in shades
so I left as much of the original on as I could. Next was a couple of coats of
Future in preparation for decals.
ell
as those areas that were still unpainted on the airframe. The Helo Drab is a bit
lighter than the original paint, but provided an interesting contrast in shades
so I left as much of the original on as I could. Next was a couple of coats of
Future in preparation for decals.
The kit decals were very generic so instead I used Isradecal sheet IAF-53, which also included several US Army Apaches. Of the four AH-64Ds, two had a shark mouth, so I picked the first one from B Company, 1-3 ATKHB, 3rd ID, in Iraq during the invasion in 2003. The Isradecals went on fairly well. I say that as they had a tendency to silver. They also did not react much to the Microscale decal solutions. This is a problem I've run into before with Cartograf printed decals. Well, this time, I tried some Mr. Mark Softener and it seemed to work fairly well, though I still have a few silvered decals. It worked great on those Hasegawa kit decals I had to use, so based on this experience, I'd have to give it 'thumbs up' in regard to the older style Hasegawa kit markings.
Once all the decals were on, I gave it an initial coat of clear matte and headed
back to add what seemed like another hundred small parts.
|
CONSTRUCTION CONTINUES |
Back at the workbench, I started adding more parts. I removed the masking from the clear bits and put the nose turret in place. I also began attaching clear bits. For this I used clear gloss paint. This works just great and eliminates the mess that glues cause. There were the nose caps for the missiles, the covers for the seeker turret, and the various ID lights. The formation lights were first prepainted on the mating surface with clear blue and clear red before attaching.
 I then glued
on the main wheels, which are not a solid attachment so one has to watch them
while they dry. The clear pieces over the nose turret sensors had to be brush
painted. Thankfully, it is a good match with the surrounding airbrushed stuff.
Let me back up a tad. I also dry-brushed the model with some Testors dark Tan as
in the little square bottles. Looks fairly good to me and again, breaks up the
solid colors. I put the rocket pods on the inner pylons and the Hellfires on the
outer. 90% or more of the photos you find will be the other way around, but I've
been assured that doing it like this was relatively common in combat, and there
are photos to back this up.
I then glued
on the main wheels, which are not a solid attachment so one has to watch them
while they dry. The clear pieces over the nose turret sensors had to be brush
painted. Thankfully, it is a good match with the surrounding airbrushed stuff.
Let me back up a tad. I also dry-brushed the model with some Testors dark Tan as
in the little square bottles. Looks fairly good to me and again, breaks up the
solid colors. I put the rocket pods on the inner pylons and the Hellfires on the
outer. 90% or more of the photos you find will be the other way around, but I've
been assured that doing it like this was relatively common in combat, and there
are photos to back this up.
Mores stuff that had to be added were the longish pole sensors, the fin antenna, plugging in the gun, and gluing the doors open. The back door doesn't want to attach to the hinge areas at all. I ended up gluing that to the center section. The door props are also difficult to mount and I used super glue to hold them in place. The last thing I did before sticking on the rotors was to use an MV lens for the landing light, my only aftermarket piece! MV lens #LS 29 is perfect for 1/48 landing lights and I've stocked up on them. I used clear paint for this as well.
As a final note, the rotor blades had become rather warped over the years and warped in the 'up' direction. Not good and so I dunked as much of the blades into very hot water (hot tap water isn't enough) in an attempt to get some sag. I don't think I got enough, but it is better than it was.
|
CONCLUSIONS |
 So there you
have it. Over six years in the making if I can believe the 2001 date on the
instructions. I bought this one brand new so it has been at least that long. It
is also proof that a kit doesn't have to fade away in a box.
So there you
have it. Over six years in the making if I can believe the 2001 date on the
instructions. I bought this one brand new so it has been at least that long. It
is also proof that a kit doesn't have to fade away in a box.
The sheer parts count and complexity of some of the sub assemblies made this a much more difficult kit to build than the Draken done a bit ago. However, all those parts do make into a particularly impressive model when done. The Apache is not a small aircraft and will take up quite a bit of shelf space, but the work is well worth the results, and that is what counts.
June 2008
Copyright ModelingMadness.com. All rights reserved. No reproduction in part or in whole without express permission from the editor.
If you would like your product reviewed fairly and fairly quickly, please contact the editor or see other details in the Note to Contributors.
Back to the Review Index Page2015