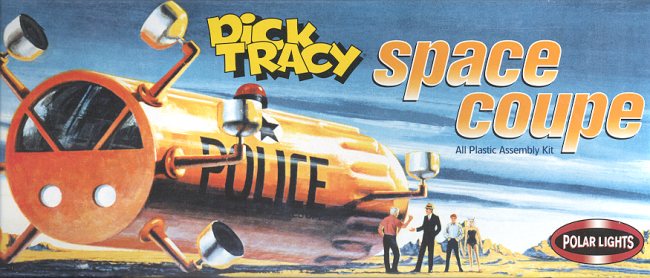
Polar Lights Dick Tracy Space Coupe
|
KIT # |
5097 |
|
PRICE: |
$15.25 |
|
DECALS: |
See review |
|
REVIEW : |
|
|
NOTES: |
Another oldie but goodie from PL |
For the preview of this kit that shows the bits and pieces, please go here.

|
CONSTRUCTION |
 Well, it took me about five minutes
from writing the preview of this kit to where I had the first glue applied to
the kit. Some models just affect one in that way. I am particularly prone to
these old kits, especially if they ooze cool or unusual. This one definitely
does just that. As you can see, this thing is basically a conical section with a
bunch of thingies sticking out of it. Seems to be a simple build, doesn't it.
Aha, that is where the kit draws one into its web! While simple in parts, it is
not simple in terms of fit and filler. To think that one can get away with no
filler on a Polar Lights Sci-fi kit is pure madness.
Well, it took me about five minutes
from writing the preview of this kit to where I had the first glue applied to
the kit. Some models just affect one in that way. I am particularly prone to
these old kits, especially if they ooze cool or unusual. This one definitely
does just that. As you can see, this thing is basically a conical section with a
bunch of thingies sticking out of it. Seems to be a simple build, doesn't it.
Aha, that is where the kit draws one into its web! While simple in parts, it is
not simple in terms of fit and filler. To think that one can get away with no
filler on a Polar Lights Sci-fi kit is pure madness.
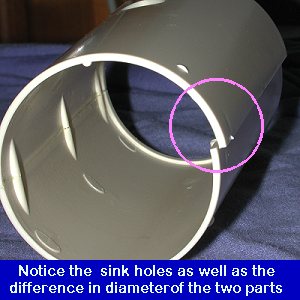
First of all, the main fuselage sections need to be glued together. A simple two piece affair, you say. Well, after sitting in a box and being shipped in a hot container all the way from China, the two parts are not the same diameter. That means squeezing one of them to fit into the other. I glued one side first and let it dry before attempting the other. As you can see from the image, there is a definite 'overbite' so to speak.
 After the one
side had dried, the other side was glued and held in place with lots of masking
tape. At this time, the front piece was installed. This was a simple fit and
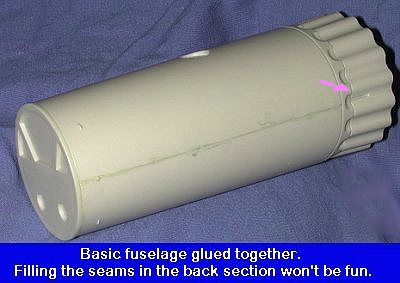
there was actually quite a bit of slop in it. Not so for the ring at the back.
This piece fits over ribs in the aft fuselage. The fit is VERY tight and
required pressure on it while the glue dried. This ring is quite small and the
rest of the fluted section fits on this. The gaps at the join are prominent as
one would expect from this type of kit. Break out the filler!!!!
After the one
side had dried, the other side was glued and held in place with lots of masking
tape. At this time, the front piece was installed. This was a simple fit and
there was actually quite a bit of slop in it. Not so for the ring at the back.
This piece fits over ribs in the aft fuselage. The fit is VERY tight and
required pressure on it while the glue dried. This ring is quite small and the
rest of the fluted section fits on this. The gaps at the join are prominent as
one would expect from this type of kit. Break out the filler!!!!
I applied filler to all the seams and it required several sessions for some of them. I also stupidly put filler on all the parts near the back. The end result was a real mess that would have looked much better had I done nothing at all. Frankly, I just couldn't think of how to get the filler out of the scalloped areas. I tried flooding the area with glue hoping that it would smooth things out. It just made things much worse. It was cleaned up as much as possible and left. It is hoped and several coats of paint in that area will fill in some of the gaps and depressions. Man, I hate it when I screw up something simple like this!
Once I had turned my attention away from the fuselage, I started assembling the arms holding the swiveling emitters. These had to be glued with care to make sure the attachments still swiveled. They also required some filler, as one would expect from this type of kit. While that was going on, the hemispherical rear end piece was glued in place.
 Then the inevitable happened: I lost interest in the kit. It sat
under an increasingly thicker patina of dust for a very long time. Like about 8
months or more! I finally got back into it after cleaning up my workbench and
realizing just how many unfinished kits I had! The nest step was to glue on all
the little emitter arms. I did the aft and six forward ones first. These then
had filler applied to any seams and left to dry. The base for the rotating cop
light was glued into its mount at this time as well. Test fitting the two aft
side fuselage emitter mounts, I noticed that the attachment 'feet' on these were
grossly too thick. Leaving them alone would mean that the emitter mounts would
stick up proud of the surface by a goodly amount. These were then sanded down
until they were nearly paper thin to get a good seating. They were set aside
until the forward mounts were properly cleaned up to prevent breaking them off.
Then the inevitable happened: I lost interest in the kit. It sat
under an increasingly thicker patina of dust for a very long time. Like about 8
months or more! I finally got back into it after cleaning up my workbench and
realizing just how many unfinished kits I had! The nest step was to glue on all
the little emitter arms. I did the aft and six forward ones first. These then
had filler applied to any seams and left to dry. The base for the rotating cop
light was glued into its mount at this time as well. Test fitting the two aft
side fuselage emitter mounts, I noticed that the attachment 'feet' on these were
grossly too thick. Leaving them alone would mean that the emitter mounts would
stick up proud of the surface by a goodly amount. These were then sanded down
until they were nearly paper thin to get a good seating. They were set aside
until the forward mounts were properly cleaned up to prevent breaking them off.
With all the emitter mounts cleaned up, they were duly glued in place. Fit was pretty good, though some needed filler at the base where they attached to the fuselage. During this time, I managed to break one of the swivel joins so repaired it with a section of paper clip.
|
PAINT |
 Now that most of the parts were glued on, it was time to do some
painting. The main body got a couple of coats of primer and then was painted
with a gloss white to keep things smooth. I had some rather nice yellow that is
part of the Boyd's line of car colors that is produced by Testors, so used that.
I know that the box art shows an orangish color and that the comics had it in a
regular school bus yellow, but this looked better to me.
Now that most of the parts were glued on, it was time to do some
painting. The main body got a couple of coats of primer and then was painted
with a gloss white to keep things smooth. I had some rather nice yellow that is
part of the Boyd's line of car colors that is produced by Testors, so used that.
I know that the box art shows an orangish color and that the comics had it in a
regular school bus yellow, but this looked better to me.
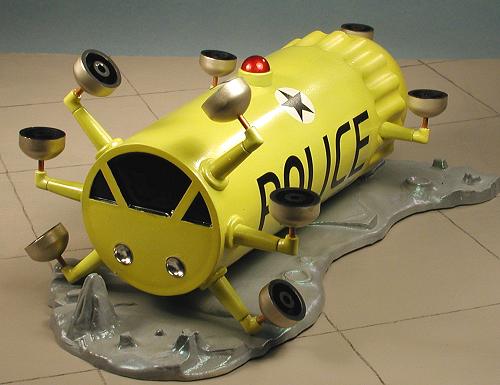
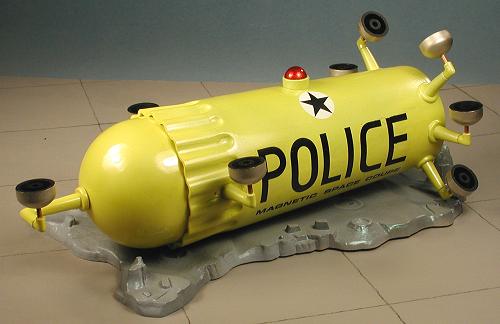
The tips of the swivels were painted copper and the emitters themselves painted with Alclad II using a 'jet exhaust' color that is actually nearly a gold. The insides of these were painted flat black. The 'bubble' light on the top was painted aluminum and when dry, was given a coat of Gunze clear red. For the front windows, a large brush was called to task and these areas were painted in matte black.
A large part of this kit is the base, which is supposed to be a moonscape. Pictures I have seen of the moons surface show it to be a grey color with a tinge of green in it. The base was painted with good old primer grey, which seemed to me to be a close match. To add some sparkle to it, I used Alclad II's greenish metalflake color and lightly misted it on. It produced a pleasing effect that changes as the angle of the light changes. After the paint had properly cured, it was back to the workbench for final touches.
|
FINAL BITS |
There really wasn't much more to do. The emitters were glued onto their respective posts and the decals were applied. These are thin and tear easily. I made a real mess of one side decal and ended up painting over the parts that I had torn. I used Solvaset setting solution, but didn't really see that it had any effect on them. In where the lights go, I used MV lenses, part # L404. They are a touch oversize, but fit into the holes well. Ordinary white glue was used to hold them in place. I also used the white glue to keep some of the emitters pointing in the direction I wanted them, as their weight was making it impossible for them to point upward. With that last step, I was done. Though the figures were not used, they are in my parts box should that be something I want to do later.

|
CONCLUSIONS |
The only reason this kit wasn't finished in short order was my own procrastination and loss of interest. The fit isn't up to today's standards, but that is because it is an Aurora kit from the '60s. Fit was not considered that important back then as these models were designed to be tossed together by kids and played with! 10-12 year olds don't care about poor fit and seams; 40-50 year old kids do!
Overall, I can recommend the kit to all who have an interest in the subject and can deal with the fact that to make it perfect, a lot of work will be needed!
July 2001
Copyright ModelingMadness.com. All rights reserved.
If you would like your product reviewed fairly and fairly quickly, please contact the editor or see other details in the Note to Contributors.
Back to Reviews Page 2018