Polar Lights Robby the Robot
| KIT # | 5025 |
| PRICE: | $18.99 |
| DECALS: | None |
| REVIEW & | |
| NOTES: |
| THE MOVIE |
Forbidden Planet is without a doubt, the premier sci-fimovie for those who like to think. Initially shown around 1956 and starringWalter Pidgeon, Anne Frances, and Leslie Nielsen. It is the story of a scientistwhose investigations of a race of beings called the Krelllead to some very interesting events, the majority of which involve some verysophisticated animation for the time, all done by animation wizards from theDisney Studios.
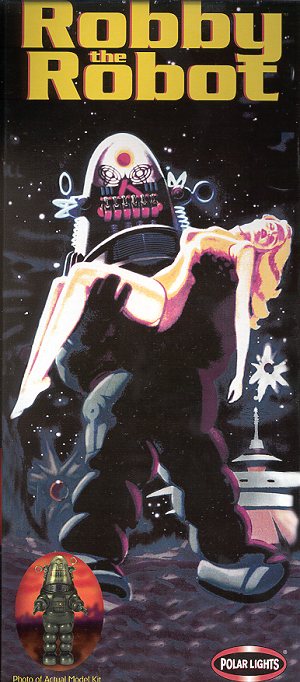
Every non-monster sci-fi movie ever made after that has elementsof Forbidden Planet woven into the storyline, whether the author realizes it ornot. The props for the movie appear in many different places including a largenumber of Twilight Zone episodes. Probably the most amazing and rememberedcharacter from the movie (aside from the then daringly dressed Miss Frances), isthe robot named Robby. Capable of lifting tons of weight and prevented fromharming sentient beings thanks to Isaac Azimov's three rules for robots, Robbyisn't the vicious beast depicted on the box art (which is a poster from themovie itself). Now, if some enterprising company would make a suitable figurefor draping across Robby's arms........ (and someone has. It was Dr. Flintstone and may still be around if you hunt long enough for it.)
| THE KIT |
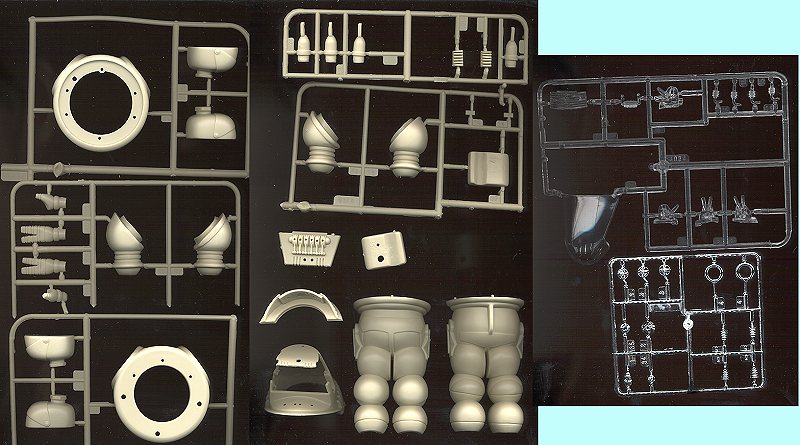
 Polar Lights kits are made in China and so come in a box strongenough to drive a truck over without damaging the parts. Once you manage towrestle the top off it, you find two bags of parts. One contains the chromeplated and clear bits and the other the main parts of the robot in tanplastic.
Unlike the Lost In Space robot, this one appears to be a newmold and not reverse engineered. All the parts look clean and crisp with novisible flash and the mold marks where they can be hidden. The chrome parts arewell done, with mold seams small enough to be left on the parts if you are soinclined. The clear parts are sort of bluish in cast with the large domescratched. There are four clear 'voice simulator tubes' (part 15) of which they arenot all the same shape. It will be interesting to see if this affectsconstruction.
The rest of the parts are very nicely done as well. All the bitswere still on the sprues. There are a few parts that were loose in the bag alongwith the base. These have been removed from the sprues at the factory. A resultof this is that the attachment points need to be cleaned up and in some cases,filled as there are small gouges in the part at the attachment point. There isalso a large base on which to display your Robby.
Kit instructions are similar to those with the LIS robot withone side of the sheet as image, ads and warnings, with the other side includingan assembly sequence, painting guide and exploded view of the kit. All the partsare noted as to if they are chrome or transparent and all of them are named.
| CONSTRUCTION |
 After checking out the kit, I found which parts could be built as subassembliesand started there.
 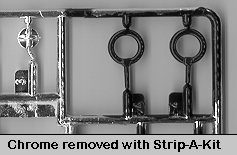 This includedRobby's feet, arms and torso. The fit is quite good, but there is need forfiller on almost all the joints, especially where the parts are cut away fromthe sprues. I also determined that it would be nearly impossible to clean up thechrome parts and keep the chrome plating so I started removing the chrome. I useStrip-A-Kitfor this as it works like magic in just a few minutes. Using a cotton bud (orQ-tip), Strip-A-Kit was coated on all the parts that were to be stripped. Afterletting it sit for just a few minutes, the chrome dissolved and it was thenwashed off with regular tap water. Total time: about 5 minutes and no need touse toxic materials like oven cleaner to remove the chrome.
Once the feet were sandedsmooth and the gaps filled, they were attached to the legs and the leg sectionswere then glued together. Getting all the seams for the insides of the legs willbe a real challenge, but with the help of of a flexifile and various grades ofsanding tape, it can be done. At this time, the hands were also glued together for attachmentto the arms. Be advised that there is a rather large ejector pin mark on thehands that needs filled before gluing as it will be visible. At this time thetrapezoidal instrument face was attached to the top section and when dry, wasblended into the surrounding area with filler. The chest instrument panel wasalso glued in place. You have a choice of two that can be used. I chose the onefrom the movie. All these parts fit pretty well, but all have gaps that need to befilled.
Next, the arms were attachedto the torso. The fit here was equally ok. The area was flooded with glue andthen the arms were squeezed into place to allow glue to ooze out. This ooze wasthen smoothed out with more glue. The result is that there are fewer gaps thatneeded filler, though those gaps left are substantial.
Back to the head area, all ofthe parts that are not clear can be glued into place as they are all the samecolor. A real problem arises with the clear bits that stick out the side ofRobby's head. Only the discs are actually clear with the other parts painted thesame color as the rest of Robby. It is further complicated by having a seamright in the middle of the part.
There are two things that canbe done. One is to fill the seam with superglue, sand it down, mask it off, andpaint the rest of the part along with the rest of the robot. The other is toremove the clear disc sections and then replace them with something else. A realquandary and one that will definitely make a difference in the finished kit. Notbeing able to come up with clear sections of that size, I took the first option,one that does require quite a bit of work.
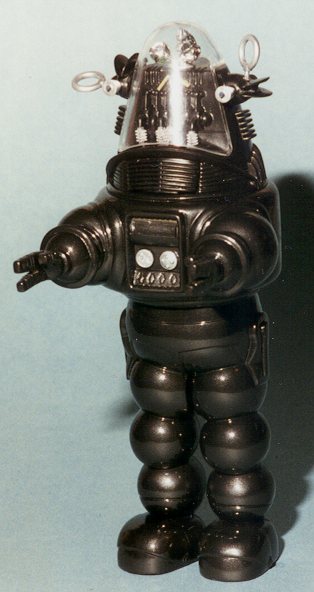
Just a note, the finnedsections just below that on the side of the head are also supposed to haveclear disc sections in them. I watched the movie several times and this is howit appeared to me. An item that is missing from the upper part of Robby's'face' is the upside down 'L' shaped widget that moves back and forth when he istalking (shown red on the box art). This was easily represented with a couple ofpieces of Evergreen plastic strut material.
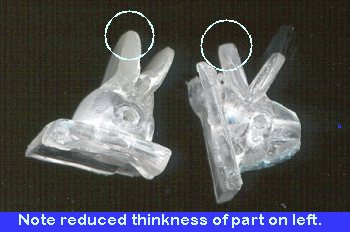 Gettingback to the clear bits. I decided to sand the heck out of them to thin themdown. Once that was done, superglue was used in the joints to make themsmoother. Next they were progressively sanded with finer grades. Upon completionof that task, they were coated with Future floor wax. Result is not that bad,but the really talented will want to replace these parts. The clear bits werefinally blended into the head with some filler and then it was off to the paintshop.
| PAINT |
First parts painted were those bits whose chrome was removed. Iused Floquil's Old Silver for this. It really gives a great finish that is quiteshiny. Naturally, it revealed some molding glitches that needed cleaned up andthen those parts were resprayed.
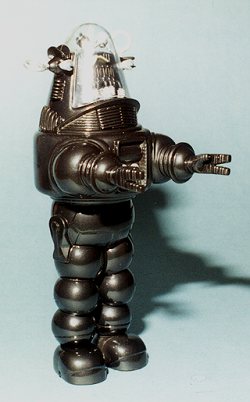
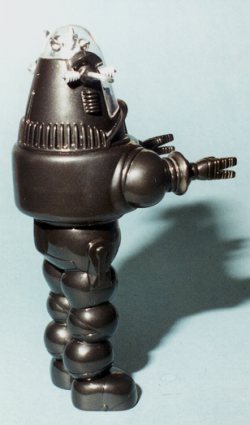
I had thought about undercoating Robby, but decided that since Iam painting it Model Master Gloss Metallic Black, that there wouldn't be anyreal need. I was right. The painting went very well. I applied several coats oneright after the other and was left with a nice, glossy metallic black finish.
| CONSTRUCTION CONTINUES |
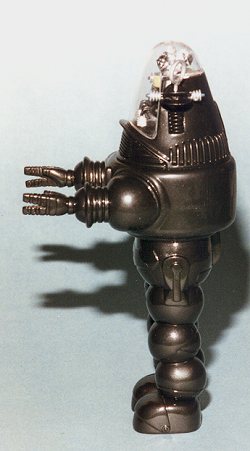 Next, it was time to fit some of the repainted bits on. First inwere the two gizmos in the chest. Those were basically press fit, they were sotight. Next the base for the rotating thingies on the top of the 'head'. Whendry, the rotating thingies were glued in place (hope the jargon isn't tooconfusing). While this was drying, the clear head piece was cleaned up andpolished. This piece is a bit too tall and leaves small, wedge-shaped gaps onthe top. I felt that any attempt to fix this gap would lead to disaster so leftit alone.
The front 'voice panel' was test fit at this time. It fits well,but does not look at all good leaving it clear as one can see the various moldmarks and attachments in the background. RATS! I had so wanted this bit toremain clear. I'll have to think of an appropriate color for it. In the movie,this panel is clear and a few 'bars' light up blue when Robby is speaking.Unfortunately, the best I could think of was to paint it semi-gloss black. Itlooks OK, but I'd have rather had it clear with a black background.
To finish him up, the rest of the 'face' was completed. Thelittle clear accordion looking gizmos were left clear while the tubes leadinginto and out of them were painted gunmetal. On top of his head, the 'L' shapedgadget was painted a pale yellow/green. The four 'zappers' on the side of hishead were glued in place and the tips painted blue-grey. The circular thingieswere glued in place on the side at angles. Finally, the clear faceplate wasglued using non-fogging superglue.
As a final note. I did not use the base as I thought it wasrather hokey. Some may like it, but it isn't to my tastes. I can see why it wasincluded as Robby is a tad topheavy!
| CONCLUSIONS |
The end result is really a very cool looking robot. It won't win contests asbuilt, but those with mucho patience and greater abilities than I can make Robbyinto a real winner. This kit was not difficult to built, and while I wouldn'tgive it to a bare beginner, those with some experience shouldn't have any realtrouble with the kit.
| REFERENCES |
Forbidden Planet by MGM, 1956
Late Entry (2005). This kit has been out of production for many years. It has virtually disappeared from shelves and I haven't a clue where you can get one so don't ask.
Review copy courtesy of me and my wallet!! If any of youmanufacturers or shop owners want to send products for review,please contact me.