Pegasus Hobbies 1/1400 NSEA Protector
| KIT #: | 9004 |
| PRICE: | $29.95 MSRP |
| DECALS: | One option |
| REVIEWER: | Scott Van Aken |
| NOTES: | Snap kit |
| HISTORY |
Never Give up; Never Surrender
 Galaxy Quest is a 1999 science fiction comedy film written by David Howard and Robert Gordon and directed by Dean Parisot. It stars Tim Allen, Sigourney Weaver and Alan Rickman and features Tony Shalhoub, Sam Rockwell, Daryl Mitchell, Missi Pyle and Justin Long in his feature-film debut. The original music score was composed by David Newman.
The movie, a parody inspired by the television series Star Trek, is about the washed-up stars of a fictional 1978–1982 TV series called Galaxy Quest. On the show, the actors played the crew of a spaceship, the NSEA Protector and embarked on "intergalactic adventures", but then they are recruited by aliens who believe that their fictional adventures were real. Portions of the movie were filmed in Goblin Valley State Park, Utah, USA.
Galaxy Quest won the 2000 Hugo Award for Best Dramatic Presentation.
| THE KIT |
Finally someone has done a model kit of the NSEA Protector and it has been Pegasus Hobbies. Pegasus had brought to us a number of nicely done sci-fi kits, all of them in an EZ-build form. Though these are allegedly aimed at the younger modeler, it is 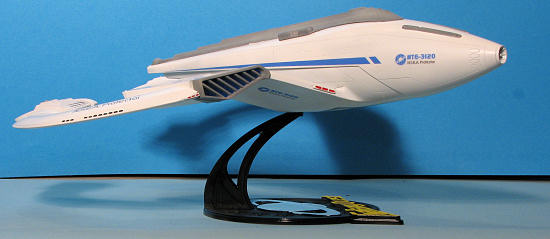 the older one that, at least locally, seems to be the ones buying it. The local hobby shop had sold out of their stock within a week of receipt.
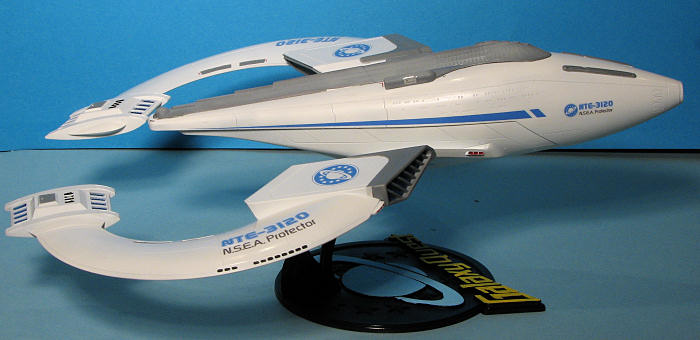
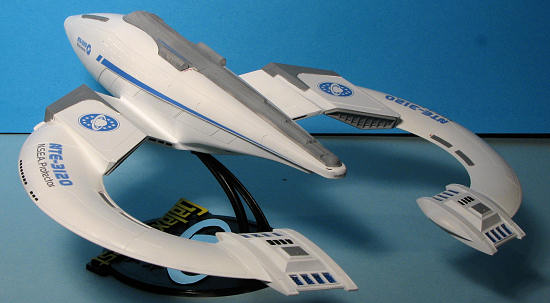
The kit has 40 parts which includes a display stand. The alignment pegs and holes are quite large and should make assembly easy, though filler will be on the list of things to have to take care of the admittedly large joins. There is a sprue of blue plastic for the engine intakes. The fit of these into the 'wings' is such that a wise modeler will be doing some pre-painting before assembling these, as masking after the fact may prove to be a bit of a challenge. The small upper 'command ship' is a separate item that is not designed to be glued in place. However, I'm sure that most of us will do just that. The display stand is quite sturdy looking and will look great once painted.
The kit's instructions are well done in 9 steps. Color information is by generic colors with no FS 595 references. Apparently this kit is ABS plastic as there is a warning not to use MEK based glues; Tamiya extra thin cement being the preferred glue. There is a decal sheet provided which is fairly well printed and from past experience, they work well.
| CONSTRUCTION |
This kit is typical of new Pegasus Hobbies releases in that it is a near snap kit. The alignment holes are quite large so assembly can go rather quickly. Now if you wish to treat this as a standard glue kit, then that works as well.
The kit starts by cementing the hull halves together, trapping a center section and the lower part of the upper hull plate. The gap isn't bad, but does need filler to close the seams. With that out of the way, I glued the upper and lower 'wing' center section. At 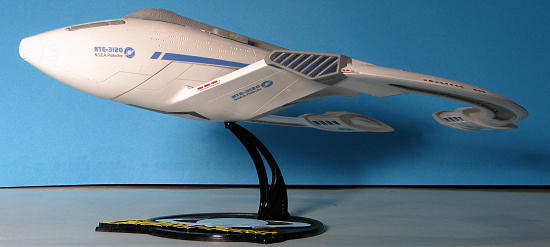 this time, you should also insert two smaller pieces in the leading edge.
Then the inner wing section was glued to the lower fuselage. There is a seam that runs between the upper inner wing section and the fuselage that is pretty well impossible to fill and sand smooth due to the angle of the join. Next, the outer wing sections were assembled. Now you may want to consider painting the rear engine modules prior to gluing the wing halves together. This way, you wouldn't have to mask off the clear blue inserts. I did not do this and masked the inserts. Hindsight says that pre-painting this area and then touching it up later would have been the wisest course of action.
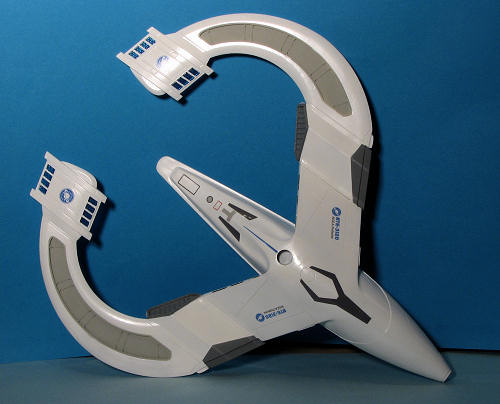 Then the outer wings were glued to the inner section. There is a small leading edge piece that needs to be glued in at this time. The fit is actually very good and surprisingly sturdy. The engine nacelles get a small end cap and the upper rear fuselage section is glued on at this time. I would recommend not attaching the upper fuselage sections until after they have been painted as it will save a lot of masking later. I glued on the rear exhaust sections but not the front ones as those were prepainted and attached at the end. I should also have pre-painted the small elongated sections on the upper nose as well. Again. to save on a lot of additional masking.
The kit comes with a separate bridge section. This should also be painted prior to attachment. I glued mine in place as the instructions neglected to mention that this piece is held on by magnets. Back in step one, two magnets are to be inserted in the upper fuselage section and at this time the others are to be be put into the bridge section. An e-mail to Pegasus Hobbies brought this omission to their attention and hopefully future kits will have a note in there regarding these magnets. For me, it was too late to do anything but glue the bridge to the upper fuselage.
| COLORS & MARKINGS |
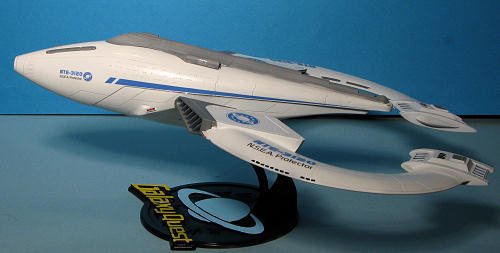 The Protector is basically white with a lot of grey areas. This is not a small model and so there was considerable painting done. In fact, painting turned a one week build into one that lasted a couple of months. There is much masking to be done to prevent problems from overspray. I used several shades of grey during the build as well, carefully masking things off as I went along and covering what had been done once dry. Using thinned paint, I also filled in some of the 'windows' and other bits as shown in the instructions.
The decals are nicely done and went on without any problems. Due to the size of the model, it was also a rather long process as I'd put on a few, and wait for those to dry before continuing. This was to prevent my hand from accidentally moving a wet decal without knowing it.
| FINAL CONSTRUCTION |
The last bit of construction was to add in the front 'intakes' and to build up the stand. I painted the stand black and brush painted the details on it with Vallejo acrylics. The model fits nicely atop it and is actually quite sturdy while also allowing easy removal or repositioning.
| CONCLUSIONS |
This one took longer than I'd thought. As much due to all the painting and masking as anything else, but the end result is a most interesting looking model that will look great in your sci-fi TV/movie collection.
| REFERENCES |
http://en.wikipedia.org/wiki/NSEA_Protector
Thanks to me and my penchant for the unusual on this one.
June 2010
If you would like your product reviewed fairly and fairly quickly, please contact the editor or see other details in the Note to Contributors.