Revell 1/110 Thor-Able
| KIT #: | 8639 |
| PRICE: | $15.00 from the sales table |
| DECALS: | One option |
| REVIEWER: | Scott Van Aken |
| NOTES: | 1983 History Makers reissue |
| HISTORY |
 The Thor-Able was an American expendable launch system and sounding rocket used for a series of re-entry vehicle tests and satellite launches between 1958 and 1960. It was a two stage rocket, consisting of a Thor IRBM as a first stage, and a Vanguard-derived Able second stage. On some flights, an Altair solid rocket motor was added as a third stage. It was a member of the Thor family, and an early predecessor of the Delta.
Sixteen Thor-Ables were launched, nine on sub-orbital re-entry vehicle test flights, and seven on orbital satellite launch attempts. Six launches resulted in failures, however three of those failures were the result of an Altair upper stage added to the rocket to allow it to launch the spacecraft onto a trans-lunar trajectory. All sixteen launches occurred from Cape Canaveral Air Force Station Launch Complex 17A.
| THE KIT |
One thing about Revell in the 1950s and 1960s, they had no trouble kitting a number of different subjects, among them early space exploration launch vehicles and ballistic missiles. One of their kits was the Thor, an IRBM that at one time equipped 20 squadrons in RAF Bomber Command for use against Soviet targets. The benefit of the Thor over other similar US missiles (like the Jupiter) was that it could be carried in US cargo aircraft like the C-124 and C-133. It was also the basis of several NASA and USAF launch vehicles.
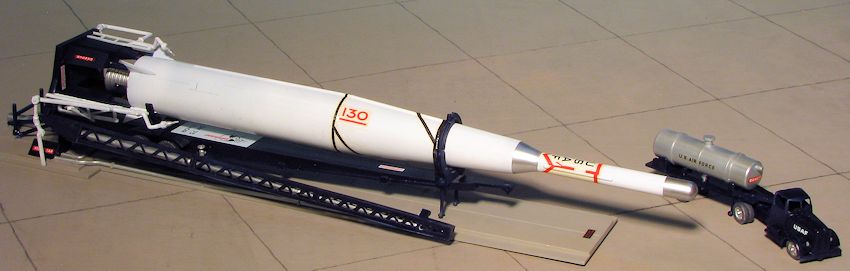
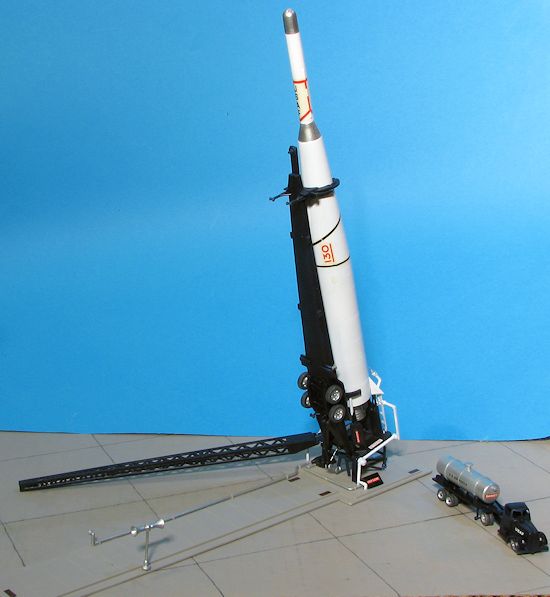
Typical of a kit from 1959 is that it has raised detail, and that includes quite a bit of rivet detail. One has to make a decision early in the build to either try to restore lost detail (something sure to happen as one fills 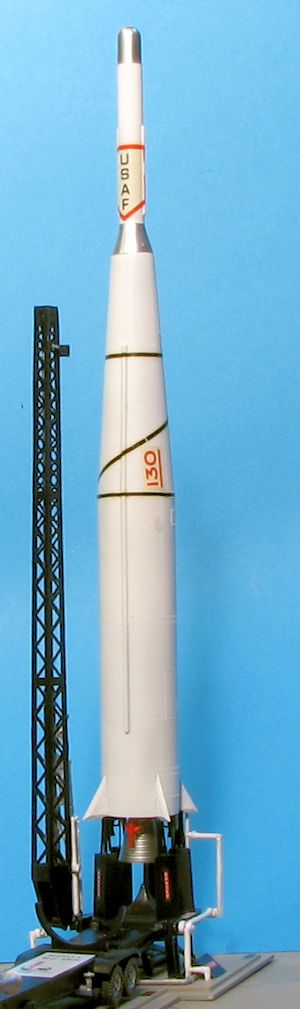 sink areas and seams) or to just leave things go. The kit includes not only the standard ThorA with the rounded nose cap, but also the ability to do a Thor-Able launch vehicle. The kit includes a launch complex complete with transporter and tower. Figures were the norm with these kits and those are also included.
Instructions are well done with generic paint references. Typically, many of the small parts had departed from the sprues, even more of an issue as the previous owner had removed many of the other bits as well. Since this is a double kit with a Jupiter as well, organizing which of the mass of loose parts belongs to which kit will be a major challenge. There is a decal sheet which does not look to be in the best of shape as it has started to yellow.
| CONSTRUCTION |
I started this one by assembling the rocket body. It is at this stage that one has to decide on the IRBM or launch vehicle version. I chose the Thor-Able as I think it looks cooler. Fit is pretty much as one would expect from a kit of this vintage in that it isn't all that great and will require a considerable amount of work to get things to fit.
One also has to pre-paint quite a few parts prior to assembly as masking really isn't a viable option for many bits and pieces. While working on the rocket itself, I got the launch assembly underway. The parts are rife with ejector pin marks so much time was spent cleaning up as many of these as I could.
I slowly worked from the ground up as it were, cleaning up, painting and attaching various bits, using the instruction's color recommendations. All went fairly smoothly until I reached the actual launch platform itself. While many of the parts location diagrams are vague, I ran into one piece that simply defied how it was supposed to fit. Despite several attempts, it was a major frustration and caused me to completely lose interest in the project for several years.
| COLORS & MARKINGS |
Painting on this kit was an on-going process. Basically the rocket is white with silver trim. The base is Badger Concrete while much of the launching pad and support equipment is a dark blue. Thanks to the nature of the kit, I had some trouble rounding up all the bits and found I was missing a wheel or two. I gave the decal sheet a test with a marking I wasn't using and found it to be still viable, though the carrier had yellowed in the intervening 30 years. Much of the detail stuff had to be hand painted and I'll admit to not being all that careful about removing every ejector pin mark as by this stage, it just did not seem all that important.
| FINAL CONSTRUCTION |
 Eventually I got back to building the kit. It is surprising how a layoff will allow one to get back into things with a new perspective. After some fussing I figured out how to fit the section that was giving me fits. The instructions were not at all helpful in this regard and it took study of the box top to realize how these bits fit into place. Super glue was a must and I even installed a few bits in reverse of how the instructions showed them fitting.
After some work, the launch pad and the support crane holding a fire extinguisher nozzle were finished. I then worked on the support vehicles. These were completed as best I could considering I was missing a number of chassis bits which made the completion of the 'pipe' trailer impossible even if it hadn't been missing the main upper section! Actually, there is no room on the display base for any of these vehicle nor the figures (which I did not build or paint). As a note to others, I found that drilling out each wheel prior to installation was a real help and kept axles from being snapped during installation.
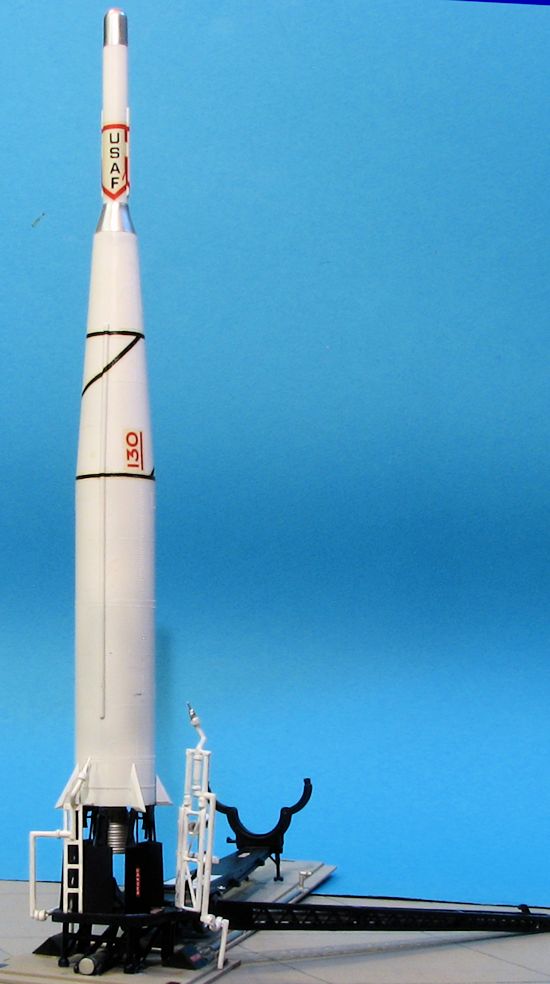
During all this, I attached the decals. These had started to yellow, but otherwise, went on with little fuss despite their age. They succumbed to Solvaset with no issues.
With all the pieces done, there was little left but to assemble the main bits. First step was to install the piston for the erection vehicle and then try to snap it in place. I did manage to break the piston assembly the first time, but fixed it and some other bits broken with super glue. The long fueling tower was next, followed by gluing on the Thor-Able to the launching hold backs. The last piece glued in place was the P.A. assembly. Much to my delight, I was able to actually get the rocket to fit onto the launching trailer and to have the trailer fall back into place. I called it done.
| CONCLUSIONS |
I can recall building very similar models in my youth when these kits were new and having things break all the time when I was putting them together. In my mind at the time, I generally avoided complex Revell kits (in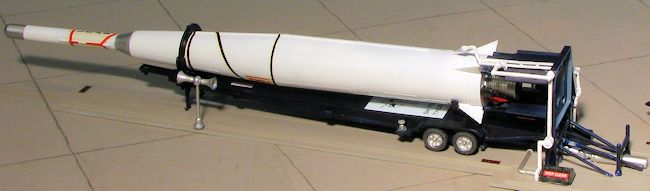 cluding cars) as these 'operating' features just meant broken bits. Now that I've gotten a tad older, I still find these features to be a real challenge when building these now ancient model kits. Still, despite the inevitable delays, I am pleased with the final results and while by no means a contest winner, they provide the satisfaction one gets from a successful build.
June 2014
Thanks to me for getting this from a vendor many years back and curses on the vendor for foisting off an incomplete kit.
If you would like your product reviewed fairly and fairly quickly, please contact the editor or see other details in the