Tamiya 1/48 Jeep
| KIT #: | part of 32552 |
| PRICE: | $18.00 at www.wingsntreads.com |
| DECALS: | Two options |
| REVIEWER: | Scott Van Aken |
| NOTES: | Second new 1/48 Jeep on the market |
| HISTORY |
One of the most recognizable pieces of hardware from WWII is the Jeep. So much so, that even modern Jeeps have a distinct family line and a soldier brought forward in time from 1944 would instantly recognize it as something familiar. If you want more information, just use your favorite search engine and you'll get literally millions of hits.
| THE KIT |
Tamiya has decided not to bend to the lawyers and pay any sort of licensing fee as did Hasegawa when they released their Jeep. By not making any sort of mention of exactly what it was, they didn't have to pay the ransom that is often sought from lawyers when models of US taxpayer paid-for products are modeled overseas. It would be natural to compare the two Jeeps and since I'm fortunate enough to have examples of both, let us see what the differences are. 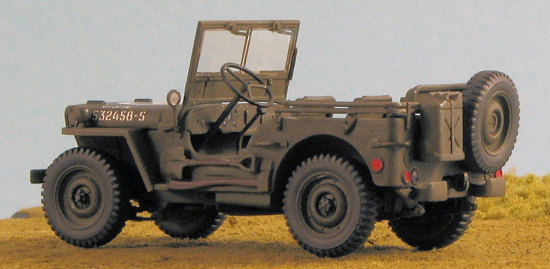
One thing that is the same with them is that they both have a ton of ejector pin marks on one side of parts. That means that the underside of the body, back of the windscreen, underside of the hood and so on have a lot of work to be done if any of those areas are to be visible.
The biggest difference is that the Hasegawa kit has a top and the body is molded with the sides in place. On the Tamiya kit the sides are separate. The Tamiya kit also has a four-piece machine gun on a stick whereas the Hasegawa one is a two piece mold. Hasegawa's windscreen wipers are molded on the windscreen while Tamiya's are on the frame. The Tamiya kit has separate wheel backs; Hasegawa's are one piece.
The Hasegawa kit has pretty much a full engine; on the Tamiya kit it is just the underside. The Tamiya kit has seats that appear to be more 'airy' than the Hasegawa ones. Tamiya's suspension is three pieces and Hasegawa's is one. Aside from that, they are both about the same in terms of what you will finally get. The general impression I have is that the Hasegawa kit isn't as 'fiddly' as the Tamiya version and does offer the benefit of having a full engine as well as a passenger and the top.
The Tamiya kit seems slightly more detailed and though not packaged as such, comes with 9 figures including a driver for the Jeep. In the end there seems to be little to actually choose between them.
| CONSTRUCTION |
 I decided to start building this kit on Monday when it seemed as if the part I was missing from my C-133 build might not arrive in time. That is indeed what happened, though I held out hope until the last day with the kit all built and ready to go.
So, I started with the cockpit.... No. I actually started with the chassis. There is a one-piece drive-line/transfer case assembly so no worries about getting all those bits properly aligned. After that, one installs the separate spring/shock assemblies and a separate exhaust system that need to be glued in place. The attachment points are quite positive and as along as you are paying attention, there will be no problems getting everything into place.
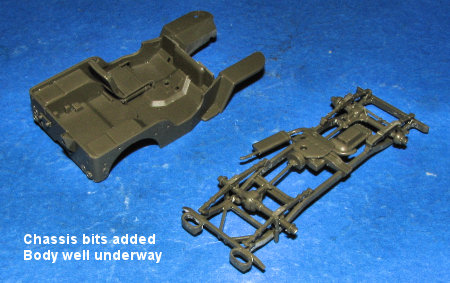 I set that aside and started on the body, where most of the actual construction takes place. The sides, back and forward firewall are glued to the main body shell. I stupidly forgot to glue in the steering shaft during this phase and had to cut it in half to get it in place later on. I would also recommend not gluing in the shift lever until the very last as mine was broken soon after during handling. I also left off the grille/radiator parts until later in the build so I could paint as much of the Jeep in one operation as possible.
The seats were next and they fit quite well. Again, depending on how you are painting things, you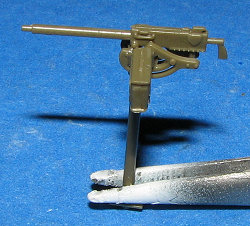 may want to leave these off until near the end. I prepainted as much as I could before installation. Since much of everything is one shade of OD, this is easy enough to do. I brush painted the seat cushions a slightly lighter shade of OD for some contrast.
There is a small decal for the instruments that can be installed when gluing the dash together. I should also point out that sometime during all this, if one wants the .30 cal machine gun installed, there is a hole the needs to be opened in the floor. I knew I wanted my Jeep to be part of a non-combat situation so left this off, though I did build up the four pieces of the construct. The gun cradle part is quite weak and mine nearly broke during handling.
The body has a number of bits that fit on the back of it. These include some handles and a railing around the 'passenger' compartment that would be the frame for the top. Apparently on these Jeeps, one raised the frame then attached the top to it.
| COLORS & MARKINGS |
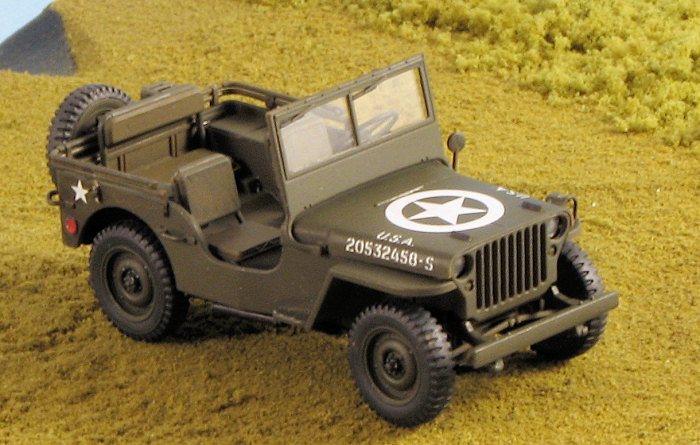
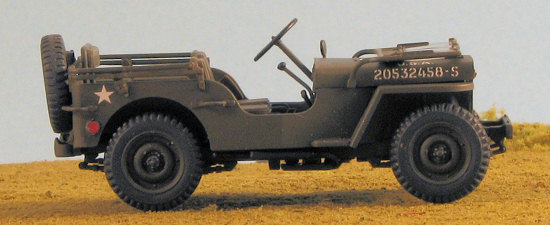
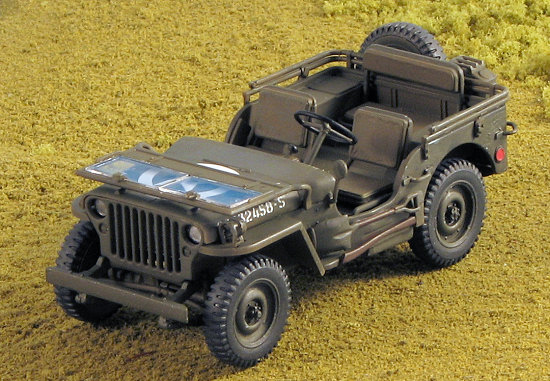 Back at the chassis, I painted some of the exhaust components to give it a bit of interest. The back of the wheels are inserts and this helps when it comes to painting them I used Floquil Grimy Black for the tires and Testors Model Master ANA 613 Olive Drab for nearly everything else. The rear view mirror and headlight interior bits were painted Humbrol #11 Metallic Silver. Once the headlight areas had dried, I used Vallejo Gloss Clear to attach the separate clear lenses. This was also used to attach the two windscreens. These are handed so be careful not to get them on the wrong side. This was one of the last things I did so as not to get any paint on them during the rest of the build.
| FINAL CONSTRUCTION |
Once the headlights were dry, that section was glued to the grille and then to the front of the body. I then glued on the hood. Fit is quite good. The frame of the windscreen just snaps into place so you can have it lowered if you wish. A nice touch. The auxilliary light and rear view mirror was glued on as were the shovel and axe. I did not attach the rifle so there are ejector pin marks showing. I didn't use it for two reasons. One is that I doubt it would have been part of the Jeep on an airfield and secondly because I broke the rifle removing it from the sprue.
At this time, I glued back the broken shifter and do hope it doesn't fall off anywhere! I added the jerry can to the back as well. The 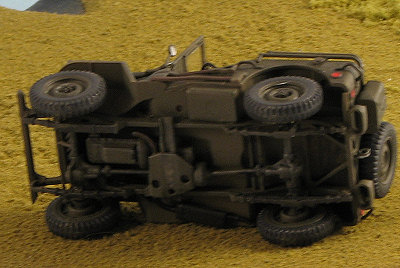 wheels have the back section keyed, for some reason, and the fit is quite tight. I had a bit of trouble getting them all together because of this. I then glued the wheels onto the chassis. The front and rear wheels have different hubs, and the instructions show just what goes where. I then aligned all the parts and let things dry, hoping for no 'three-wheeling'.
Once that was done, I attached the body to the chassis then added the rest of the parts, which consisted of the shovel and axe, steering wheel and I also reattached the steering wheel. More painting was done in terms of touch-up and then I applied the decals right atop the matte paint finish. I used Solvaset to be sure there would be no silvering and other than totally screwing up one small decal, it worked as advertised. I then brush painted on some Vallejo Matte Clear atop it. I then glued in the windscreen glass with Vallejo Gloss Clear and that was it.
| CONCLUSIONS |
September 2007
#1485 in a series
Copyright ModelingMadness.com. All rights reserved.
You can get this fine kit at www.wingsntreads.com. My thanks for the review sample.
If you would like your product reviewed fairly and fairly quickly, please contact the editor or see other details in the Note to Contributors.