Dragon 1/35 M48A3 Mod B
| KIT #: | 3544 |
| PRICE: | $60.00 |
| DECALS: | Four options |
| REVIEWER: | Scott Van Aken |
| NOTES: | Smart kit |
| HISTORY |
The M48 Patton is a medium tank that was designed in the United States. It was the third and final tank to be officially named after General George S. Patton, commander of the U.S. Third Army during World War II and one of the earliest American advocates for the use of tanks in battle It was a further development of the M47 Patton tank. The M48 Patton served as an interim tank in U.S. service until replaced by the U.S. Army's first main battle tank (MBT), the M60. The M48 served as the U.S. Army and Marine Corps's primary battle tank during the Vietnam War. It was widely used by U.S. Cold War allies, especially other NATO countries.
 The M48 Patton tank was designed to replace the previous M47 Pattons and M4 Shermans. Although largely resembling the M47, the M48 Patton was a completely new tank design. Some M48A5 models served well into the 1980s with American forces, and many various M48 Patton models remain in service in other countries. The M48 was the last U.S. tank to mount the 90 mm tank gun, with the last model, the M48A5, being upgraded to carry the new standard weapon of the M60, the 105mm gun.
The Turkish Army is the largest operator of the modernized M48 MBT, with more than 1,400 M48s in its inventory (around 1,000 have been phased out/in storage or modified to ARVs.
In February 1963, the US Army accepted its first of 600 M48 Patton tanks that had been converted to M48A3's, and by 1964, the US Marine Corps had received 419 Patton tanks. The A3 model introduced the diesel engine, countering the earlier versions' characteristic of catching fire. These Pattons were to be deployed to battle in Vietnam. Because all M48A3 tanks were conversions from earlier models, many characteristics varied among individual examples of this type. M48A3 tanks could have either 3 or 5 support rollers on each side and might have either the early or later type headlight assemblies. The Mod B had additional armor on the exhausts and tail lights, and a raised commander's cupola.
| THE KIT |
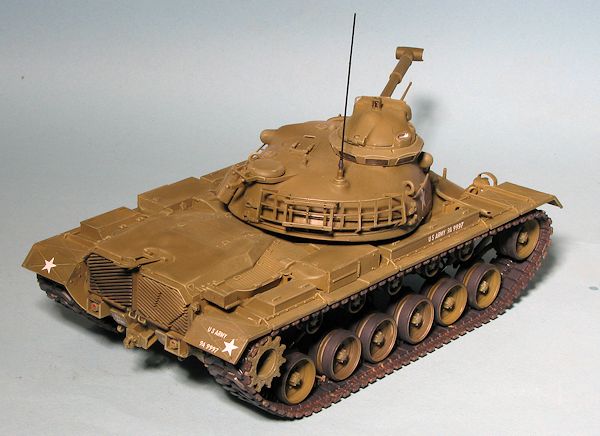
I am pretty sure this is a new tool kit and it is nice to see something a bit more modern from Dragon. I can anticipate that this will start a series of these. The kit is unlike others that Dragon has done as the total parts count is only about 200 bits, pretty low when you consider the 7-800 part panzers that they have 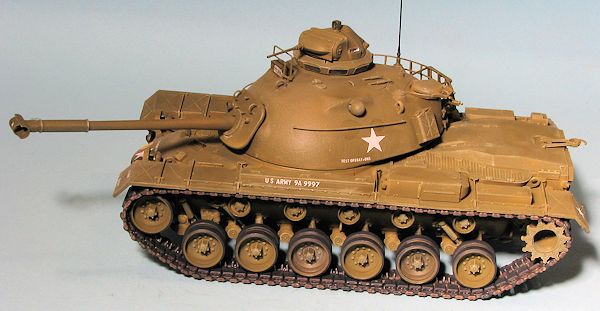 done in the past. The kit comes with Dragon's excellent DS tracks so no worries about a mass of individual track links. It also does not include any photo etch, something else that is a bit different from the usual. The only metal is in the tow cable. This kit has the five return rollers. There are other features and you can find a list in the preview.
There are decals for four vehicles, all in olive drab and all listed as being in Vietnam during 1965. Only one is identified that that is not the box art kit but a vehicle from B company, 3rd Marine Tank Batallion. There are more markings on the sheet than are accounted for, so it seems that if you wanted to do other Marine Tanks, you have that option. Only one of the other options carried the white star insignia. I'm sure most will gravitate towards the named shark mouth version.
| CONSTRUCTION |
I rarely build AFVs in this scale due to the high parts count and my miserable completion rate (I have a Priest that has been box bound about 70% done for several years). But I thought I would give this one a go as it has no photo etch and no individual track links. Still, there are several hundred parts and this is the version with five return rollers per side meaning a lot of rollers and road wheels. The instructions start you with these, probably to get them out of the way. The kit has separate tires for each of the road wheels 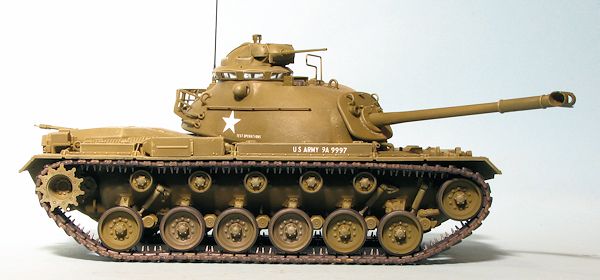 so that is even more work in this area. By work, I mean seam removal. Painting is one thing, spending time monotonously removing seams from parts is another. However, it has to be done so done it will be.
Anyway, I got all the road wheels and rollers cleaned up and attached. I then painted them. I am pretty sure Dragon expects me to completely build the kit then go back and figure out how to paint the rubber bits and the tracks. Not going to happen with me as I'm not one of these modelers who is skilled enough to pull that off. What I did do after these parts were assembled and in the paint shop was to add all of the suspension attachment points and the other bits to the upper and lower hulls. Dragon would have you attach the roller mounting plates to the rollers before gluing these to the upper hull section. I just glued the mounting plates in place. Once these areas are painted, then the round bits will be attached. I only hope this will not come back to bite me in the end.
After going through most of the first three steps (I also did not glue on the clear vision ports on the hull), I cemented the the upper and lower hull halves. To be sure I had minimal seams to deal with, I first glued only the forward portion. When dry, I tackled one side and when that was dry, did the other. This did not totally eliminate seam gaps, but did a very good job of reducing them.
Meanwhile I moved around a bit and started working on turret bits. First was the small machine gun turret, which went together rather quickly. In fact, the entire kit fit very well and I was able to get much of it done in a weekend, but I digress. The basket for the back of the turret took a bit of work to get things to fit as 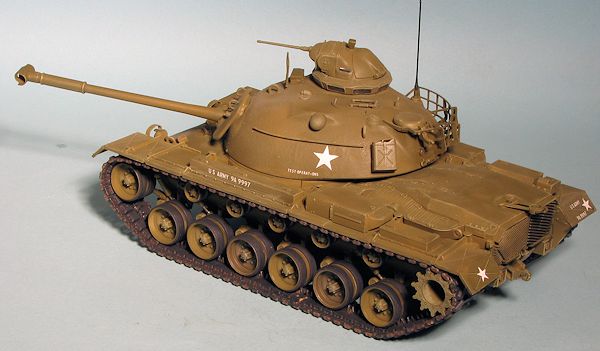 the various railing sections simply stack up. The end pieces will help to keep things aligned. Some of the smaller bits like the lift rings were then attached and things were set aside to dry.
I moved to the rest of the upper hull. The fit of the aft sections isn't as good as some of the other bits, though it is still very nice. It took some squeezing and pressing to get things properly aligned, but eventually they were. Next in line were the fenders with all of their various bits and pieces. Those who are doing contest modeling will want to fill in all the visible slots and holes on the underside, but for most of us, this area will remain as it is. The forward and aft portions of the fender assembly are the trickiest to get in place as they sort of just lay atop the fender and side brace. Gluing them on will also take some of that pressing and squeezing I mentioned earlier so it is a good idea to be sure everything is dry before attaching.
I should point out that the headlight covers on the front will take some fiddling around to get right. These are molded in left and right halves and are butt joined in the middle. You may well need filler to hide this seam once you get things in place.
| COLORS & MARKINGS |
Due to the nature of this beast, painting went on throughout the build once I got bits enough to paint. I know that some paint everything at once and then add detail painting later, but I just cannot get road wheels and return roller rubber areas to look right painting them in place. What I did was to pre paint all of the road wheels and return rollers as well as the hull, once all the pieces were installed. For this I used Testors Model Master Olive Drab. It looks a bit light to me, but OD is a tough shade to pin down anyway. 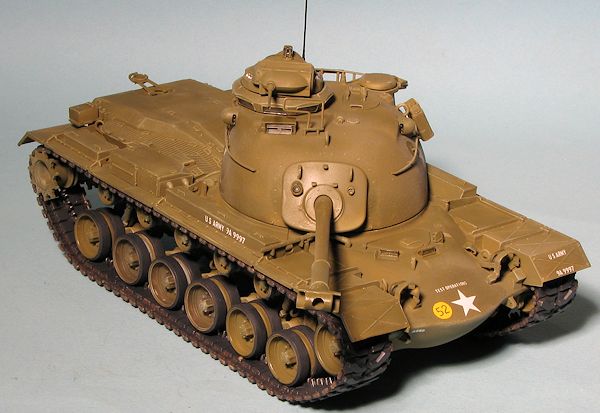 Painting the return rollers helps the black paint stick to it a bit better, and for that I used Floquil Weathered black. I had thought that the rubber part of the road wheels were all to be done in the black shade as well, but soon found out that things were a bit more complex than that with these separate bits being metal on the inside and the thin rim with black rubber on the outside. So much for my thought that these would be easy to paint. The tracks were also rubber treads so I painted these with the Weathered Black as well before rusting up the metal pieces that stuck out.
In order to break up all the olive drab, I decided to dry-brush the entire tank. This was done before the wheels were attached so I could gain access to the various suspension bits. For this task, I used Vallejo Buff and it really seemed to work quite well, not only adding emphasis to details, but also in lightening up the color a bit.
| FINAL CONSTRUCTION |
There really was not all that much left. The road wheels and return rollers were cemented in place, starting with the return rollers. The attachment area of these is not that great and there is a lot of wiggle room for them before the cement dries. I had not installed the radio antenna for fear of breaking it during construction and handling. I also did not install most of the clear bits. Some of these, like the range finder bits on the side of the turret, and the windows for the machine gun hatch, had been masked off prior to painting. The ones in the machine gun turret were simply pressed into place. The viewing windows on the front and the head light lenses were hand painted and then glued in place. I then glued on the drive sprockets and once they were firmly dry, installed the tracks.
 I have to tell you that I had a bit of a struggle with the tracks as the space between the drive sprocket and the underside of the fender was very small. I ended up removing some paint from the tracks in this process. I will have to primer them next time as rubbing and flaking paint were an issue even once they were on. The attachment holes on the second track were enlarged to make mating easier and it helped.
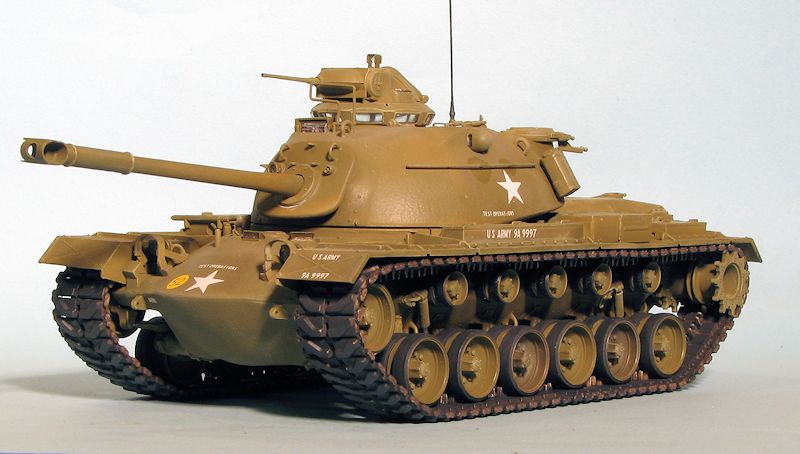
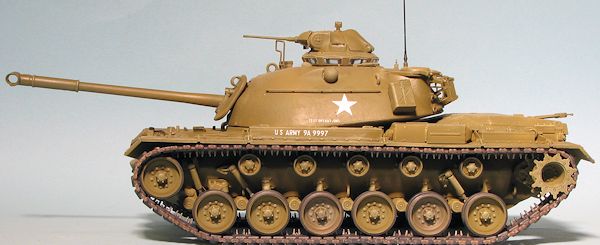
With the tracks in place, areas to accept decals were then clear coated. Considering the issues I had getting these areas to look matte after the markings were on, and the lack of issues I had with silvering on those few not applied to a gloss surface, I think I'll bypass the glossing portion next time. I chose a tank with the white stars that was probably used in the States as it has 'test operations' marks. I was less than thrilled that the U and S of the side US ARMY decals were separate. Why these could not have been part of the 'ARMY' decal are beyond me. The decals were very good and I had no issues with silvering or tearing.
I added the remaining clear bits after painting part of them as required. The very last item to be attached was the radio mast. Naturally, I broke the top portion of it within 30 minutes of attaching it. I'm not good at heavy weathering so none was done. I did do some pastels on the engine exhaust area, though.
| CONCLUSIONS |
I have to say that I thoroughly enjoyed building this one. By not including any photo etch, Dragon made it so I could go from clipping the first bits to completion in less than 10 days. It was also the first 1/35 tracked vehicle I've completed in decades. The fit was generally excellent and I ran into no issues of mis-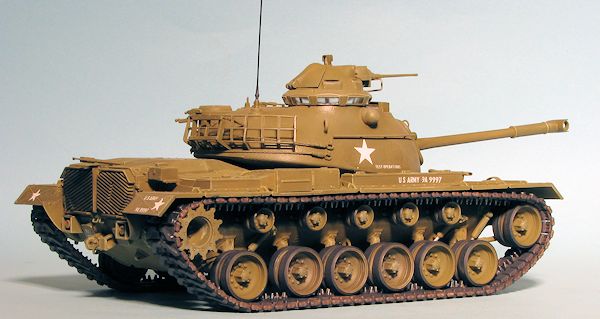 numbered parts. At least I don't think so as everything seemed to fit where it should.
The DS tracks gave me a bit more hassle than I'd have thought, but I will put that down to my inexperience with them. I thought it odd that the main gun barrel was not hollowed out as one looks into a blank face when peering down the end of it. I also found the attachment of the tow cables to be a bit of an issue. The instructions call for a length that is too short and does not allow the ends to meet at the little bumps provided on the turret for them to fit. I would suggest cutting them in half.
Overall, it turned out great (at least to my eyes) and it is a kit that I can easily recommend to you, especially if you like these big tanks and want to build one without exotic materials.
| REFERENCES |
http://en.wikipedia.org/wiki/M48_Patton
July 2013
Thanks to www.dragonmodelsusa.com for the review kit. Get yours at your local retailer.
If you would like your product reviewed fairly and fairly quickly, please contact the editor or see other details in the