| KIT #: | 84815 |
| PRICE: | $21.50 |
| DECALS: | One option |
| REVIEWER: | Scott Van Aken |
| NOTES: | New Mold |
| HISTORY |
On December 19, 1939, the KV-1 Heavy Tank was accepted for the service with the Soviet Army. At that time, the KV-1 took part in combat tests on the Russian-Finnish War (the Winter War). During those battles, the Soviet High Command came to the conclusion that a heavy tank with more powerful armament is highly needed to combat with enemy's bunkers, pillboxes and other fortifications.
The North-Western Front HQ ordered four KV-1 tanks from the experimental group to be armed with 152 mm howitzers. To do this, the best engineers from KTZ's design bureau were summoned. After two weeks the new project was completed. At first engineers 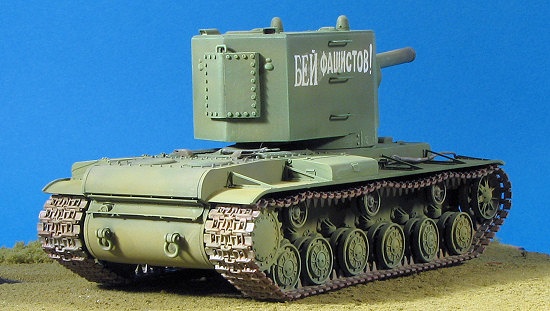 decided use the 152 mm mod.1909/1930 howitzer, but later it was replaced with more modern 152 mm M-10 Howitzer Model 1938/1940. A new, bigger turret was designed to accept such a heavy cannon. That turret was named "MT-1".
At the beginning of 1941, the this tank was renamed to KV-2. Before this, the KV-1 called the "Tank With a Small Turret", and the KV-2 called "The Tank With a Big Turret". The MT-1 turret was placed on the chassis of a twin-turret experimental tank instead of small turret (a large turret was also removed from the hull). On February 10, 1940, first trials were conducted. At the time, Soviet tank designers weren't very experienced in vehicles of such a heavy weight. They added a small lid on the the howitzer's barrel. That lid was intended to protect the gun from dust, shell's fragments and bullets. However, after the first shot this lid was torn away and never again used.
In 1940, a pair of KV-2s were sent to the battlefront on the Karelian isthmus. In spite of some rumors, KV-2s didn't take part in battles before the Great Patriotic War. The pair of KV-2 fired on already captured pillboxes. The results of those tests were excellent and later, in 1940, a KV-2 Heavy Tank was accepted for service. Soviet tankers often called those tanks "Dreadnoughts".
 During production, the tank's turret was slightly improved and additional DT Machine-Gun was mounted in it. The shortened M-10 Howitzer was able to fire a 52-kg high-explosive projectile with muzzle velocity of 436 m/s. Only high-explosive shells with reduced propellant charge were used in the KV-2's gun! No armor-piercing and concrete-piercing ammo used! It was allowed to use Naval Semi-AP Round M.1915/28. However this ammo was used only by Red Navla units; it was absent in Red Army's warehouses. Despite some modern sources, the use of armor-piercing and concrete-piercing ammunition was prohibited; this was highlighted in the KV-2's Operational Manual. The problem was with its big recoil; it definitely jammed KV's turret. Until the middle of 1941 Soviet engineers tried to develop a special concrete-piercing projectile for KV-2, but were unsuccessful.
| THE KIT |
This is the first time I've bought a Hobby Boss kit. Normally, I'd have passed but when I saw this KV-2 in amongst a box full of KV-1s, it got my attention and I picked it up. The Hobby Boss T-34s have an excellent reputation and while the Shermans have been less well thought of, I figured that this one might be pretty nice.
 Molded in grey plastic, the kit is devoid of just about any molding glitches. Ejector pin marks will be hidden when built and even the opposite side of hatches are free of these pesky deformations. The only place I found these were some rather prominent 'pips' on the underside of the hull. Some parts also show a teeny amount of flash. Packaging is super with only one or two sprues per bag.
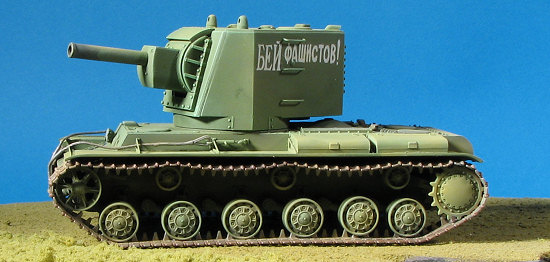
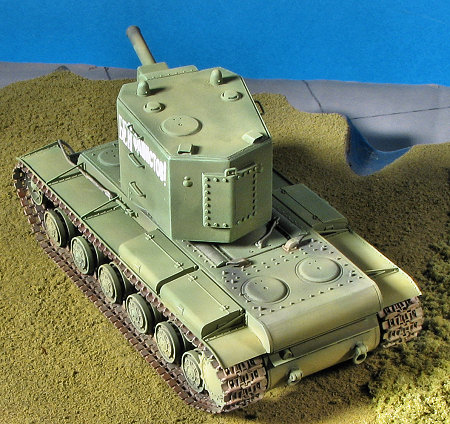
The surface of the hull and turret are well done and show a slightly rough texture that one would expect from Soviet plate armor. The molding of all the other bits is crisp and clear; just what one would expect from a modern kit. Tracks are plastic and consists of long runs with individual links where they wrap around drive sprokets, road wheels and idlers. The upper tracks are quite realistically sagged so no need for expensive aftermarket metal or plastic tracks for this one. No crew members are provided.
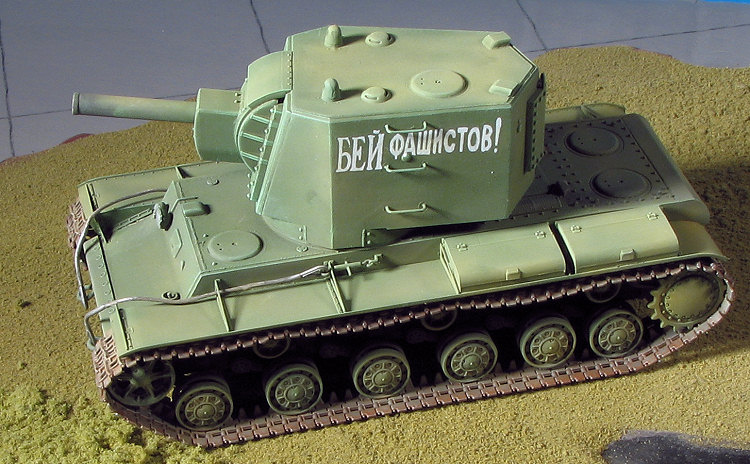
The instructions are superbly drawn and the 14 construction steps are very easy to follow. No painting information is provided in the construction sequences so one has to assume that everything is one color. A jig is provided for the tracks so that you can get the proper shape to fit prior to installation. This will help a lot and reduces the track installation to four major sub-assemblies. Etched metal is provided for the skirt braces and it is some rather hefty stuff. A section of braided brass cable is also provided to make a towing cable. A rule is printed on the sheet to get the right length. The KV-2 was often devoid of any markings at all, and this kit provides one set of patriotic slogans for the box art kit. You can have your KV-2 in any color as long as it is one of the myriad shades of Soviet Military Green!
| CONSTRUCTION |
 The first thing I did was to examine all the parts for sink areas that would be seen when the kit was completed. In addition to the two I found on the bottom, there was another on the front of the hull that would be visible when the kit was done. Those were filled and later sanded smooth. I then started construction. The steps are pretty straight-forward and identify each part. I did no pre-painting on this as it seems everything is going to be green aside from the tracks. When gluing on the aft upper hull section, you'll need to trim down the supports as they are of a height that will keep the piece from sitting flat. I also did not attach any of the hatch hinges. With no interior, the hatches will be glued shut so no point in adding an unnecessary piece.
I also started on the turret. You have to be quite careful to remove all the sprue stubs prior to construction as they will get in the way of things and cause fit problems. Probably the most tedious part of the build is the clean-up of parts. I found in several cases that the mold seams were rather large and needed considerable sanding/scraping. I also found that in many cases the sprue attachment points on small parts was such that a LOT of care had to be taken to remove them. The overlap into the part itself meant that one has to do more work to try to return the shape of the part. I think that Hobby Boss needs to seriously look into how large these attachment points are on some parts as removing them often damages the parts themselves. This was particularly troublesome on the Q sprue.
 I liked the way that the towing pintles were able to be snapped into place. I also liked the way that the gun was glued in. Though there were some ejector pin marks to be filled on a small piece, the fit was good and tight, which means that the barrel won't be flopping around because it is too loose. One doe have to take care in construction not to get some of the mantle pieces in upside down (been there, done that).
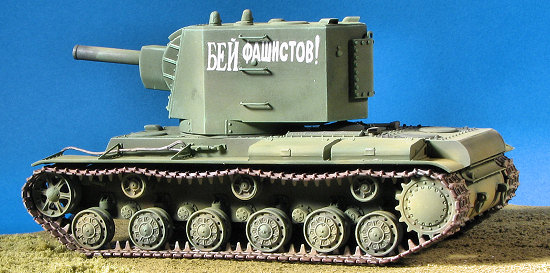
I found that the fit of the road wheels was quite tight so that one can move them somewhat for the best alignment. The sprockets also fit quite well and one can move those while putting on the tracks for a more positive fit. I then proceeded to build up the track link sections. The guides are a real help in this regard, but I still took it rather slowly so as not to make too many goofs!
Meanwhile I continued to build the rest of the kit. The turret had the final bits installed including several hand grabs. Unlike some of the other small pieces, these had very fine sprue gates and I was able to get them removed and installed quite easily. Again, the hatch did not have the inner hinge attached as it was glued shut. Now that I had most of the kit parts assembled (aside from the tracks and the fender assembly), I decided to go ahead and give things its first coat of paint. This was also inspired by my learning that the road wheels and idlers did not have rubber rims!
| COLORS & MARKINGS |
The old saying about 'paint it any color as long as it is green' is quite applicable for Soviet armor. As long as it isn't a bright or very dark green, it will look fine and few will be able to fuss about it. The Color Cops can stay at home over this one! I had a nice bottle of something that looked appropriate already mixed up from an previous project so used it. Well, despite getting good coverage, when I returned to the paint shop the next AM to continue with things, I was surprised to find that the paint had cracked. I can only assume that it was the combination of putting it on a bit too heavy along with using lacquer thinner than caused the problem. I've not seen this in a very, very long time and the cracking wasn't everywhere. So I got out my bottle of Strip A Kit and went work on it. I was not totally successful in this regard, thanks to the use of lacquer thinner. SAK does not work well with lacquers and while it got a lot of the stuff off, I still had to so a bit of sanding to remove the actual crack areas themselves. Then the bits were repainted, but without a recurrence of this cracking phenomenon.
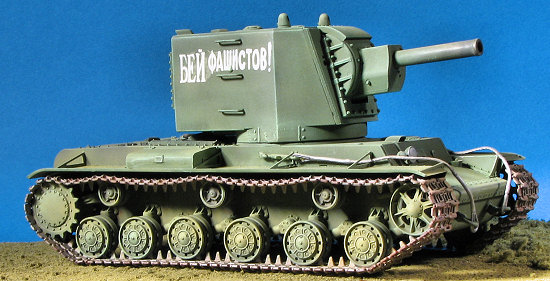
 Meanwhile, I'd built up the four track 'ends' and so took this opportunity to paint those pieces and the long straight areas between them. I used Alclad II steel for these as it provides a nice dark metallic surface and goes on well. I then glued on the tracks. It seems that something was amiss as I had a considerable gap on the top. Now I'm sure that I used the correct number of links as posted in the instructions, but I needed to insert two more links on the upper run; one on either side of the upper piece to be sure that the sags would be in the right place. Of course, knowing my luck, I put the darn things on backwards.... Eventually both sets of tracks were in place. I brush painted on the Alclad II steel where it was needed for the spare tracks. Then the tracks were drenched with Rust-All to provide a little of the 'used' look I was seeking.
 Once the Rust-All had dried, I put tape over the top of the upper treads and then started gluing on the fenders and braces. I carefully sanded the fenders to be sure I got a good fit and then glued them in place. The braces are made out of double thick etched brass. Fit of these was superb aside from the very front ones. I had gaps in these. Nothing serious, but perhaps had I glued them on at the same time as the fenders (which is what the instructions showed), I'd not have had the gaps. When attaching the tool boxes, the mounting holes had to be enlarged about three times the size so the rather large mounting pegs would fit. Once these were on, a set of hooks was glued in place and the rest of the lower hull was then painted once more.
| FINAL CONSTRUCTION |
Well, actually there isn't much of a final construction on this one after the painting is done. I gloss coated the turret sides and then applied the decals that came with the kit. I could just as easily left them off as most KV-2s were quite anonymous in terms of any sort of exterior markings. The decals themselves are nice and thin. I applied some clear acrylic paint where I wanted these to go and while the paint was still wet, put down the decals. I then applied some Microset to them and let things dry. Turned out well, though there was a bit of silvering. I then matte coated the entire tank to get the same basic appearance. Next step was dry brushing it. I used a lighter green to do this, using a Vallejo acrylic. The results were good, though it did take some time. I know that some people would put this on heavier and possibly using a more constrasty color, but I don't like overdoing it. To me, when folks overdo things (like panel lines and weathering), it just doesn't look right at all, so I go for the more subtle effects. Of course, the nice thing about this hobby is that we each can do as we please.
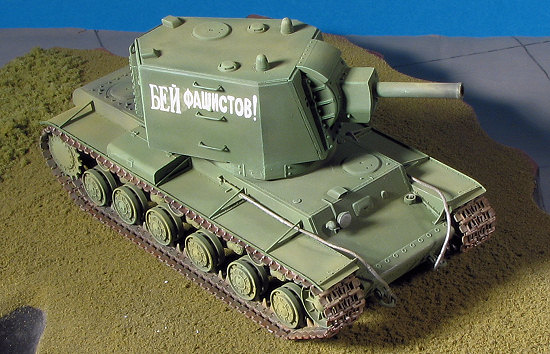
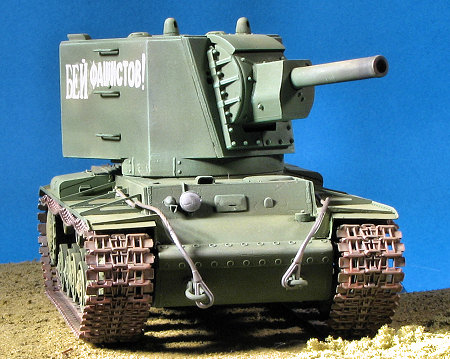
 Once that was done, I looked into the box to see what I'd missed. Sure enough, there were the tow cables. Hobby Boss provides a nice length of copper stranded wire and tow ends. One cuts the wire to 30mm lengths (a ruler is printed on the instructions) and then glues the ends on with super glue. Of course, the wire needs painted and will soak up whatever paint you use like a sponge. it took several applications of steel to get decent coverage. Once finished, I realized that I'd already attached the attachment points. The forward ones weren't a problem as they snapped in place. The ones on the side of the body, however, had been glued in place. Fortunately they popped up and with a bit of help, the other cable ends popped in place.
Still didn't look quite right. I then took some old Aeromaster Italian Tan acrylic, thinned it to near water-like consistency and then lightly sprayed it on the entire model, putting more of it on the road wheel area and rear of the tank than on the rest of it. A bit of time working with it gave me a more pleasing presentation than just shades of green. I probably should have done a wash as well, but like I said, I'm not into the heavier aspects of the hobby, no matter what the current fad might be.
| CONCLUSIONS |
 Hobby Boss have done a fine job on this kit. I've not seen any of the other KV-2s by Trumpeter or Tamiya or anyone else so can't compare, but I can tell you that you get a kit that goes together fairly well with no real traumas. It has nice detail and I'm sure there will be the usual outpouring of aftermarket for all those who strive for more detail and probably end up building a lot fewer kits as a result. I know that aftermarket, at a minimum, doubles my construction time.
The only area I would improve on the kit as it is, would be to lessen the size of the sprue attachment points on some of the smaller parts. I know it can be done as the other sprues seem to have mastered that. Why sprue Q has such huge attachment gates for some very small parts is a mystery. Regardless, it is a very good kit and a very reasonable price (I'd bet that when Tamiya does a KV-2 it will be at a 50% greater MSRP) and perfect for those who want a 1/48 armor kit without the cast metal hulls.
| REFERENCES |
March 2007
#1459 in a series
Copyright ModelingMadness.com. All rights reserved. Thanks to me and the fact that people owed me money for this one. If you would like your product reviewed fairly and fairly quickly, please contact the editor or see other details in the