Trumpeter 1/72 Sd.Ah. 116 tank transporter trailer
| KIT #: | 07249 |
| PRICE: | $16.98 |
| DECALS: | Three options |
| REVIEWER: | Scott Van Aken |
| NOTES: | Includes small length of chain |
| HISTORY |
The only tank-transporter trailer in common use throughout the greater part of the war was one of 22 to 23-ton capacity, although trailers of 45-tons and 60-tons capacity were developed and standardized - without, however, being encountered in the field. A few specimens of 68-ton trailer for the Tiger II tank were encountered.  The 8- and 10-ton types (mainly used for carrying the light Panzer I/II), both known as Sd.Ah.115, were low loading trailers having a single pair of twin wheels with pneumatic tires at either end. The front axle was arranged for fifth-wheel steering and supported the raised front end of the platform through its loading position on the ground. Ramps could be inserted from the loading platform to the top of the raised front portion enabling the entire trailer to be used as a ramp for loading the tank on to a railway flat or heavy lorry of the Faun L.900 D567 type. The unladen weight of the trailer was 5-tons and the overall length 31 ft, the width 8 ft and the height (unladen) 4 ft 9 in. It was manufactured by Wagen-und Maschinen AG vorm. Busch of Bautzen.
The 22-ton tank-transporter trailer (Sd.Ah.116) - later rated to carry 23-tons - differed from the previous model in having the loading platform suspended between two bogies, each with two pairs of single pneumatic-ti red wheels. Both pairs of wheels on the front bogie steered from the draw-bar by means of an arrangement of tie-rods. There was a similar arrangement at the rear, where a light draw-bar was provided for handling the bogie when detached; but in addition, a steering wheel with a compressed-air servo mechanism was provided for the use of an operator required to look after the rear end of the vehicle during travel (the driver of the trailer had to demonstrate driving ability equivalent to that of a holder of a Class 2 driver's license). For raising and lowering the platform, hand-operated winches were used on the earlier models and hydraulic jacks on the later ones. The draw-bar could be locked in the central position. The earlier models were provided with special ramps to enable them to be used for loading railway flats over the front end of the transporter. The unladen weight of the trailer was 11 3/4 -tons, the overall length 45 ft 6 in, the width 9 ft 9 in and overall height (unladen) 8 ft. It was built by Robert Schenk, Waggon-Fabrik, Stuttgart-Feuerbach.
| THE KIT |
You all know that Trumpeter is involved in all aspects of the plastic model hobby and that includes doing military vehicles. About the only arena they have done poorly in has been that of cars.
 This particular kit is for the Sd.Ab. 116 22/23 ton trailer. This was sufficient for carrying the Panzer III/IV (though the Panzer IV at 25 tons was a bit of an overload) and vehicles based on those chassis. There are 89 parts on three sprues and there are vinyl/rubber tires. Also included is a length of string and a small chain. Typical of Trumpeter kits, the detailing is excellent. Also typical is the on all the largish parts, there are a myriad of ejector pin marks on one side. Though most will be invisible to those not using IPMS anal lasers, some will not and will require a bit of thought to remove or fill and sand. I also found a couple of sink areas, but none were blatantly obvious and all should be easy to fill and sand. There are no optional parts and you will use all the bits provided in the kit. The string is to be wound around a hoist and the chain is just that; a chain that will be stowed on the flat.
Instructions are very nicely done and consist of nine well-drawn construction steps. The markings guide uses Gunze paints and depicts one trailer in Panzer yellow with green and brown streaks on it. Apparently this was only built in panzer yellow so your options in terms of painting are limited to that. Of course, this makes painting quite easy if you do not wish to use the camo scheme. A nicely done decal sheet includes the various stencils and warning markings. I guess you have three options in this regard, but the markings guide doesn't differentiate.
| CONSTRUCTION |
This is the first kit I've completed in several months. A combination of factors has kept me from putting in as much time as I'd like building kits and I don't see many of those changing. Construction is pretty straightforward and as you might expect, you need to do a lot of mold seam clean-up on the various parts. As this was all going to be one basic color, I assembled everything except the wheels prior to painting.
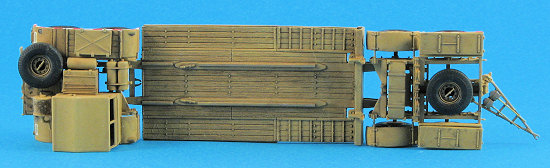
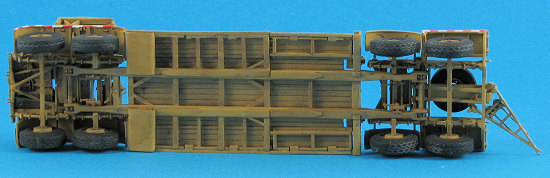 Placement of parts provided no real trouble though I should point out a few things. One is that you need to get all the suspension pieces as square as you possibly can. Not doing this will result in problems fitting bits in place later on. For that reason, I think it would be a good idea to assemble as many of the parts at one time as you can. I also found that I needed to do this with the flatbed section as well. I didn't and had some fit issues later because parts didn't dry square.
Another section to be careful constructing are the rear fenders of the forward section. Mine broke away several times. I recommend cementing these on near the end of the build. It can be done. I also found that the mounts to the reel on the back of the rear section broke easily so be very careful handling them. No problem with wrapping the thread around it.
 The tires are actually pneumatic (as in hollow), so you do need to take special care getting these to fit on the wheels. It is not as easy a task as first envisioned and in some ways, I wish they were plastic. I did not have to glue them in place. You can also chastise me now for not removing all the mold seams from the tires.. Interestingly, I found that it was easier to get the ends to fit on all four wheels with this kit than it has been with other wheeled kits I've done in this scale. Gluing the bed between the two wheeled sections was quite easy. I'd feared that there would be problems getting it all to fit well. I did not fit the cover to the driver's compartment until after painting. I also did not use the small chain piece provided as the bits to which they would fit were both short shot or perhaps broken in transit. Another caution is to be sure that part A22 on the bed is glued so that the small attachment part will be 'up'. The instructions do not make this very clear and I later discovered I installed mine upside down.
| COLORS & MARKINGS |
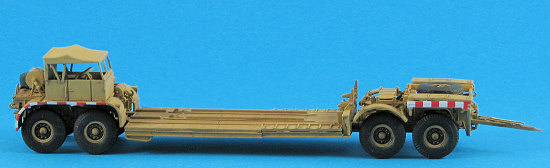
 Painting was simple. Panzer yellow overall. This was then followed by weeks of washes and various dry brushing and some detail painting to keep it from looking so monotone. Decals are quite good and will succumb to Solvaset. In fact, I trashed one by accidentally touching it before it dried. As it was one of the red/white fender warning decals, one side has a section missing. These fender edge markings are oversized in height so be sure to cut them to allow them to snuggle down. I had the excess wrap to the underside. It did take several Solvaset applications. With this all done, I sprayed on a matte clear coat to remove the shine from the tires and decals. The cabin section of the rear part was then glued in place and that was it.
| CONCLUSIONS |
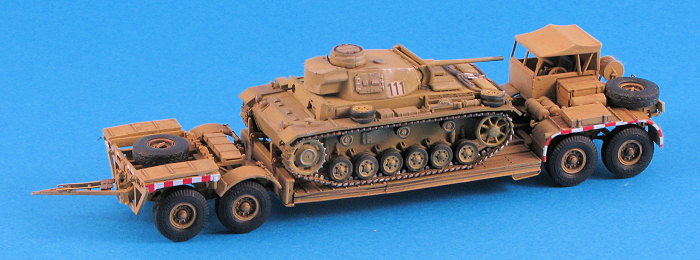
I have to say this is something I don't build very often. In fact, it is the first time I've built a stand-alone trailer. My Revell Panzer III fits on it quite well and makes for a most interesting combo, especially as they both have different shades of Panzer Yellow! Only thing I need now is a prime move and fortunately, Trumpeter does do a Famo for it.
| REFERENCES |
'German Miltary Transport of World War Two', by John Milsom.
January 2008
Copyright ModelingMadness.com. All rights reserved.
I bought this one for you, thanks to 'store credit', and because I thought it was different.
If you would like your product reviewed fairly and fairly quickly, please contact the editor or see other details in the