Dragon 1/35 5cm PaK 38
| KIT #: | 6444 |
| PRICE: | $ |
| DECALS: | None |
| REVIEWER: | Scott Van Aken |
| NOTES: | Kit includes four man crew |
| HISTORY |
The 5 cm PaK 38 (L/60) (5 cm Panzerabwehrkanone 38 (L/60)) was a German anti-tank gun of 50 mm calibre. It was developed in 1938 by Rheinmetall-Borsig AG as a successor to the 37 mm PaK 36, and was in turn followed by the 75 mm PaK 40.
 The PaK 38 was first used by the
German forces in the Second World War on April 1941. When the Germans faced
Soviet tanks in 1941 during Operation Barbarossa, the PaK 38 was one of the few
early guns capable of effectively penetrating the 45 mm armor of the formidable
T-34. Additionally, the gun was also equipped with
Panzergranate 40
APCR shots featuring a tungsten core, in an attempt to penetrate the armor of
the heavier KV-1 tank. Although it was replaced by more powerful weapons, it
remained a potent and useful weapon and remained in service with the German
infantry until the end of the war.
The PaK 38 was first used by the
German forces in the Second World War on April 1941. When the Germans faced
Soviet tanks in 1941 during Operation Barbarossa, the PaK 38 was one of the few
early guns capable of effectively penetrating the 45 mm armor of the formidable
T-34. Additionally, the gun was also equipped with
Panzergranate 40
APCR shots featuring a tungsten core, in an attempt to penetrate the armor of
the heavier KV-1 tank. Although it was replaced by more powerful weapons, it
remained a potent and useful weapon and remained in service with the German
infantry until the end of the war.
| THE KIT |
Based
on Dragon’s original release of this weapon system, it has received a
comprehensive upgrade to make it more appealing than ever. One of the major
modifications is the inclusion of the third wheel that was hitched to the
split-trail spades to allow easier manhandling. This newly tooled wheel is
designed to widen modelers’ diorama horizons, as it permits the gun to be
displayed in either a travel or combat mod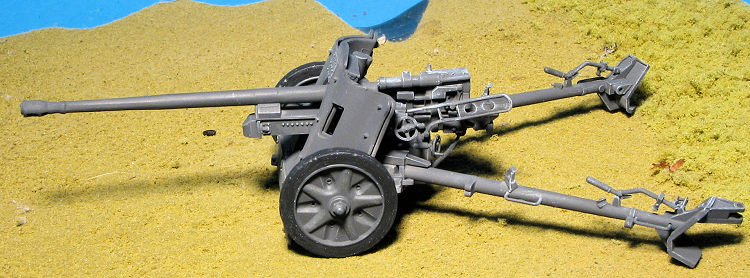 e. In addition, this Premium Edition
kit also has a set of four crewmen with brand new arms and hands to operate the
gun and hold scale ammo rounds. The crew also benefits from upgraded GEN2
weapons and equipment. This is a versatile and accurately rendered kit of an
important antitank gun that served right through to the end of WWII, and it
offers modelers endless possibilities.
e. In addition, this Premium Edition
kit also has a set of four crewmen with brand new arms and hands to operate the
gun and hold scale ammo rounds. The crew also benefits from upgraded GEN2
weapons and equipment. This is a versatile and accurately rendered kit of an
important antitank gun that served right through to the end of WWII, and it
offers modelers endless possibilities.
Dragon's usual excellent instructions provides fully detailed construction steps and color references in both Gunze and Model Master paints. Any optional settings, such as having the gun ready to fire or ready to be towed are clearly shown. The painting guide shows the gun in panzer grey, but really, you could paint it any way you deem necessary. In addition, there is an assembly guide for the crew showing placement of various parts and a sample pattern for their uniforms. No decals are required for the kit and none are provided.
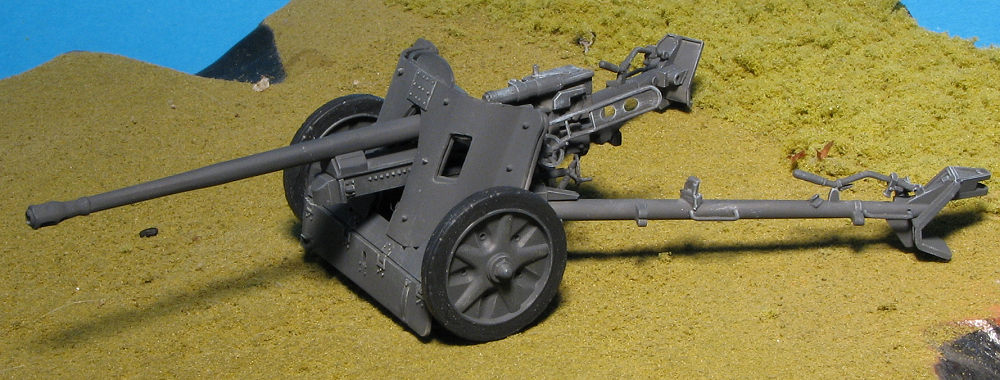
| CONSTRUCTION |
Since I don't do crews, I set aside most of the plastic in this kit and concentrated on the gun. Right off the bat I found a glitch in that the parts # 46/47 should be put on the opposite sides. Note that the half rounded bit to the back has to be up. Also make sure you do not cut off the small mounting post from parts 13/14 as I did or you will have to sort of fudge the fit.
 This was a kit that I worked on sporadically as our club would have 'build
nights. Eventually I got all the main 'chassis' pieces along with the trails
done when the club stopped doing these events and the kit languished in the box
for several years. As regular readers are aware, I'm currently going through a
phase of trying to clear-up the backlog of what has become several dozen 'Shelf
of Doom (SOD)' kits. This became one of them.
This was a kit that I worked on sporadically as our club would have 'build
nights. Eventually I got all the main 'chassis' pieces along with the trails
done when the club stopped doing these events and the kit languished in the box
for several years. As regular readers are aware, I'm currently going through a
phase of trying to clear-up the backlog of what has become several dozen 'Shelf
of Doom (SOD)' kits. This became one of them.
When I started back up, I came to find that the small shield braces were all glued at the wrong angles. This was not helped by the less that useful instruction sheet that led me awry on several occasions. As attaching the shield wasn't until the end of the build, I simply left them. I did not install the wheels in the first step as I thought it would be easier to put them on last. This wasn't a bad move.
Eventually, I got all the bits on the trails and started building up the gun and its mount. Somewhere in the past, the end ring on the muzzle brake disappeared so that had to be left off. The attachment of the pieces for the breech were fairly straight forward and no issues there. However, getting the gun onto the carriage required some concerted fiddling. In the process, I broke most of the gun shield brace pieces. I also left off the lower carriage armor until the end as well, though it did make it a bit more difficult to install.
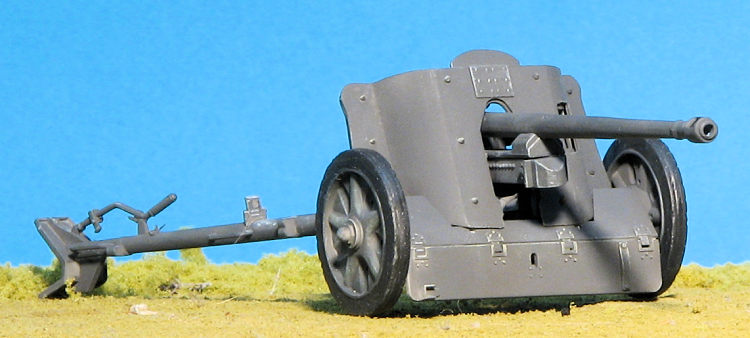
 The gun shield was built up and fit fairly well. There are some boxes that
attach to the back of it and those are delineated by small raised surfaces. Once
it was dry it was time to install it. Well, you have to do a lot of twisting and
grunting to install it as the openings are too small to allow it to easily slide
in place. Eventually I got it installed and let it dry, This partially covered
up the lower carriage armor attachment points so that later it was a bit of a
struggle to get that installed, but it seems it would have been more difficult
to get the shield on if I'd installed them earlier. The final bits were the
addition of the wheels. Since I wasn't going to have this towed, I left off the
third wheel and the brace that holds the trails together when transporting.
The gun shield was built up and fit fairly well. There are some boxes that
attach to the back of it and those are delineated by small raised surfaces. Once
it was dry it was time to install it. Well, you have to do a lot of twisting and
grunting to install it as the openings are too small to allow it to easily slide
in place. Eventually I got it installed and let it dry, This partially covered
up the lower carriage armor attachment points so that later it was a bit of a
struggle to get that installed, but it seems it would have been more difficult
to get the shield on if I'd installed them earlier. The final bits were the
addition of the wheels. Since I wasn't going to have this towed, I left off the
third wheel and the brace that holds the trails together when transporting.
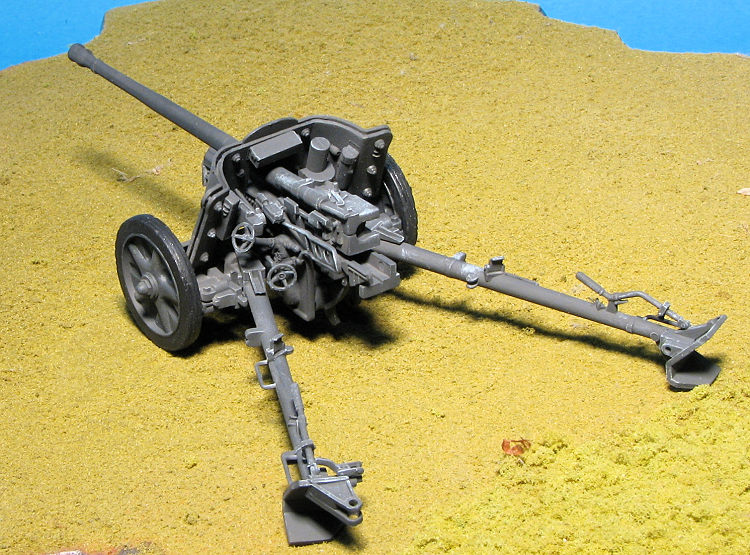
Painting this is very easy. Overall German Grey and I used Tamiya paint for it. One of the issues with painting something that is complete is that there is invariably a spot or two that the paint doesn't reach. Well, in this case, that isn't an issue as it won't be in a contest and like most SOD kits, was something I just wanted to finish. I brush painted the tires with Rubber Black and this only verified that Tamiya paints do not brush well in any situation other than small bits. When done, I gave things a coat of clear matt, did a bit of dry-brushing with white (perhaps too much in areas) and another kit was saved from 'The Shelf'.
| CONCLUSIONS |
This really is a nice little kit. The instructions could have been better and there were times when I found it a bit of a pain to construct, but overall, anyone with at least some time building artillery should be able to do well with this.
22 June 2019
Copyright ModelingMadness.com. All rights reserved. If you would like your product reviewed fairly and fairly quickly, please
contact
the editor or see other details in the
Note to
Contributors.