Dragon 1/72 SdKfz 251/7 Ausf D
| KIT #: | 7317 |
| PRICE: | @$14.95 |
| DECALS: | Several options |
| REVIEWER: | Scott Van Aken |
| NOTES: | Includes small etched frets |
| HISTORY |
The Sonderkraftfahrzeug 251 (SdKfz 251) half-track was an armored fighting vehicle designed and first built by Germany's Hanomag company during World War II. They were produced throughout the war.
The early production models of this vehicle were issued to the 1st Panzer Division in 1939. There were four main models (A - D), with many variants. The initial idea was for a vehicle that could be used to transport a squad of infantry to the battlefield protected from enemy small arms fire, and with some protection from artillery fire. The open top meant that the crew was still vulnerable, especially to high explosive rounds and shell fragments.
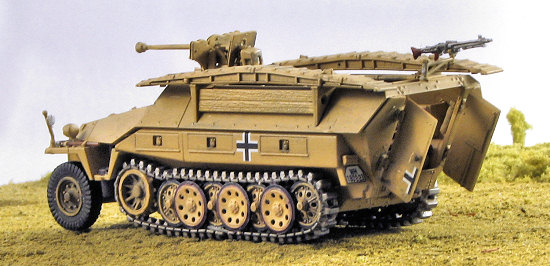 The first two models were produced in small numbers. The C variant had a larger production run, but was a quite complex vehicle to build, involving many angled plates that gave reasonable protection from small arms fire. The D version utilized a much simpler design, and can be easily recognised by its single piece sloping rear (with flat doors).
Although designed for cross country work, it had some limitations as the front wheels were not powered.
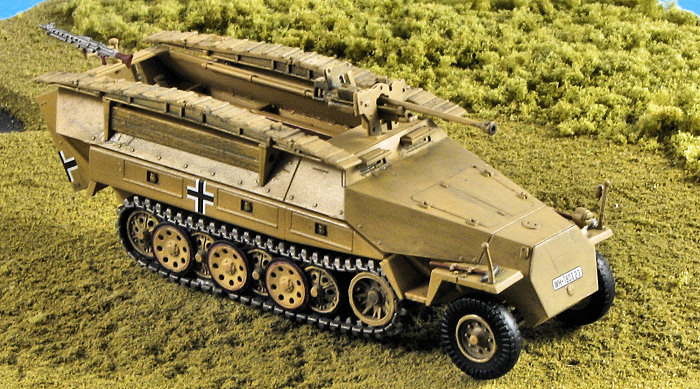
The standard personnel carrier version was equipped with a 7.92 mm MG34 or MG42 machine gun mounted at the front of the open compartment, above and behind the driver. A second machine gun was usually mounted at the rear on an anti-aircraft mount.
Variants were produced for specialized purposes, including with anti-aircraft guns, anti-tank rockets (triple Panzerschrecks fitted on either side of the vehicle) as well as a version with an infra-red search light used to spot potential targets for associated Panther tanks equipped with infrared detectors.
Sdkfz 251/7-I - Pionierpanzerwagen is the subject of this kit. It is an assault engineer vehicle with fittings to carry assault bridge ramps on the sides. They could also be somewhat heavily armed if required.
| THE KIT |
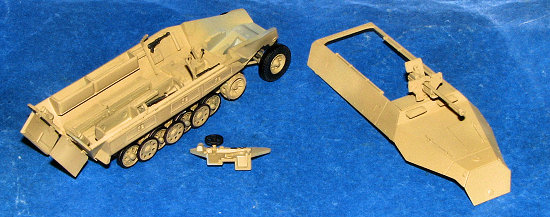
I've bought a few Dragon small scale armor kits in the past and have generally been pleased with with what I've seen, though I've not yet built any of them!. This one is no exception and continues Dragon's concentration on providing a quality kit that rivals the large scales of just a few years ago. Dragon seems to not want to put more than two sprues in a polybag, which is just fine with 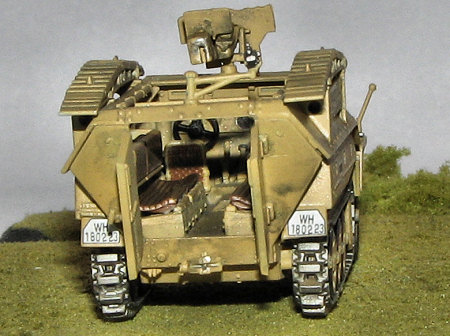 me. In this case the multiple bagged items are identical sprues, as it is better to do one of an item and do two sprues full of these singular items. There are nine plastic sprues plus one for the flexible tracks and two small etched frets, mostly for the 2.8cm anti-tank gun's shields.
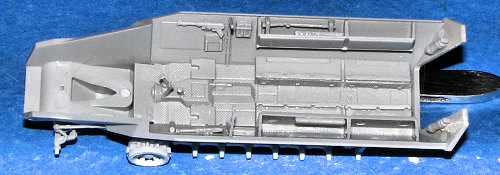
Since this is an open topped vehicle, you get a full crew compartment that includes driver's seats, instrument panel, steering wheel and other accoutrement that you'd expect from what is basically a ACV. As it is an engineer's vehicle, you also get stream and ditch fording rails and the inclusion of the anti-tank gun incase they run into more than the usual threats.
A very nice touch is that the vast majority of the road wheels are ganged together, taking away much of the chore of construction in this area, but none of the painting. Only the very outer three wheels on each side are separate. All of the attaching thingies are hidden behind them. The tracks are a specialty of Dragon that are not only easily glued with super glue but are of such a material that they can be painted without having to worry about the paint flaking off.
Instructions are superb and provide not only a parts breakdown, but color info in Gunze, Model Master and generic specs. Two painting options are provided, one is the box art vehicle from Italy in 1944 in sand with brown and green 'tiger stripes'. the other is a Normandy 1944 overall panzer sand color. The decal sheets are quite nicely done and provide more than enough markings to do just about any vehicle for which you can find a photo.
| CONSTRUCTION |
Looking over the instructions, I decided to assemble as much of the vehicle that I could before painting anything. The idea of painting all those small road wheels while on the vehicle didn't exactly spin my wheels and is one of the reasons that I build so few tracked vehicles in any scale.
 Some of the parts of this are quite small and I also found that the instructions were somewhat vague in a few spots. This was probably as much to my lack of knowledge of the subject as any fault of the instructions. I'm willing to admit to that. So what I did was to look for subassemblies. Basically, I found that one could build up the interior minus the seats, guns and steering wheel as all those parts were given the same color as the outside. I also painted the side sponsons and fenders separately. This was a bit of a mistake. Hindsight says that I should have glued those in place first as they all fit rather close together.
I did build up the front suspension pieces. There is a bit of question when first looking at the steering linkage as one isn't quite sure how this fits. Same when it comes to attaching the long steering arm as the drawings never show the right side of the vehicle aside from one illustration very early in the process before the front suspension is attached.
As you might expect, I did have a few pieces go flying. I found all but one and that is the reason there are not two sets of rifle racks in the storage bays. I also knocked off a lot of tiny bits during construction. The parking brake was reattached at least five times though it seems as if it will stay there. Having the rear doors open seemed like a good idea as well, but those were bumped off  several times also. Dexterity with tweezers and a magnifying hood of some sort are mandatory for doing this one as Dragon doesn't believe in molding all the detail to the side panels.
Painting all the road wheels was a real time consumer and though I tried the circle template mask deal, it just didn't work well for me and really, never has. What is fortunate for most of us is that once you dirty things up a bit and add the tracks, these sort of disappear so my goofs won't be as noticeable.
Anyway, I built the lower section and the upper section separately, planning on fitting them together for the final construction. Part of the upper section is the 2.8 cm gun. This is an extremely fiddly construct. I had to pull apart the component pieces several times after the glue had set to readjust things. The only p.e. I used in the whole kit was for the gun shields. The other teeny bits were for the interior pistol holders and gave those up as a bad idea early after losing one of the Liliputian etched pieces to the carpet gnomes.
| COLORS & MARKINGS |
 It was at this time, before I attached the road wheel bits, and some of the interior bits that I painted things. It got several overall sprays done of many separate pieces. I used Humbrol #94, matte panzer yellow for this. The paint is excellent and did just what I wanted. I also painted the driver and passenger seats with a darkish brown (some sort of old Aeromaster acrylic). The gun stocks were done with dark earth and I painted various tools and guns with browns and metallics. I also painted the tracks using Alclad II Steel. The plastic that Dragon uses for the flexible tracks hold paint superbly with no problems in flaking off. I can see why they have decided to start using these as they have most of the benefits of 'rubber band' tracks with the ability to hold paint and provide good detail as well. Those who insist on separate links or link and section type tracks will still be able to find those things in aftermarket. To me, this new track type is definitely the way to go (despite my totally botching one track with too much cement).
| FINAL CONSTRUCTION |
 Then it was time to glue the upper half, lower section and the fenders in place. Fit is probably good, but I found gaps along the upper hull/lower hull mating surface. Perhaps this is normal, but I'm betting not. The kit has faint alignment notches for much of these parts, but it is easy to miss them. I had the work box areas above the tracks off a bit and they didn't meet the fenders properly. I pried them off and reglued. I also glued the front part of the upper surface first, let it dry and then did the back as there was a bit of what seemed to be a warp, though I'm sure this was not the case.
Front wheels took a while as the ends of the axle are short and rather weak. Even now there is considerable flex in the axle ends, part of the problem one often has when doing things like this in scale. The gun and mount were glued on as were the engineer rails and a myriad of tiny parts like door handles, aft gun mount, tools on the fenders and the seats. BTW, you have to install the front seats before you put the gun on or you won't be able to get to them.
I also glued on the tracks. I learned a few things about this stuff the tracks are made from. One is don't use liquid cement. I used Tamiya cement to build this kit and if put on in what I'd consider normal amounts for styrene, it will eat up the track material. One side shows the results of several breaks in the track because of this. Another is that the two tracks seem to be made for a specific 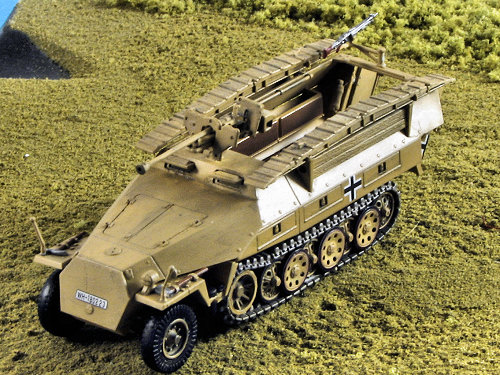 side, though the instructions say nothing about it (at least not what I could find). One side was definitely longer than the other. Anyway, super glue works just fine with this stuff and I was able to use it to glue the upper portion of the track to the wheels to make it look as if the track had sagged.I was unsure about painting the track blocks or not as the instructions just said to paint the whole track steel while the box art shows them as black.
So I asked on the Forum. While waiting for an answer, I put on the decals. These work superbly. I do, however, wish that there were some 'ready to go' license plate numbers as making them up out of teensy separate numbers was not my idea of oodles of fun. Eventually, I got them all on, and about that time my answer came from the forum (thanks Tank). Apparently both were used so I left them in metal. I also realized that one of them is on backwards, but I'll let you figure out which one!
With the decals in place, 'twas time for a matte coat, followed by a nice wash of dirty thinner and a touch of dry brushing. I know that others do a MUCH better job of weathering than I so I rarely do more than minimums.
| CONCLUSIONS |
Well, there you have it. Another nice model 'in a week'. The end result is a very nicely detailed German halftrack and I learned a few things along the way that will be helpful in future projects. This is a kit that I know you'll enjoy as long as you can handle the small pieces. The new tracks work beautifully and I can fully understand why Dragon is now eschewing the link on link type for these.
| REFERENCES |
My thanks to www.dragonmodelsusa.com for the review kit. You can find this kit either at the hyperlink or your favorite hobby shop.
August 2007
#1481 in a series
If you would like your product reviewed fairly and fairly quickly, please contactthe editor or see other details in the