ESCI 1/72 Fiat-Ansaldo M13/40
|
KIT # |
8030 |
|
PRICE: |
$3.99 when new |
|
DECALS: |
Several tanks |
|
REVIEWER: |
|
|
NOTES: |
Now long OOP |
|
HISTORY |
 The Fiat
Ansaldo M13/40 was one of the better know Italian medium tanks of the second
world war. Developed from the earlier M11/39, it differed mostly from being a
riveted design. Fifteen prototypes were ready by July 1940. It was basically
built from armored plates bolted to a steel frame. Undoubtedly, the effect of
dislodged rivets flying around the interior was not very encouraging to crews as
the armor had a tendency to crack when hit. After about 150 tanks were produced
a small change was made to the design by having a radio installed and the long
mudguards were cut back. Most of the tanks produced were built by
Ansaldo-Fossati.
The Fiat
Ansaldo M13/40 was one of the better know Italian medium tanks of the second
world war. Developed from the earlier M11/39, it differed mostly from being a
riveted design. Fifteen prototypes were ready by July 1940. It was basically
built from armored plates bolted to a steel frame. Undoubtedly, the effect of
dislodged rivets flying around the interior was not very encouraging to crews as
the armor had a tendency to crack when hit. After about 150 tanks were produced
a small change was made to the design by having a radio installed and the long
mudguards were cut back. Most of the tanks produced were built by
Ansaldo-Fossati.
In action proved to be unreliable and prone to catching fire. Again, not a trait that encourages aggressive action. The 47 mm gun had a muzzle velocity of 2,060 ft/sec, which was more than adequate against the foes it would meet in battle, including the US M3 Lees. First saw action on Dec. 9, 1940 at Sollum-Halfaya. Most of its service was in North Africa, Greece (with battalion of theCentauro), Yugoslavia, and Montenegro. Over 100 were captured at Beda Fomm during North African action against the British and some were used to equip the 6th Royal Tanks and Australian 6th Cavalry (who were undoubtedly glad to be rid of them).
|
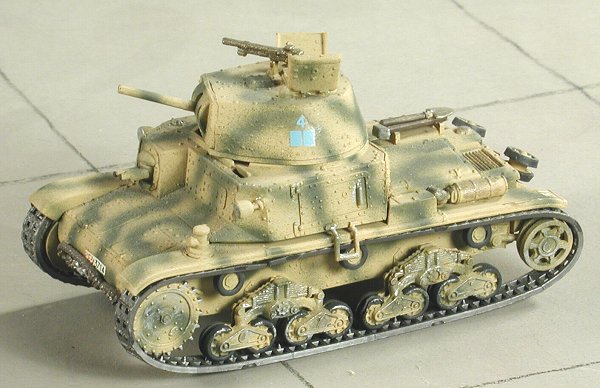
THE KIT |
 The kit itself is well cast
and generally free from flaws. There are the usual small ejector pin marks, but
one expects that kind of thing from a kit of this era. Total parts count is not
very high and the only real options are to have the hatches open or closed. The
turret was designed to turn and the main gun could be elevated if desired. The
hull was in two main pieces, a full, boxed in lower section and a flatish upper
part. No six part hulls, that one sees a lot of nowadays. No interior was
included. Tracks were the standard 'rubber band' variety, but rather well
detailed.
The kit itself is well cast
and generally free from flaws. There are the usual small ejector pin marks, but
one expects that kind of thing from a kit of this era. Total parts count is not
very high and the only real options are to have the hatches open or closed. The
turret was designed to turn and the main gun could be elevated if desired. The
hull was in two main pieces, a full, boxed in lower section and a flatish upper
part. No six part hulls, that one sees a lot of nowadays. No interior was
included. Tracks were the standard 'rubber band' variety, but rather well
detailed.
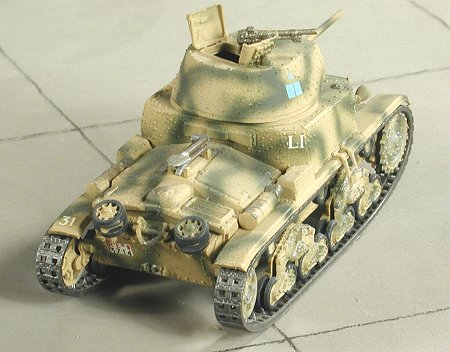
Instructions were typical of ESCI kits in that they were well done and provided what painting information was needed. Markings were for several tanks, all painted in either sand or sand with green stripes painted on them. When this kit was new, I picked it and many other ESCI 1/72 armor kits for $3 and there were lots of them around. I now wish I'd bought hundreds of them!
|
CONSTRUCTION |
Thanks to the general simplicity and good engineering,
construction went quickly. I used no filler at all during the construction of
this kit, which I can't say about a lot of other models I build. The first thing
I did was to do the sub assembly
 thing. In this case it meant
assembling the turret and the hull sections. The turret went quickly as it is a
single piece that fits onto a lower plate. This plate holds the gun into the
opening and allows it to elevate. It also has 'ears' on it so that it will fit
into a similar slot on the upper surface of the hull, thus allowing it to
rotate.
thing. In this case it meant
assembling the turret and the hull sections. The turret went quickly as it is a
single piece that fits onto a lower plate. This plate holds the gun into the
opening and allows it to elevate. It also has 'ears' on it so that it will fit
into a similar slot on the upper surface of the hull, thus allowing it to
rotate.
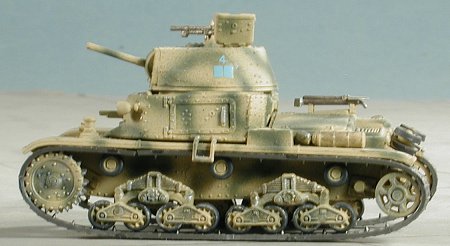
The upper hull is really a sort of two story section with an upper section that holds the gun and most of the crew. It is a box arrangement that went together quite quickly and was glued to the upper plate. The two forward firing machine guns were just 'snapped' in place and actually fit quite tightly. They are supposed to move, but don't. Then the various attaching pieces such as the lights and steps were glued on this upper section and the turret installed. The tracks had the 'hot knife' routine done to hold them together. Then the various idler wheels were attached. The suspension is a single piece and designed so that it can be added after everything is painted. That is just what I did. I also attached all the various bits and pieced to the hull and it includes extra idler wheels, the usual rope to pull it out of the mud/sand and various boxes.
|
PAINT & DECALS |
With all the various bits and pieces attached to the tank (some, like the
suspension parts just press fit into place), the tank was painted. I used
Humbrol German colors for this one, painting the whole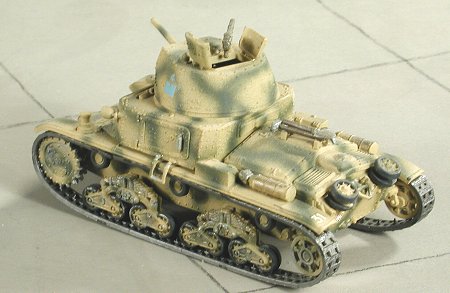 thing sand and then later going over it with a green color. When that was done,
I got out my paint brush, and painted all of the various items like the tow
cable, shovels, lights, exhaust and idler wheels. I did not paint the tracks at
all as I couldn't get paint to stick to them. Having not glued in the
suspension parts really helped when it came to painting them! With the paint
nice and dry, I then applied the decals. Yep, no gloss coat on this one and
there was no silvering, which really surprised me.
thing sand and then later going over it with a green color. When that was done,
I got out my paint brush, and painted all of the various items like the tow
cable, shovels, lights, exhaust and idler wheels. I did not paint the tracks at
all as I couldn't get paint to stick to them. Having not glued in the
suspension parts really helped when it came to painting them! With the paint
nice and dry, I then applied the decals. Yep, no gloss coat on this one and
there was no silvering, which really surprised me.
|
FINAL BITS |
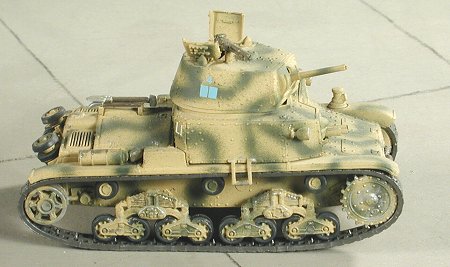
With the model painted and decaled, the only thing left was to reattach a few parts that I'd broken off and attach the tracks. I did this by removing the suspension parts and once the tracks were in place, I pushed the suspension bits back into their attachment holes. They have never been glued and fit quite snugly. As you can see, the tracks are a tad large, which really helped get them in place. I did some very light dry-brushing using aluminum.
|
CONCLUSIONS |
 I really liked
this kit and I can say the same for any of the 1/72 ESCI armor kits I've built.
They are well detailed, well engineered and build with minimal hassles. It is
unfortunate that they are so hard to find. However, I can tell you that Italeri
has started on a campaign of reissuing several of these in the last year or so.
One can only hope that they will eventually come out with some of the more
unusual ones like this little Fiat tank.
I really liked
this kit and I can say the same for any of the 1/72 ESCI armor kits I've built.
They are well detailed, well engineered and build with minimal hassles. It is
unfortunate that they are so hard to find. However, I can tell you that Italeri
has started on a campaign of reissuing several of these in the last year or so.
One can only hope that they will eventually come out with some of the more
unusual ones like this little Fiat tank.
Review Feb 2003
Kit built August 1984
#377 in a series
Copyright ModelingMadness.com. All rights reserved.
If you would like your product reviewed fairly and fairly quickly, please contact the editor or see other details in the Note to Contributors.