Dragon 1/72 LRDG Patrol Car
| KIT #: | 7439 |
| PRICE: | $23.50 SRP |
| DECALS: | Two options |
| REVIEWER: | Scott Van Aken |
| NOTES: | New tool kit |
| HISTORY |
Originally called the Long Range Patrol (LRP), the unit was founded in Egypt in June 1940 by Major Ralph A. Bagnold, acting under the direction of General Archibald Wavell. Bagnold was assisted by Captain Patrick Clayton and Captain William Shaw. At 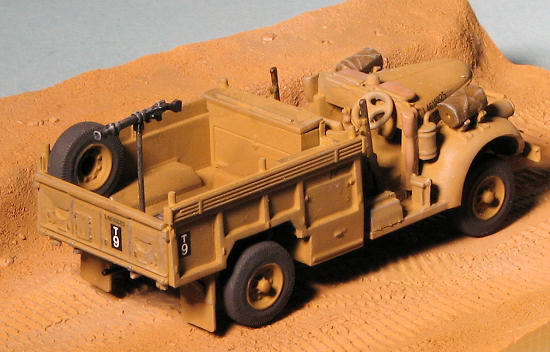 first the majority of the men were from New Zealand, but they were soon joined by Rhodesian and British volunteers, whereupon new sub-units were formed and the name was changed to the better-known Long Range Desert Group (LRDG). The LRDG never numbered more than 350 men, all of whom were volunteers.
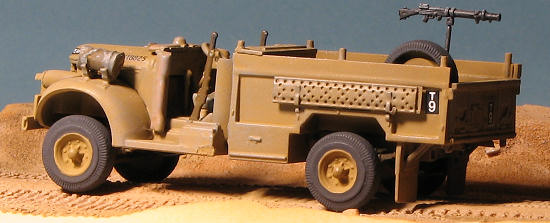
As these men had to be self-sufficient and were in the field for many weeks and sometimes months, it was important for them to be able to carry much of what they needed for the duration. Perhaps the vehicle most readily associated with the LRDG aside from the ubiquitous Jeep, is the two-wheel-drive patrol car. It entered service in March 1942 and it became an LRDG mainstay. The sturdy Canadian-manufactured Chevrolet 1533x30 cwt trucks carried sand channels, jerry cans, a sun compass, sometimes a wireless, improved radiator cooling system and low-pressure desert tires. They were fitted with weapons such as Lewis guns, Boys anti-tank guns, Vickers medium machine guns and the Vickers K.
| THE KIT |
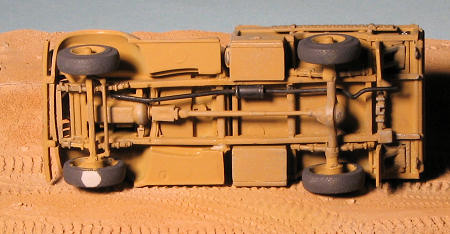
As some of you know, I really like wheeled military vehicles and am quite pleased to see this one kitted. THis is the first 1/72 scale injected kit of this vehicle. The previous Matchbox kit was to 1/76 scale. This is not an Armor Pro kit so none of the 55 parts are made from photo etch, not that p.e. is needed. The kit comes with a full chassis and lower engine half. A very scale exhaust is provided that one should take care of removing from the sprue. The open driver's compartment is also well detailed as is the rear bed. While there are a number of items to be placed on fenders, the side of the bed and in the bed, the truck is pretty empty compared to photos I have seen of these in the field. This provides the option to hit the aftermarket folks to fill up this space.
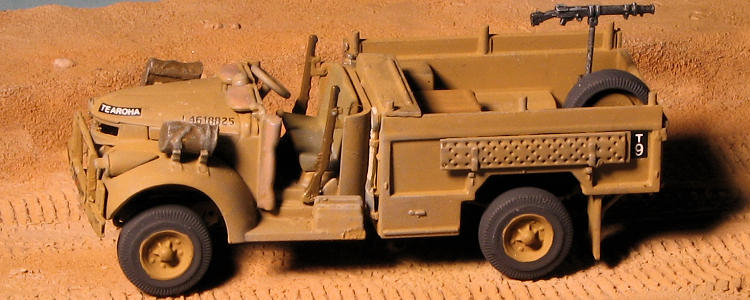
Markings are provided for two vehicles. One is the box art version from T Patrol named 'Te Aroha' in 1943. From the same time period is R Patrol's 'Rotowhero', this time in sand pink and brown. The decal sheet is well printed and offers the opportunity to make your own registration numbers if you so wish.
| CONSTRUCTION |
The kit basically consists of three major subassemblies; the chassis, the bed and the forward section. I tackled them in roughly that order, building all three subassemblies at pretty much the same time.
 Starting with the chassis. I found that the forward bumper did not have a good attachment point. In fact, the areas to be attached seemed to not align up with the areas on the chassis to which they were to mate. I decided, right or wrong, to leave this piece off until near the end of the build. I also chose not to install the wheels, something I am sure will come back to bite me in terms of not having them all fit flush to the ground! I also had some difficulty with the exhaust. It seems the forward part that fits into the exhaust manifold, did not want to seat properly. I had glued the muffler to the chassis and this seems to have kept the forward end from fitting. Eventually, I slathered super glue on the join, pressed the pipe end into it, and doused it with accelerator.
The bed was not that much trouble, though things were not smooth here. For instance, though one has stuff to put into the cargo bed, you have to place the items where there are large attachment points. I would have rather had the option to place them where I wanted in some of the cases. I also found that the container that fits onto the tail gate did not fit as nicely as I would have liked. Perhaps it is because I put the top of it on last, but it did not seem to sit all the way down. I also found some rather bothersome ejector towers where the 'mud flap' assemblies fit. These must be ground out before the flaps will fit.
 On the forward section, fit was pretty good. The steering column/wheel has no positive locator aside from a hole under the dash. It is up to the builder to get this properly aligned, not an easy task as the hole through which it fits is large and loose. Also be sure to attach the door curtains before attaching any of the surrounding parts or you will find issues with getting these parts in place properly. The sprue attachment points for many of the parts are quite large, requiring some dedicated clean up before attaching parts. The bed rolls for the hood were particularly bad in this regard and had a considerable mold seam to clean up.
Finally, I got to the point where I had a complete forward section, rear section and chassis, save for the wheels, forward bumper and the Lewis gun and mount. The rear section was glued onto the chassis and I then decided it was time for some paint.
| COLORS & MARKINGS |
The kit was painted overall British WWII Desert Tan using Humbrol paints. I then used a number of other shades for the blanket rolls on the fenders, the seats and the boxes in the back. I used Vallejo's Tinny Tin for the exhaust system. The next step was the  application of the decals. The kit decals are actually very good and were put over the paint without resorting to any gloss clear coat, which I felt would work OK. Using Mr Mark Softer setting solution was the trick and I had no issues with silvering.
| FINAL CONSTRUCTION |
For the last bits, I glued the forward and aft sections to the chassis. The rear box fit fairly well, but the front one seems to only properly mate with the large receptacle in which an equally large pin fits. Makes things a bit wobbly. I also fit on the wheels. The rear ones fit well, but on the front the holes in the wheels are several times larger than the end of the axle. It took some very careful gluing with super glue and accelerator to get these in place. Even then I managed to get them a tad off so had to sand down the bottom of one wheel to get all four wheels to touch on a flat surface. The bumper was cemented to the front of the body. How Dragon expected this thing to stay on the chassis is beyond me as the attachment points are bordering on the ephemeral. The guns were the last bits added and that was it.
| CONCLUSIONS |
Aside from the 1/72 Matchbox kit, this is the only 1/72 LRDG truck that has been kitted. I found it to be a bit more difficult to build than originally anticipated. However, the end result is a very nice little vehicle that I think most will be pleased to have in their collection.
| REFERENCES |
 http://en.wikipedia.org
October 2012
Thanks to www.dragonmodelsusa.com for the review kit. You can find this at your local retailer or have them order it for you.
If you would like your product reviewed fairly and fairly quickly, please contact the editor or see other details in the