
Tsukuda 1/20 Nausicaä and Kai
|
KIT # |
GC-01 |
|
PRICE: |
¥600 |
|
DECALS: |
|
|
REVIEW : |
|
|
NOTES: |
|
HISTORY |
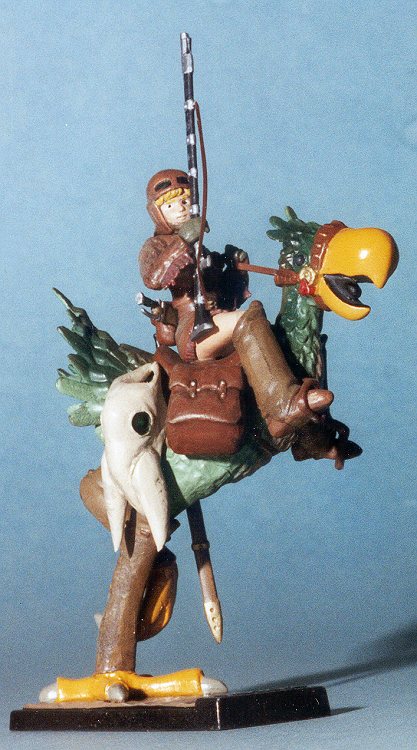
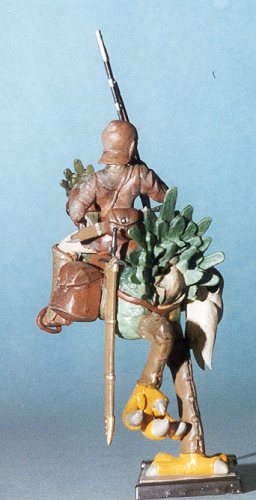
Those of you who have been readers for a while will recall that I built Nausicaä's gunship back about a year ago. Well that kit has done very well on the model show contest, taking some pretty impressive awards, despite the dodgy fit of the kit. This kit is another in the series . This one is Nausicaa and her friend/ride, Kai. Now I will repeat that I have only a fleeting understanding of what the whole Nausicaä thing is about. For that I'll have to repeat what I put in the gunship review.
NAUSICAÄ - She is the daughter of Jiru, the chief of a small kingdom called the Valley of the Wind. After Jiru was killed, Nausicaä and her troops joined the Torumekian force according to a treaty signed long ago. Nausicaä meanwhile discovered that the Decayed Sea cleaned up the contaminated world, and by communicating with the Ohmu, the giant insects, she foresaw the coming of a great disaster. She fights bravely and hopes to witness the coming of a new world.
Confused? Me too. If you want to find out more about it, here is a link that should be of some help. http://www.nausicaa.net/miyazaki/nausicaa/ . I would HIGHLY RECOMMEND the DVD movie of this. It will get you hooked on the works of Hayao Miyazaki better than me just telling you about it.
|
THE KIT |
L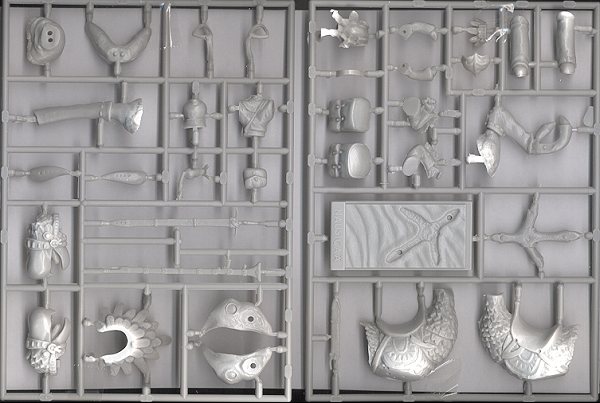 et me get into my 'kit description' mode here. "Molded in
medium grey plastic, the detail is very good, despite the age of the kit."
There are enough bits to make both Nausicaä and Kai (of course) and the parts
are all pretty well molded. Detail is pretty crisp and there is minimal flash on
the bits and pieces. A nice touch is that Tsukuda taped the two trees to a piece
of card to keep them from sloshing about in the box and getting damaged.
et me get into my 'kit description' mode here. "Molded in
medium grey plastic, the detail is very good, despite the age of the kit."
There are enough bits to make both Nausicaä and Kai (of course) and the parts
are all pretty well molded. Detail is pretty crisp and there is minimal flash on
the bits and pieces. A nice touch is that Tsukuda taped the two trees to a piece
of card to keep them from sloshing about in the box and getting damaged.
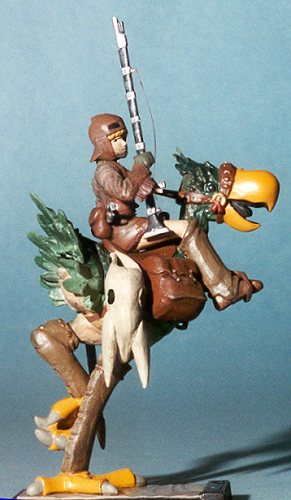
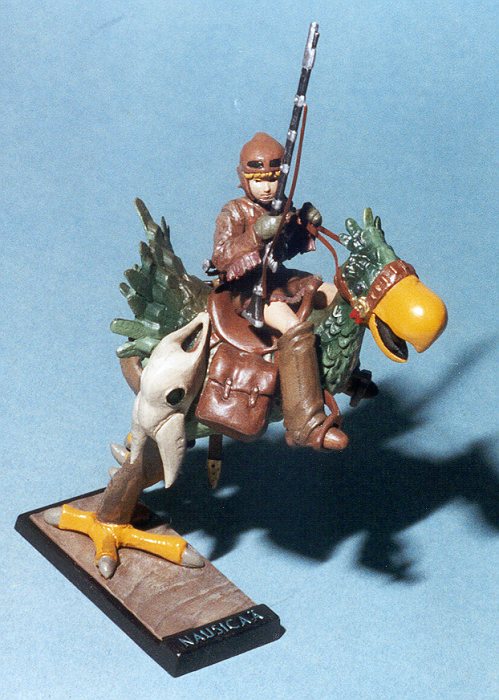
Instructions are six construction steps and I'm sure there is a painting guide there somewhere, but I can't read Japanese so I'm pretty clueless as to what is what color. It seems that most of the kit is Kai, who appears to be a sort of Roc. I'll let you look up what that is. Consider it your 'learned something new today' session. According to the box art, both Kai and Nausicaa are in mostly blue, though that can easily be changed! There is also a small critter that fits on Nausicaä's shoulder. It looks like a.........No, it can't be..........lt sure looks like a Pokémon of some sort!!!
Needless to say, no decals with this one either, folks, though there is a stand for Kai so that he won't go falling over! I fully expect the fit of parts to be a dodgy as they were for the gunship. I also expect it to draw as much interest as well!
|
CONSTRUCTION |
 With most kits, construction begins with the interior. Not with
this one though as the interior would be a bit messy to be able to duplicate!
No, with this one, the best thing to do is to start gluing together halves.
There are basically two models involved in this. One is Nausicaä herself and the
other is the warrior chicken,err... the Kai.
With most kits, construction begins with the interior. Not with
this one though as the interior would be a bit messy to be able to duplicate!
No, with this one, the best thing to do is to start gluing together halves.
There are basically two models involved in this. One is Nausicaä herself and the
other is the warrior chicken,err... the Kai.
As you may recall from the other Nausicaä kit, the molds for this are not anywhere near new. The fit of most parts is not that great and there are usually large gaps or mismatches from side to side. This one proved to be no exception.
Anyway, I did start with gluing together as many parts that came in halves as I could. This was Kai's body, and head as well as some sort of skull looking thing that hung from the side. Then I attached the claws to the foot that is to be up in the air. I also glued together the torso and skirt of Nausicaä as these are to be painted the same color. There are gaps in all of the joins. The area behind the claws on the upraised foot is a disaster and frankly, impossible to clean up.
 I attacked all of the joints with a sanding stick and got things
relatively clean. The mold seams, which were also pretty awful, were also
cleaned up as much as possible. Some filler was applied to a few parts. Before
using filler on Kai's body, I attached the tail feathers and the rear portion.
Fit here was not at all good, especially the section inside the tail feathers.
It will be interesting to see how this will be cleaned up. I also glued on the
long leg that will eventually sit on the base. There are some bumps and pits
which are supposed to be lined up. I removed the bumps as they were not any real
help.
I attacked all of the joints with a sanding stick and got things
relatively clean. The mold seams, which were also pretty awful, were also
cleaned up as much as possible. Some filler was applied to a few parts. Before
using filler on Kai's body, I attached the tail feathers and the rear portion.
Fit here was not at all good, especially the section inside the tail feathers.
It will be interesting to see how this will be cleaned up. I also glued on the
long leg that will eventually sit on the base. There are some bumps and pits
which are supposed to be lined up. I removed the bumps as they were not any real
help.
Next I did some work on Nausicaä herself. In this instance, I glued the arms to the shoulders. The fit here is better than on any of Kai's parts, but still needed a lot of cleanup and some other work with files to get parts smoothed out. One thing I use that really helps take care of areas where a lot of scraping and gouging has been done is liquid cement. It smoothes out a lot of the lumps and bumps and does a pretty good job of blending things into each other.
 During this time I added the 'horns' onto the skull thing that
will hang from the saddle. You need to note that the parts are shown being
attached on the wrong side. Simply switch parts 10 and 11 and you'll get a much
better fit! :o) The other leg was then attached to Kai as was the aft part of
his head feathers. Fit is not good.
During this time I added the 'horns' onto the skull thing that
will hang from the saddle. You need to note that the parts are shown being
attached on the wrong side. Simply switch parts 10 and 11 and you'll get a much
better fit! :o) The other leg was then attached to Kai as was the aft part of
his head feathers. Fit is not good.
I took a bit of time off to remove the weapons from the sprues and clean them up. The gun had the barrel drilled out and the swords had the flash cleaned from them. I left the packs on the sprues as it seems like they are designed for a certain place, but as poor as the other parts fit, I'm not sure if it makes any difference.
I finally got most of the parts in place for the two main figures. All the baggage will be added on once the figures are completely painted.
|
PAINT & DECALS |
 This part was extremely time consuming. Mostly because of all
the different colors of paint that I used and the time it took to dry between
coats. I took a lot of liberties against the 'actual' colors of these characters
as shown in the movie. I airbrushed on several of the colors, but most of them were applied with
a brush due to the small area that needed to be painted. I used Aeromaster
acrylics and enamels, Modelmaster enamels and Badger Acrylics when I sprayed.
This is the first time I have used the Badger paints and though they were a bit
thin, they went on quite well. As you may know, the Badger paints are premixed
and ready to spray.
This part was extremely time consuming. Mostly because of all
the different colors of paint that I used and the time it took to dry between
coats. I took a lot of liberties against the 'actual' colors of these characters
as shown in the movie. I airbrushed on several of the colors, but most of them were applied with
a brush due to the small area that needed to be painted. I used Aeromaster
acrylics and enamels, Modelmaster enamels and Badger Acrylics when I sprayed.
This is the first time I have used the Badger paints and though they were a bit
thin, they went on quite well. As you may know, the Badger paints are premixed
and ready to spray.
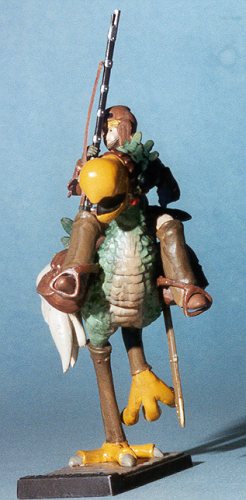
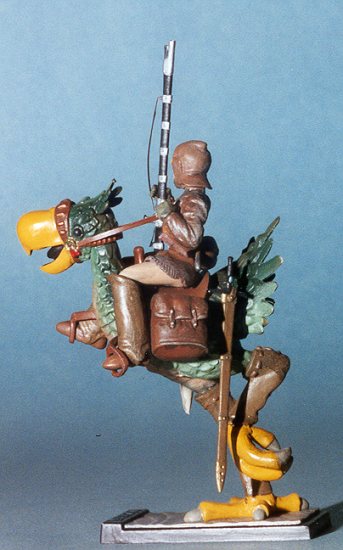
Rather than paint Nausicaä and the kai in the blues shown on the box art, I chose to keep all the colors in the green and brown area. This included Nausicaä's outfit as well. The only deviation to this was the use of some metallics and the orange-yellow of the kai's beak and feet.
Painting took several weeks to accomplish, and once done, the figures were given a clear coat. When that was dry, a dark wash was applied and then some light drybrushing was applied to a few areas. This was done with several colors depending on the background.
|
CONSTRUCTION |
Then it was time to attach all the bits and pieces. I first hooked up the large saddle bags as they were paramount to placing Nausicaä in the saddle. After much fiddling to get the saddlebags to fit, I plunked Nausicaä into the saddle. Hmmm. She doesn't seem to fit very well. In fact, she doesn't fit at all. Only a small area of her actually fits into the saddle. Perhaps I should have glued her torso to the saddle, then attached the bags and then the legs. Well, it is too late for that now.
 Another
result is that the stirrups are too short! To fix that, I attached several
pieces of paper to the ends and threaded them under the bags. Looks ok if you
don't use a flashlight! As recommended in the instructions, reins were made of
paper as was the sling for her rifle. The other bits and pieces like the
backpack with short sword, the long sword, the gun, and the gas mask were then
glued on.
Another
result is that the stirrups are too short! To fix that, I attached several
pieces of paper to the ends and threaded them under the bags. Looks ok if you
don't use a flashlight! As recommended in the instructions, reins were made of
paper as was the sling for her rifle. The other bits and pieces like the
backpack with short sword, the long sword, the gun, and the gas mask were then
glued on.
This all made the whole assembly very heavy on one side, so I added some weight to the other side of the underside of the base to compensate. Then any touchup was done and the entire kit sprayed with clear acrylic. When dry, the whole kit was washed with a thin gloss black enamel. Then matte clear was sprayed on all but the beak and feet of the kai. A bit more drybrushing was then done and the kit was complete.
|
CONCLUSIONS |
Well, I certainly think it looks neat. Those I show it to like it as well. It was sorta fun and would have been more so if the parts fit properly. It was fun to paint as most of it was done with a brush. One thing it proved to me is that I still can't do figures! I will recommend this kit only to those who have experience with kits that don't fit worth a s*it.
2014 note: sadly, this model is no longer extant having succumbed to felonious felines, despite being placed where I thought they could not reach.
September, 2000
Copyright ModelingMadness.com. All rights reserved.
Review kit courtesy of me and my wallet!
If you would like your product reviewed fairly and fairly quickly, please contact the editor or see other details in the Note to Contributors.